DreamTeams Enterprise Installation Guide
DreamTeams in Tableau is On Premise only. In this guide, we will walk you through the installation process of DreamTeams. Luckily, this process is very easy and you’ll be up-and-running in no time.
Prerequisites
Admin access to Azure Portal to create an App Service.
Files
You will need the following files that come with DreamTeams. You can download these from the enterprise portal. From the portal, you can pick the operating system of your choice.
- An .env.example file (on some systems a hidden file)
- A .trex file
- A binary build file (specific to your operating system)
- A license.lic file (download from the Enterprise Portal)
1. Create an App Registry in Azure
- Login to your Azure portal with administrator privileges.
- Go to https://portal.azure.com/#home.
- Search for App Registration in the top search bar.
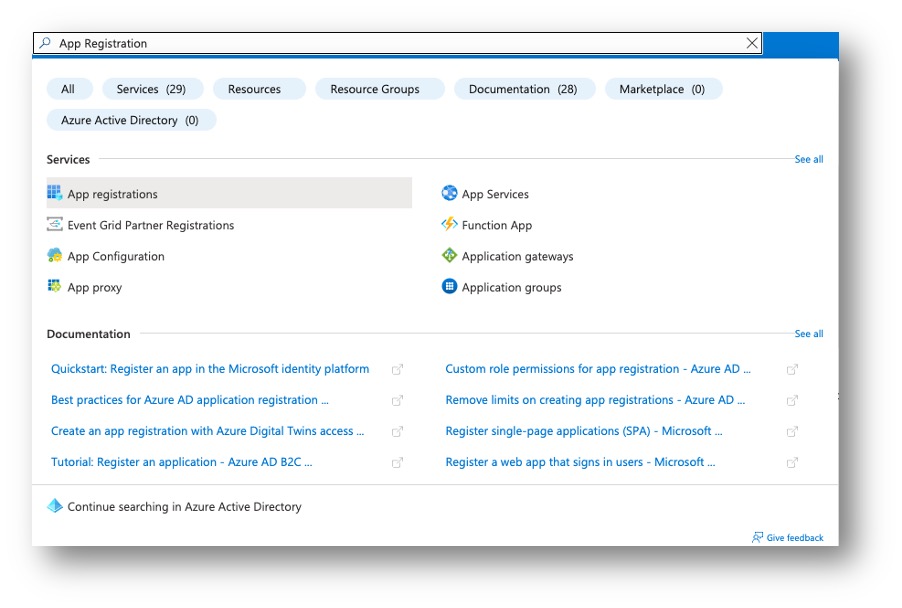
- Click on new registration.
- Give a name to the application, Eg: “DreamTeams”
- Under supported account types, choose the first option “Accounts in this organisational directory only (single tenant)”. This option will enable this app only for your organization.
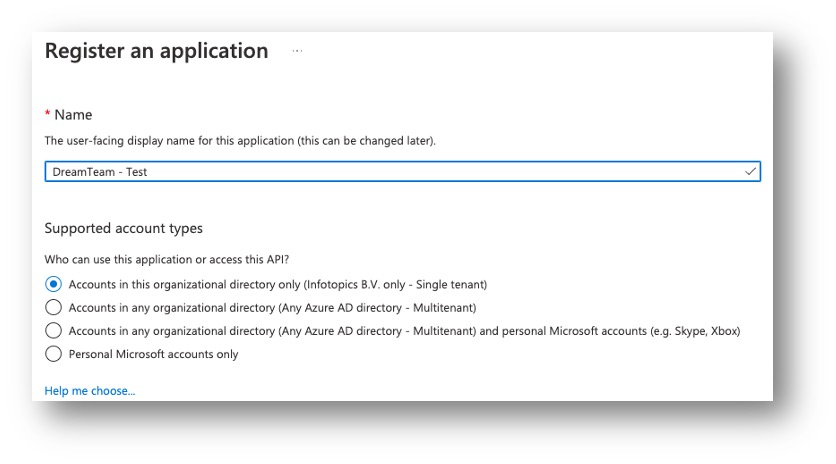
- In the redirect URL, set the platform to ‘Web’ then enter the domain made for DreamTeams as a result of the general Enterprise installation procedure described before. Now add/redirect to it. For eg: https://dreamteams.company.com/redirect. You have successfully created an app registry after completing this step. We now have to finish the configuration of the extension server.
Create a “Secret” with your App
Once the app is registered in your Azure environment, we can set up the connection with the DreamTeams extension via a “secret” key. This procedure is described below. This must also be done by an Azure user with administrator priveleges.
- On the left pane, click on Certificates & secrets.
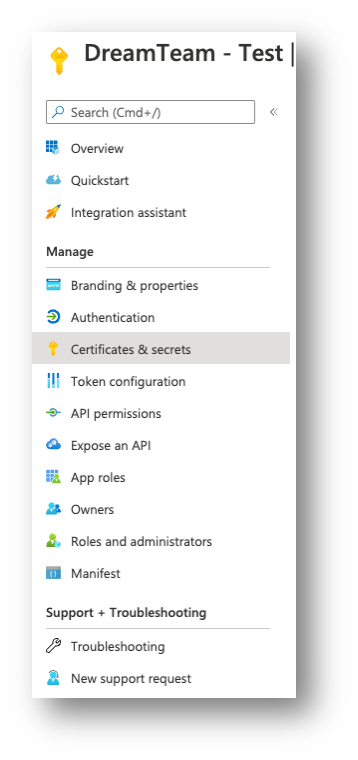
- Click on ‘New Client Secret’.
- Give a description and set an expiration time period.
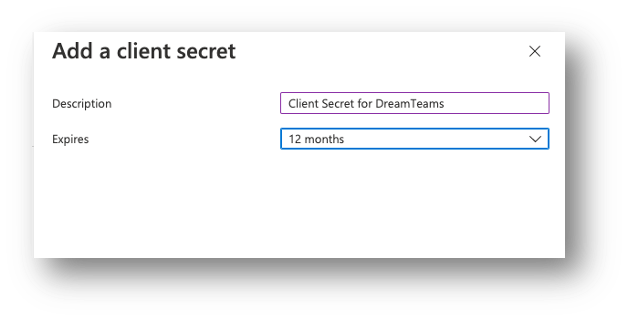
Click Add. - Copy the Value of the Client Secret (the secret is blurred with asterisks in this manual for security reasons). IMPORTANT: The client value is only visible during creation. Please note it down / copy it carefully.

- Head over to the installation folder of your DreamTeams server installation (described in previous steps)
- In your DreamTeams server installation folder copy the “env.example” file and rename your copy to “.env” .
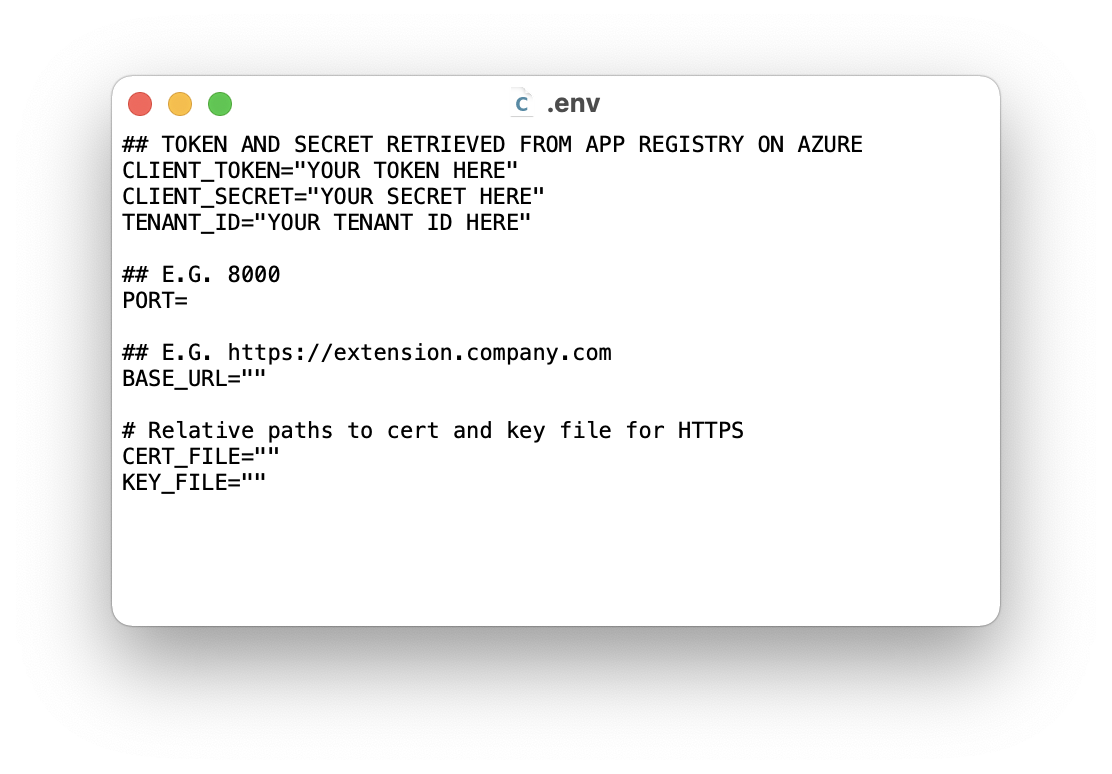
- Check the available information and add the following properties:
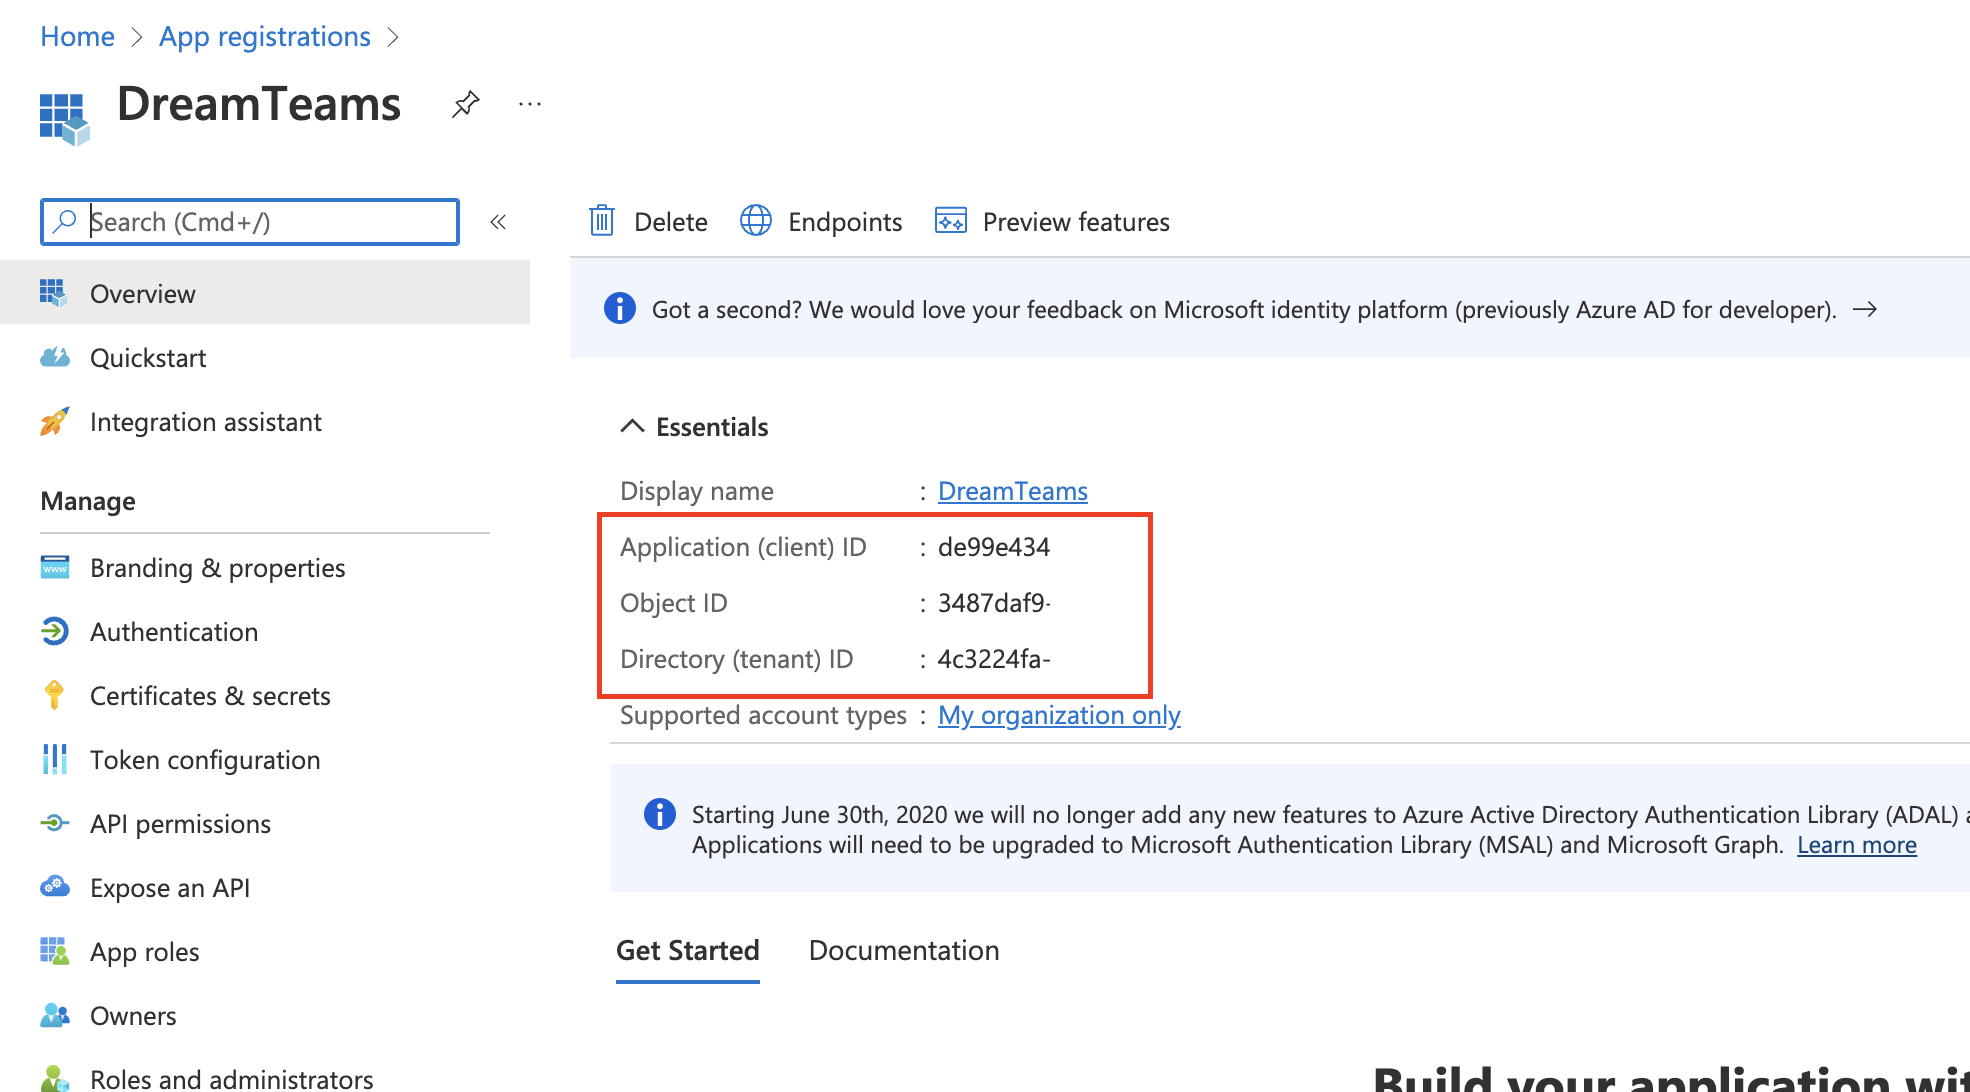
CLIENT_TOKEN = Application (client) ID (see image below)
CLIENT_SECRET= The value of the ‘secret’ you just copied/stored from the previous step.
TENANT_ID= Directory (tenant) ID (see image below)
Install the extension
We have successfully set up the Azure implementation. The last step is to install the binary as a server. You can use our enterprise installation guide for this. The only difference is that you set the key and certificate paths in the .env instead of using them in the start command.
Configure the .trex file
Change the url tag in the .trex file to the url you will use to host DreamTeams. The url port should match with the “APP_PORT” you specified in the .env file.
Allow the app to run
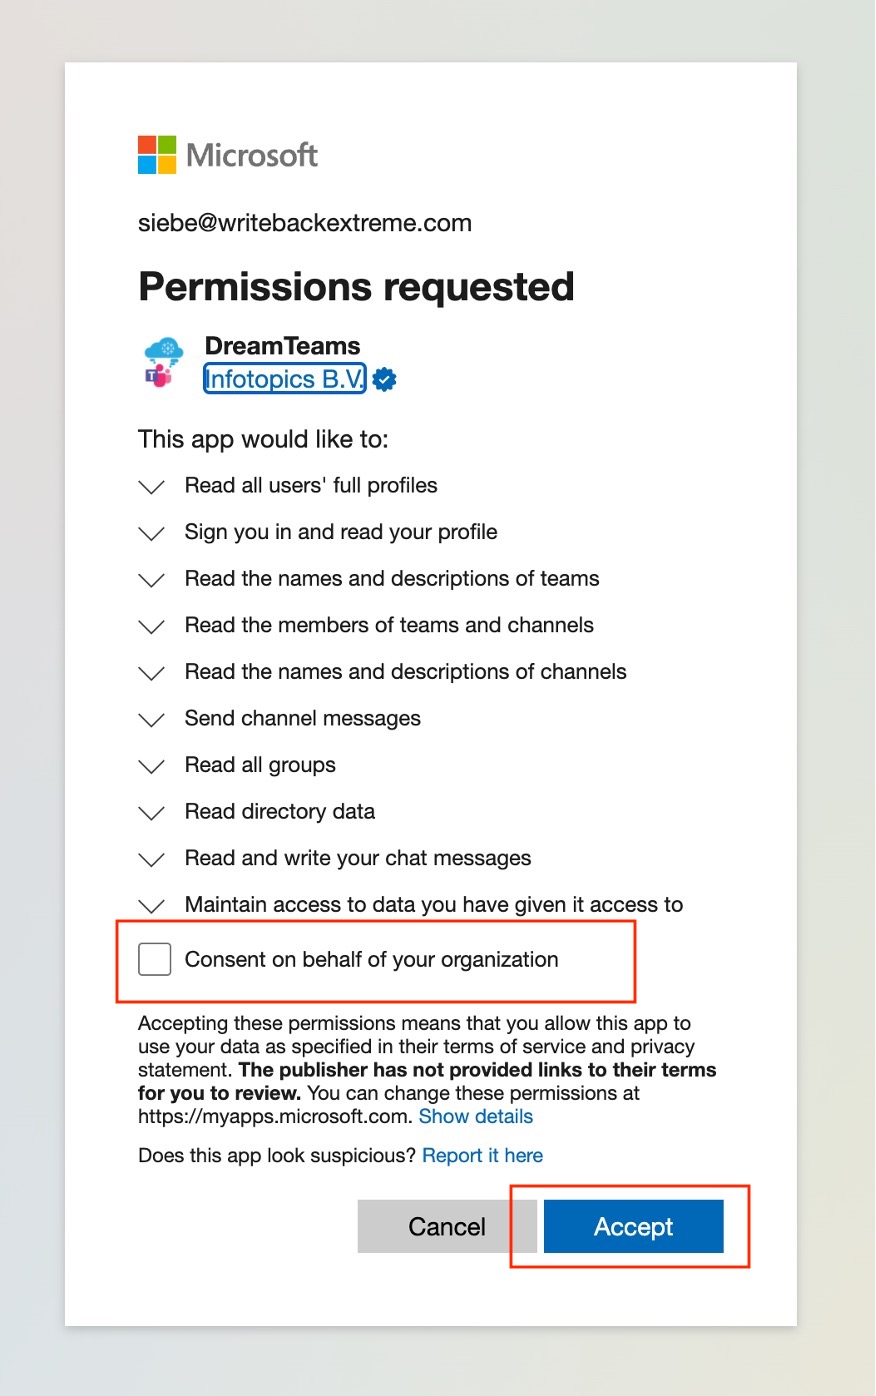
The last step for the Azure admin is to go to the domain you are running DreamTeams on and allow the app: https://dreamteams.company.com/setup this will trigger a popup and ask you to allow the app. After this step DreamTeams is ready to go!
Using the extension
Now that everything is set up, you’re ready to use the extension in Tableau with the .trex file. If you want to know more about how to use the extension, we have prepared a guide to get you started.
DreamTeams Permissions explained
1. Authenticate User and Read User’s Name
The DreamTeams extension reads the user’s name and displays it at the top of the message page as a greeting after authenticating them.
Permission Required: User.Read
Admin consent required: No.
Description: Allows you to sign into the app with your organizational account and let the app read your profile. It also allows the app to read basic company information.
API Used: GET /me
More Information
2. Read Team Names
The DreamTeams extension contains a dropdown list to choose a Team you wish to send a message to.
Permission Required: Team.ReadBasic.All
Admin consent required: No.
Description: Read the names and descriptions of teams, on behalf of the user.
API Used: GET /me/joinedTeams
3. Read Channel Names
The DreamTeams extension contains a dropdown list to choose a Channel you wish to send a message to.
Permission Required: Channel.ReadBasic.All
Admin consent required: No.
Description: Read channel names and channel descriptions, on your behalf.
API Used: GET /teams/{team-id}/channels
4. Read Team Member’s Name
The DreamTeams extension contains a dropdown list to choose Team Members you wish to @mention in your message.
Permission Required: ChannelMember.Read.All
Admin consent required: Yes.
Description: Read the members of channels, on behalf of the signed-in user.
API Used: GET /teams/{team-id}/channels/{channel-id}/members
5. Read Chat Names
The DreamTeams extension contains a dropdown list to choose a Chat you wish to send a message to.
Permission Required: Chat.ReadBasic
Admin consent required: No.
Description: Allows an app to read the members and descriptions of 1:1 and group chats threads, on behalf of the signed-in user.
API Used: GET /chats
6. Read Chat Member’s Names
The DreamTeams extension contains a dropdown list to choose a Chat Member you wish to @mention in your message.
Permission Required: ChatMember.Read
Admin consent required: Yes.
Description: Read the members of chats on behalf of the signed-in user.
API Used: GET /chats/{chat-id}/members
7. Send Message to Channel
The DreamTeams extension can send messages with the visualizations attached to a Channel of a Team.
Permission Required: ChannelMessage.Send
Admin consent required: No.
Description: Allows an app to send channel messages in Microsoft Teams, on behalf of the signed-in user.
API Used: POST /teams/{team-id}/channels/{channel-id}/messages
8. Send Message to Chat
The DreamTeams extension can send messages with the visualizations attached to a Chat.
Permission Required: ChatMessage.Send
Admin consent required: No.
Description: Allows an app to send 1:1 and group chat messages in Microsoft Teams, on behalf of the signed-in user.
API Used: POST /chats/{chat-id}/messages