Introduction
In this guide we show how to install and upgrade our extensions. Within Infotopics | Apps for Tableau we have an application that wraps around our
extensions, called our extension server. This gives the opportunity to install/run our extensions close to native on the required platforms (Windows,
Linux, and MacOS).
Please note were are always looking for ways to improve our products and make it easier for customers to work with.
Installation guide
In this installation guide, you’ll find the steps to set up for the majority of our Tableau extensions. There are some extensions that have more configuration
options before starting. The following extensions are having a more extended installation:
- VizSlides
- DashboardUsage
This guide does NOT apply for WriteBackExtreme, DreamTeams, MailScheduler and SuperKPIs!
Prerequisite
There are a few prerequisites and things you’ll need before the installation:
- A web domain, for example, <https://extension.company.com> (create a DNS entry) which points to the host of the extension.
- SSL certificates for the above domain (the installation requires the domain’s `.crt` and private `.key` file, or a `.pfx` file).
- Server Resources: 4 vCPU, 8Gb, 50Gb application disk space, 100Mbps or 1Gbps network-interface
- Firewall rules permit access on port 443 (HTTPS) to the server (or any other port you configure in the startup commands of the extension server). Both internal, external, network and server-firewall.
- A license (license.lic or LICENSE) from our portal (https://my-appsfortableau.infotopics.com).
- Administrator access on Microsoft account (for the custom add-in setup).
Please note that Tableau requires extensions to be running on HTTPS/SSL connection and therefore required!
Before you start
The extensions server can run in 2 ways:
- Via configuration (config.yml) file that’s on the same machine (recommended),
- Or with command-line arguments.
Because the extension server is cross platform there are multiple binaries with
different file extensions.
- Windows: “extension-name.exe”
- Linux: “extension-name”
Example of a configuration file `config.yml`:
—
## This configuration file will be used for building as well.
## Configuration will be merged into the options/arguments list.
## In production there will be a more stripped version
server:
## Host includes port if necessary. Do not include when running on :80 or :443
## example: extension.company.com
host: localhost:8000
## Set custom base path for the extension on a domain “custom-extension” e.g.
## localhost:8080/custom-extension/
base: /
## Enable HTTPS for the webserver can be done here
## In case you want to use the .pfx certificate
## uncomment the `key` and `cert` property, using #
https:
# key: ../ssl/localhost.key
## or localhost.cert
# cert: ../ssl/localhost.crt
## or when on windows and want to use a .pfx file
# pfx: ../ssl/localhost.pfx
# passphrase: some-passphrase
## Change the license configuration
license:
## When not set, it will check for a `license.lic` or `LICENSE` file and
## load license in the current directory.
Example in current folder:
# file: ./license.lic
Example in different folder:
# file: ../enterprise_licenses/license.lic
All options for using the extension server in command-line mode, without config:
Usage: super-tables [options]
Options:
| –config [config] | Change config file. Yaml formatted file. |
| -l, –license [file] | Use license file. Do not use when next to binary. |
| -s, –static [path…] | Add static routes to serve directly. Runtime static files. Path must be relative from the binary directory. |
| -b, –base [base-path] | Base path to serve from. |
| –debug | Run the application in debug mode. |
| -h, –host [port] | The host of the domain with port.. (default: “:8000”) |
| –key [key] | Relative path `key` file for SSL. requires –cert to be passed. |
| –cert [cert] | Relative path `cert` file for SSL. requires –key to be passed. |
| –pfx [pfx] | Relative path to Windows PFX file for SSL/HTTPS. requires –passphrase to be passed. |
| –passphrase [passphrase] | Relative path passphrase for .pfx and encrypted .key files for SSL/HTTPS. requires –pfx or –key to be passed. |
| –help | Display help for command |
Please note that this example can change in upcoming versions.
Getting started with Windows
1. Before you start, we need to setup a configuration file. We ship an example configuration that can be modified to your liking. This configuration file can
be published to the same folder where the application will run from:
extension-name.exe publish:config
This will generate a config file, see example in “Getting started”. Check and configuration can be found in `config.yml`.
2. Make sure you have a license file in the directory.
3. Now we can start the extension server to test it:
extension-name.exe
When successful the extension can be used in production.
Run as a service on Windows
The easiest way to have the extension started automatically as a service is to create a task in Windows Task scheduler. The trigger of the task must be configured to “System boot” and it is best run under System Credentials. Below the steps to follow.
Follow this video for a full tutorial:
1. Start windows Task Scheduler
2. Create a new task
3. Enter the general task information
- Name the task with a reference to the extension, you will start with this task
- Set SYSTEM user account to execute this task. It is important to use an account with privileges to start services
- Check what version suits your system best (Windows Server)
4. Set trigger for the task to be executed
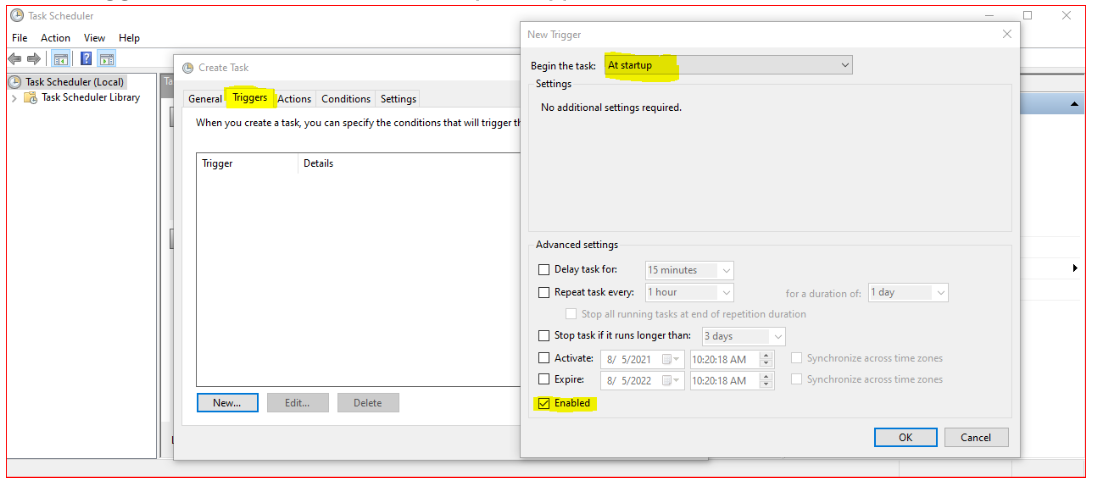
- Add a new _trigger_ on the TASK pane
- Select the trigger “At Startup”
- Make sure the trigger is enabled
5. Set the action to start the program
- On the “Actions” tab select “New…”
- Set your action to type “Start program”
- Select the binary file of your extension as the “Program”. In this example it is “C:SuperTablessuper-tables-win.exe”. Make sure to include the entire path.
- _Optional when using `config.yml`_. Set your Arguments for the extension server (port number and certificate details).
In this example: `- -port 443 – -cert certificate.crt – -key certificate.key` (double dashes without space in between) - Set the “Start in” folder. This is very important for the service to start correctly. It is the path where the binary file/program is located. In this example: “C:SuperTables”
- Press OK to store your “Action”
6. Set proper conditions for task
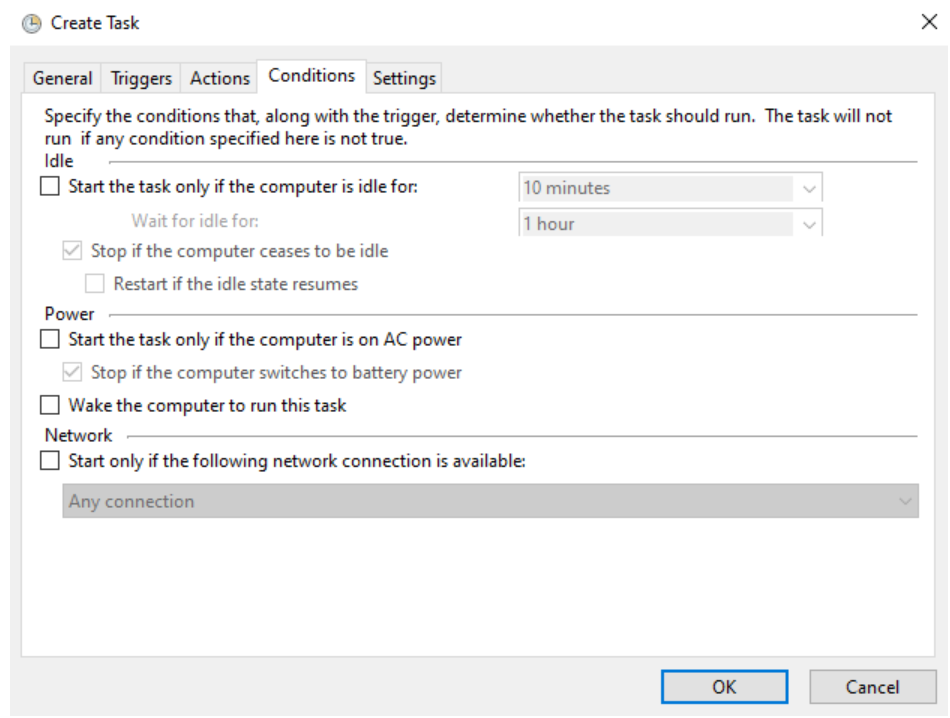
Make sure the task will always be executed (battery or AC power)!
7. Set extra settings
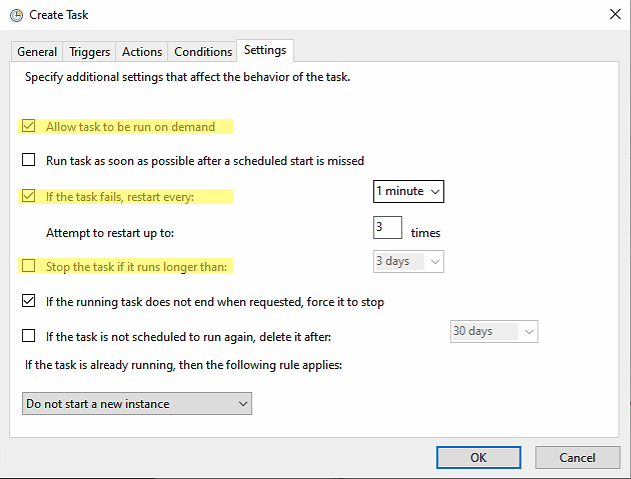
- Make sure the task will remain running
- Make sure the task can be started on demand
- Make sure the task will restart automatically on failure
8.Manually start the task
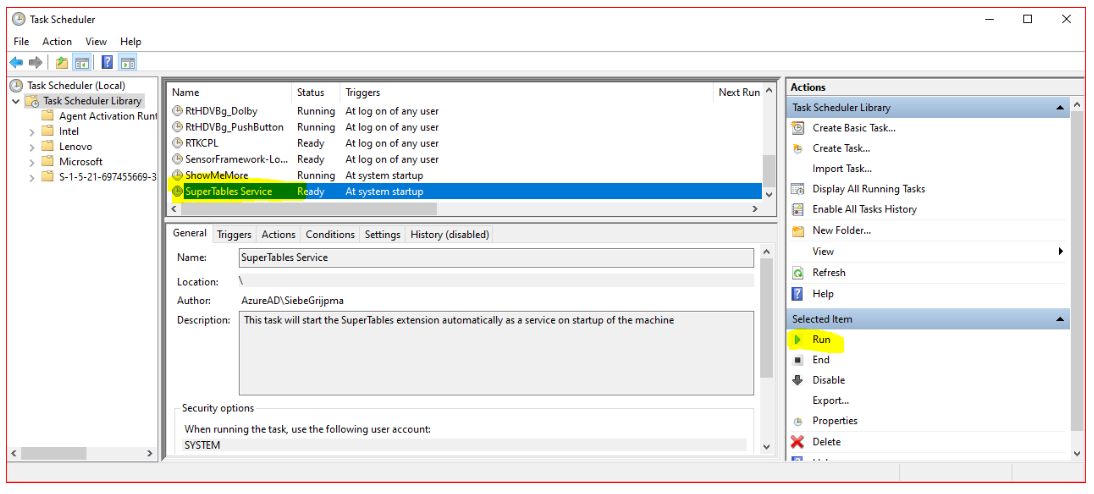
- Once you saved the newly created task select it in the list of tasks
- Click the “Run” button on the right panel to start the new tas
- The status of the service will change from “Ready” to “Running” just like the ShowMeMore task in the screenshot.
Getting started with Linux
1. Before you start, we need to setup a configuration file. We ship an example configuration that can be modified to your liking. This configuration file can
be published to the same folder where the application will run from:
./extension-name publish:config
This will generate a config file, see example in “Getting started”. Check and configuration can be found in `config.yml`.
2. Make sure you have a license file in the directory.
3. Now we can start the extension server to test it:
./extension-name
When successful the extension can being used in production.
Run as a service on Linux
Create a Custom systemd Service
1. Create a Unit file to define a systemd service:
File: /lib/systemd/system/myservice.service
[Unit]
Description=Extension Name Service
After=network.target
[Service]
User=root
WorkingDirectory=/usr/local/bin
# when using config:
# ExecStart=/usr/local/bin/super-tables-linux
# when NOT using config:
# ExecStart=/usr/local/bin/super-tables-linux –port 443 –cert yourdomain.crt –key yourdomain.key
Restart=always
[Install]
WantedBy=multi-user.target
This defines a simple service. The critical part is the `ExecStart` directive, which specifies the command that will be run to start the service.
2. Copy the unit file to /etc/systemd/system and give it permissions:
sudo cp myservice.service /etc/systemd/system/myservice.service
sudo chmod 644 /etc/systemd/system/myservice.service
Start and Enable the Service
1. Once you have a unit file, you are ready to test the service:
sudo systemctl start myservice
2. Check the status of the service:
sudo systemctl status myservice
If the service is running correctly, the output should resemble the following:
● myservice.service – Example systemd service.
Loaded: loaded (/lib/systemd/system/myservice.service; enabled; vendor preset: enabled)
Active: active (running) since Tue 2018-05-01 18:17:14 UTC; 4s ago
Main PID: 16266 (bash)
Tasks: 2 Memory: 748.0K CPU: 4ms CGroup: /system.slice/myservice.service
├─16266 /bin/bash /usr/bin/test_service.sh
└─16270 sleep 30
May 01 18:17:14 localhost systemd[1]: Started Example systemd service..
May 01 18:17:14 localhost cat[16269]: Example service started at 2018-05-01 18:17:14
May 01 18:17:14 localhost bash[16266]: Looping…
“`
3. The service can be stopped or restarted using standard `systemd` commands:
sudo systemctl stop myservice
sudo systemctl restart myservice
4. Finally, use the enable command to ensure that the service starts whenever the system boots:
sudo systemctl enable myservice
Created symlink from /etc/systemd/system/multi-user.target.wants/myservice.service to /lib/systemd/system/myservice.service.
5. Reboot your Linode from the Linode Manager and check the status of the service:
sudo systemctl status myservice
You should see that the service logged its start time immediately after booting:
● myservice.service – Example systemd service.
Loaded: loaded (/usr/lib/systemd/system/myservice.service; enabled; vendor preset: disabled)
Active: active (running) since Wed 2018-05-02 15:03:07 UTC; 48s ago
Main PID: 2973 (bash)
CGroup: /system.slice/myservice.service
├─2973 /bin/bash /usr/bin/test_service.sh
└─3371 sleep 30
May 02 15:03:07 localhost systemd[1]: Started Example systemd service..
May 02 15:03:07 localhost systemd[1]: Starting Example systemd service….
May 02 15:03:07 localhost bash[2973]: Looping…
May 02 15:03:37 localhost bash[2973]: Looping…
Getting a 🦖 trex file
There are two ways of getting a generated `.trex` file:
- When the extension server is started open in the browser: `https://{your-host}/trex`. Here you can download it. You can share the URL to your users to distribute.
- Or run the `publish:trex` command in the terminal.
Windows: `extension-name.exe publish:trex`.
Linux: `./extension-name publish:trex`.
Upgrade guide
In this upgrade guide, you’ll find the steps to set up all Tableau extensions except for the following:
- WritebackExtreme
- MailScheduler
- SuperKPIs
There are some extensions that have more configuration options before starting. The following extensions are having a more extensive installation:
- VizSlides
- DashboardUsage
💡 TIP: before upgrading the production environment test the new versions on your acceptance/testing/developing environment. This is always a good practice!
Steps to upgrade
1. Stop the service from running.
2. Make a backup from the current version: `extension-name`, `config.yml` or `.env` file and other custom related files (in SuperTables `custom.css` and
`custom.js` files).
3. Replace the executable/binary file of the extension server with the new one.
4. Check the `config.yml` for new configuration and/or missing configuration.
5. Start the service again.
If you are not much of a reader, please watch the following video:
Change/upgrade SSL/HTTPS certificate
1. Stop the service from running.
2. Replace your `.crt` and `.key` or `.pfx` file.
3. Run the `extension-name` binary on the command-line to test. When the test is successful, stop the runtime.
4. Start the service to run it again.
Goals of upgrades
The Apps for Tableau extensions will continue to develop over time. We will add new functionality, expand possibilities and eliminate bugs. This section will
explain how to upgrade your (production) instance of your Enterprise extension server. The principles of this procedure are:
- Commands are written for the Windows executable but are equally applicable in
Linux environments. - You have access to the command prompt of the server the AppsforTableau extension
server is running on. - You don’t have to change the trex file already distributed to your users.