
HierarchyFilter
Product Guide
visualize, browse and interact with your hierarchies
The HierarchyFilter extension can interact with your dashboard through parameters that can be used in calculations, filters, and set/parameter actions. It also allows you to set a filter that can be used to limit the data in the hierarchy to the current node and all child nodes and mark selections of selected nodes and child nodes.

Supported data structures
It is important to know that the HierarchyFilter extension supports two different data models to visualize and interact with your hierarchy dataset. Both datamodels require a different approach in configuring the HIerarchyFilter extension. This Product Guide will elaborate on both data models/structures.
-
Dimensional data. The hierarchy is based on the dimensions in your dataset. An example of this model is the Product Structure in the SuperStore demo dataset of Tableau (Category >> Sub-Category >> Manufacturer >> Product Name)
-
Hierarchical data. The data structure you will often find in organization structures and consists of a Parent-Child relationship.
Dimensional dataset
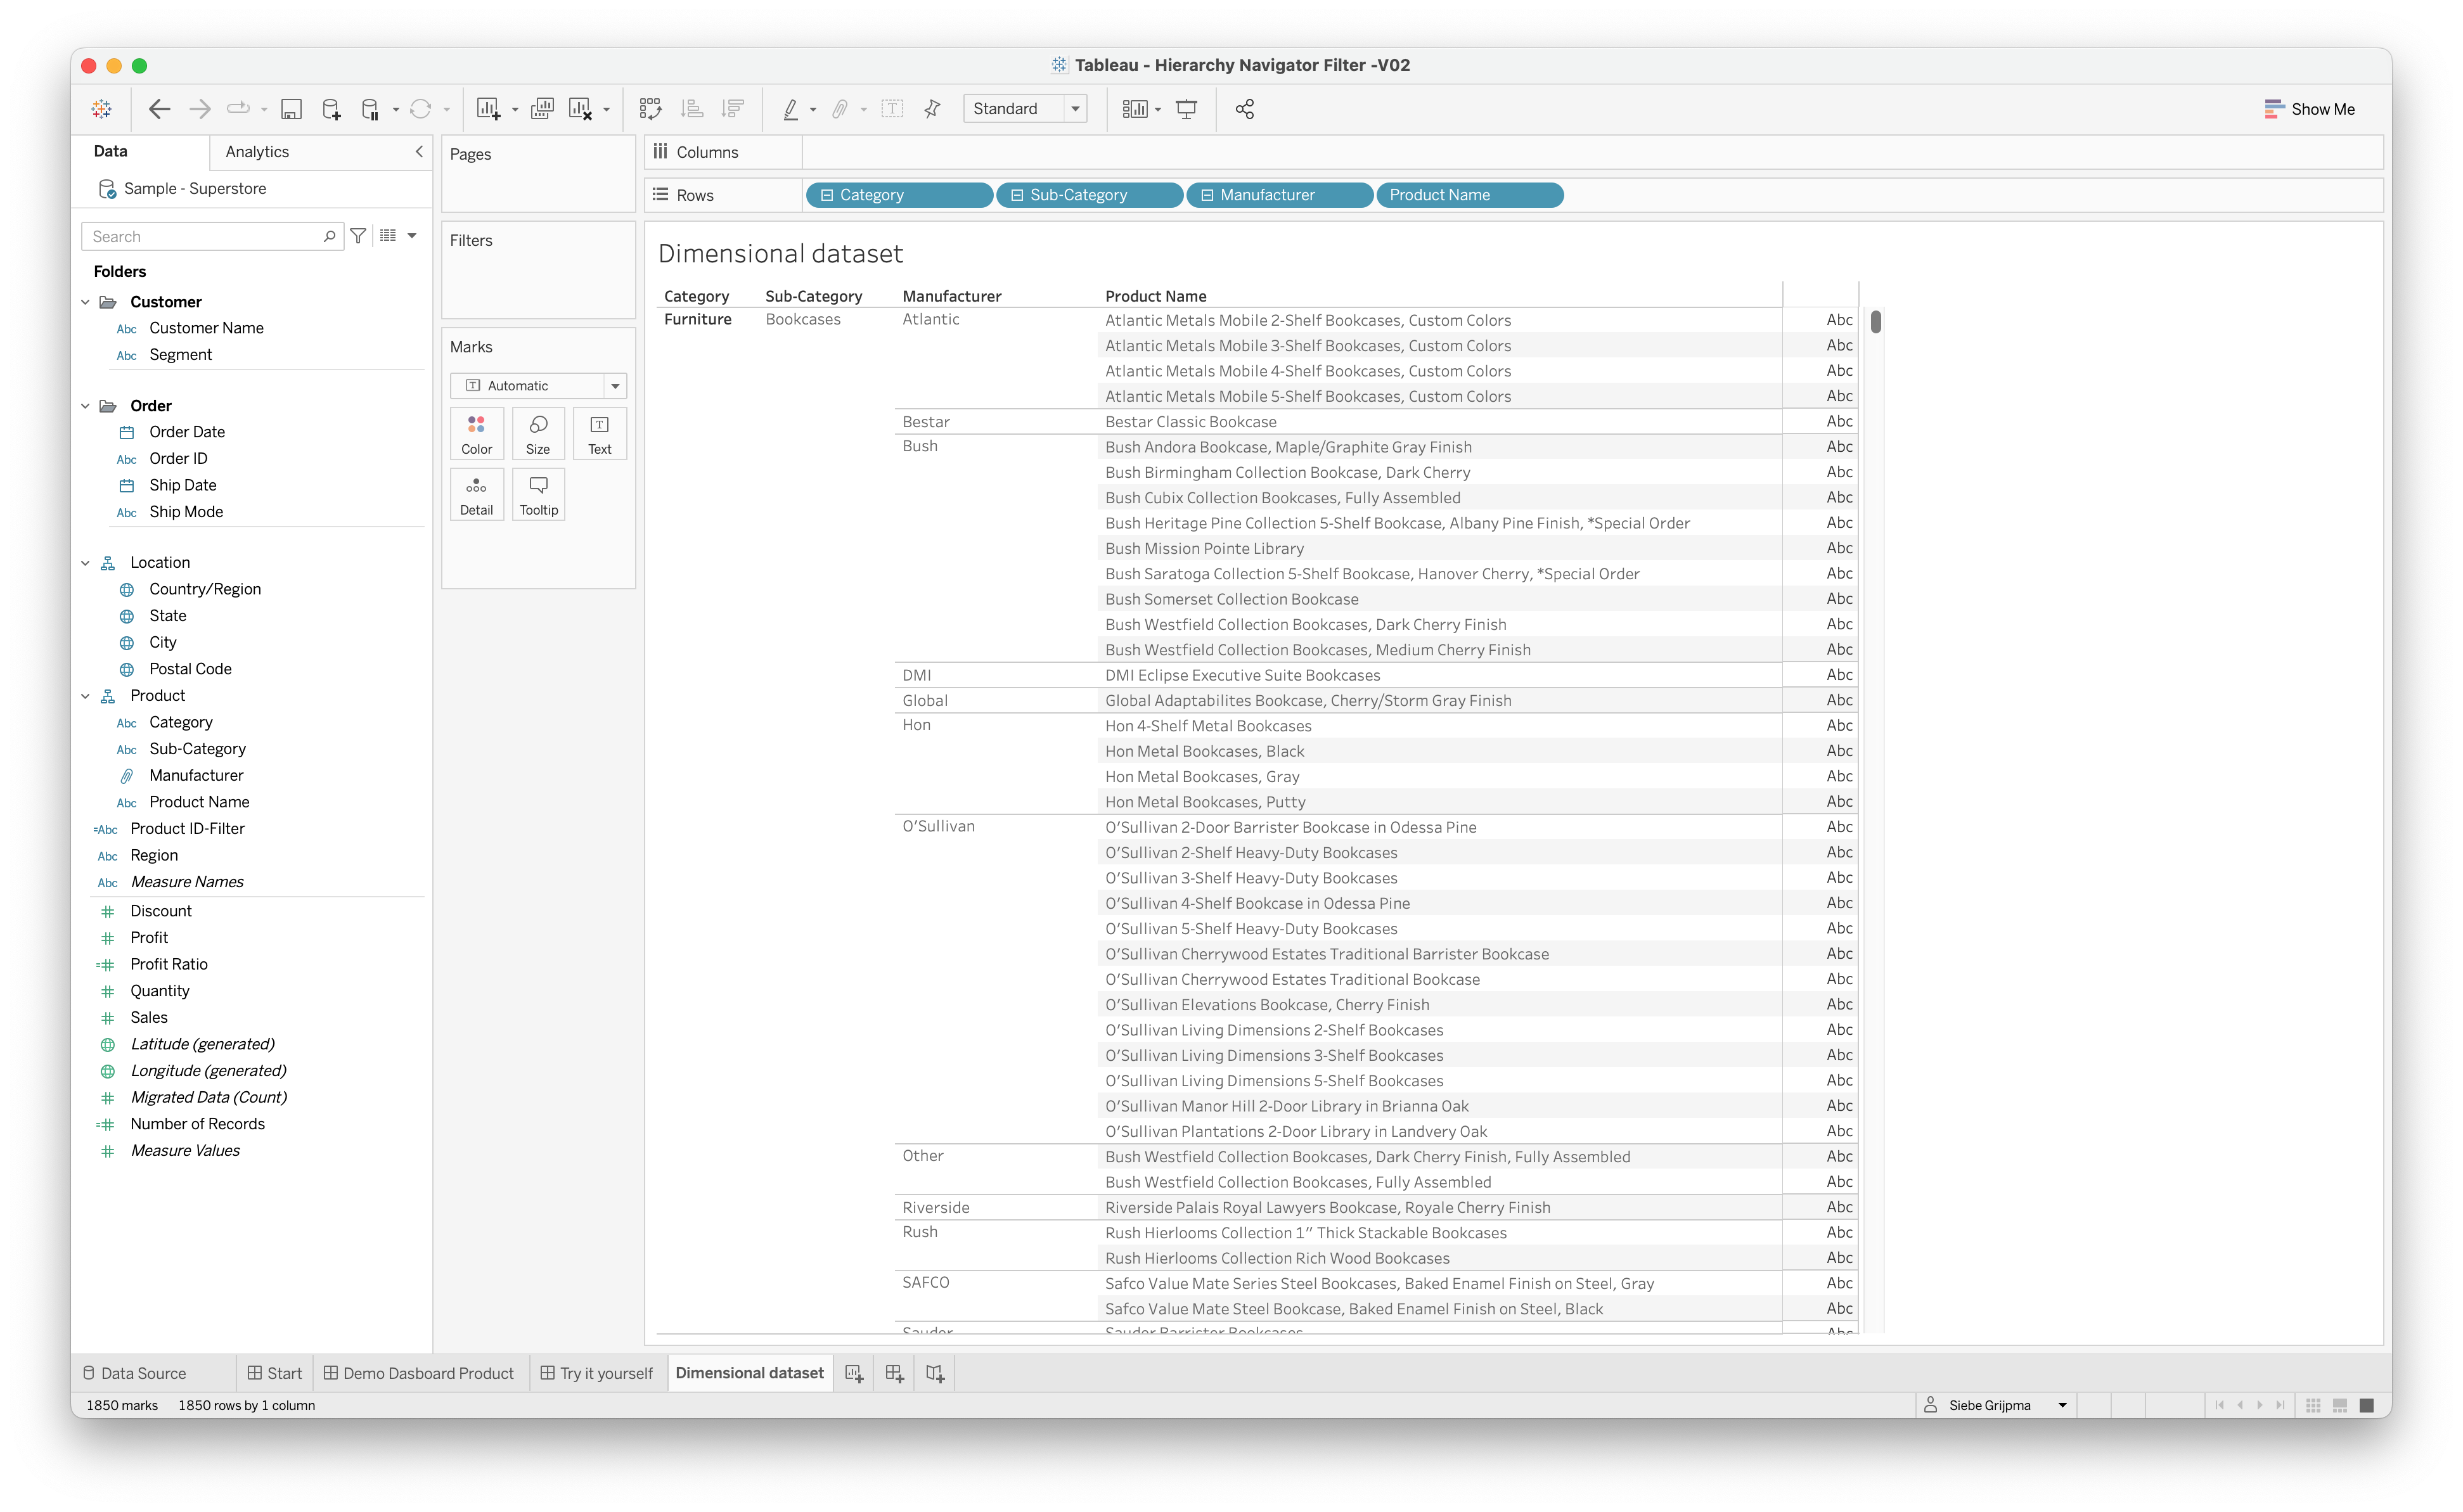
As indicated above, the HierarchyFilter supports a Dimensional dataset. In this example, we use Product structure from the SuperStore dataset which is already available as a hierarchy. The image shows an example of the Product structure hierarchy in the SuperStore dataset. The dimensions are available on a row level in your data.
Global overview for dimensional datamodel
When working with a dimensional dataset, the global process of getting started with the HierarchyFilter extension for Tableau consists of the steps listed below. After this summary, we will explain each step.
- Create your hierarchy datasheet
- Define your hierarchy structure
- Create parameters for extra dashboard interactivity
- Configure the extension
- Hide your hierarchy datasheet
- Interact with your dashboard
Create your hierarchy datasheet
It is not necessary to have your data source structured in Tableau Hierarchies! The image shows an example of the Product structure hierarchy in the SuperStore dataset, you can also use your dimensional dataset of course without setting up a Tableau Hierarchy upfront. The dimensions are available on a row level in your data, just add them to your hierarchy datasheet as shown in the example. Don’t worry about formatting, this sheet is necessary on your dashboard but will be hidden once we set up the extension properly.
Create your hierarchy structure in a calculated field
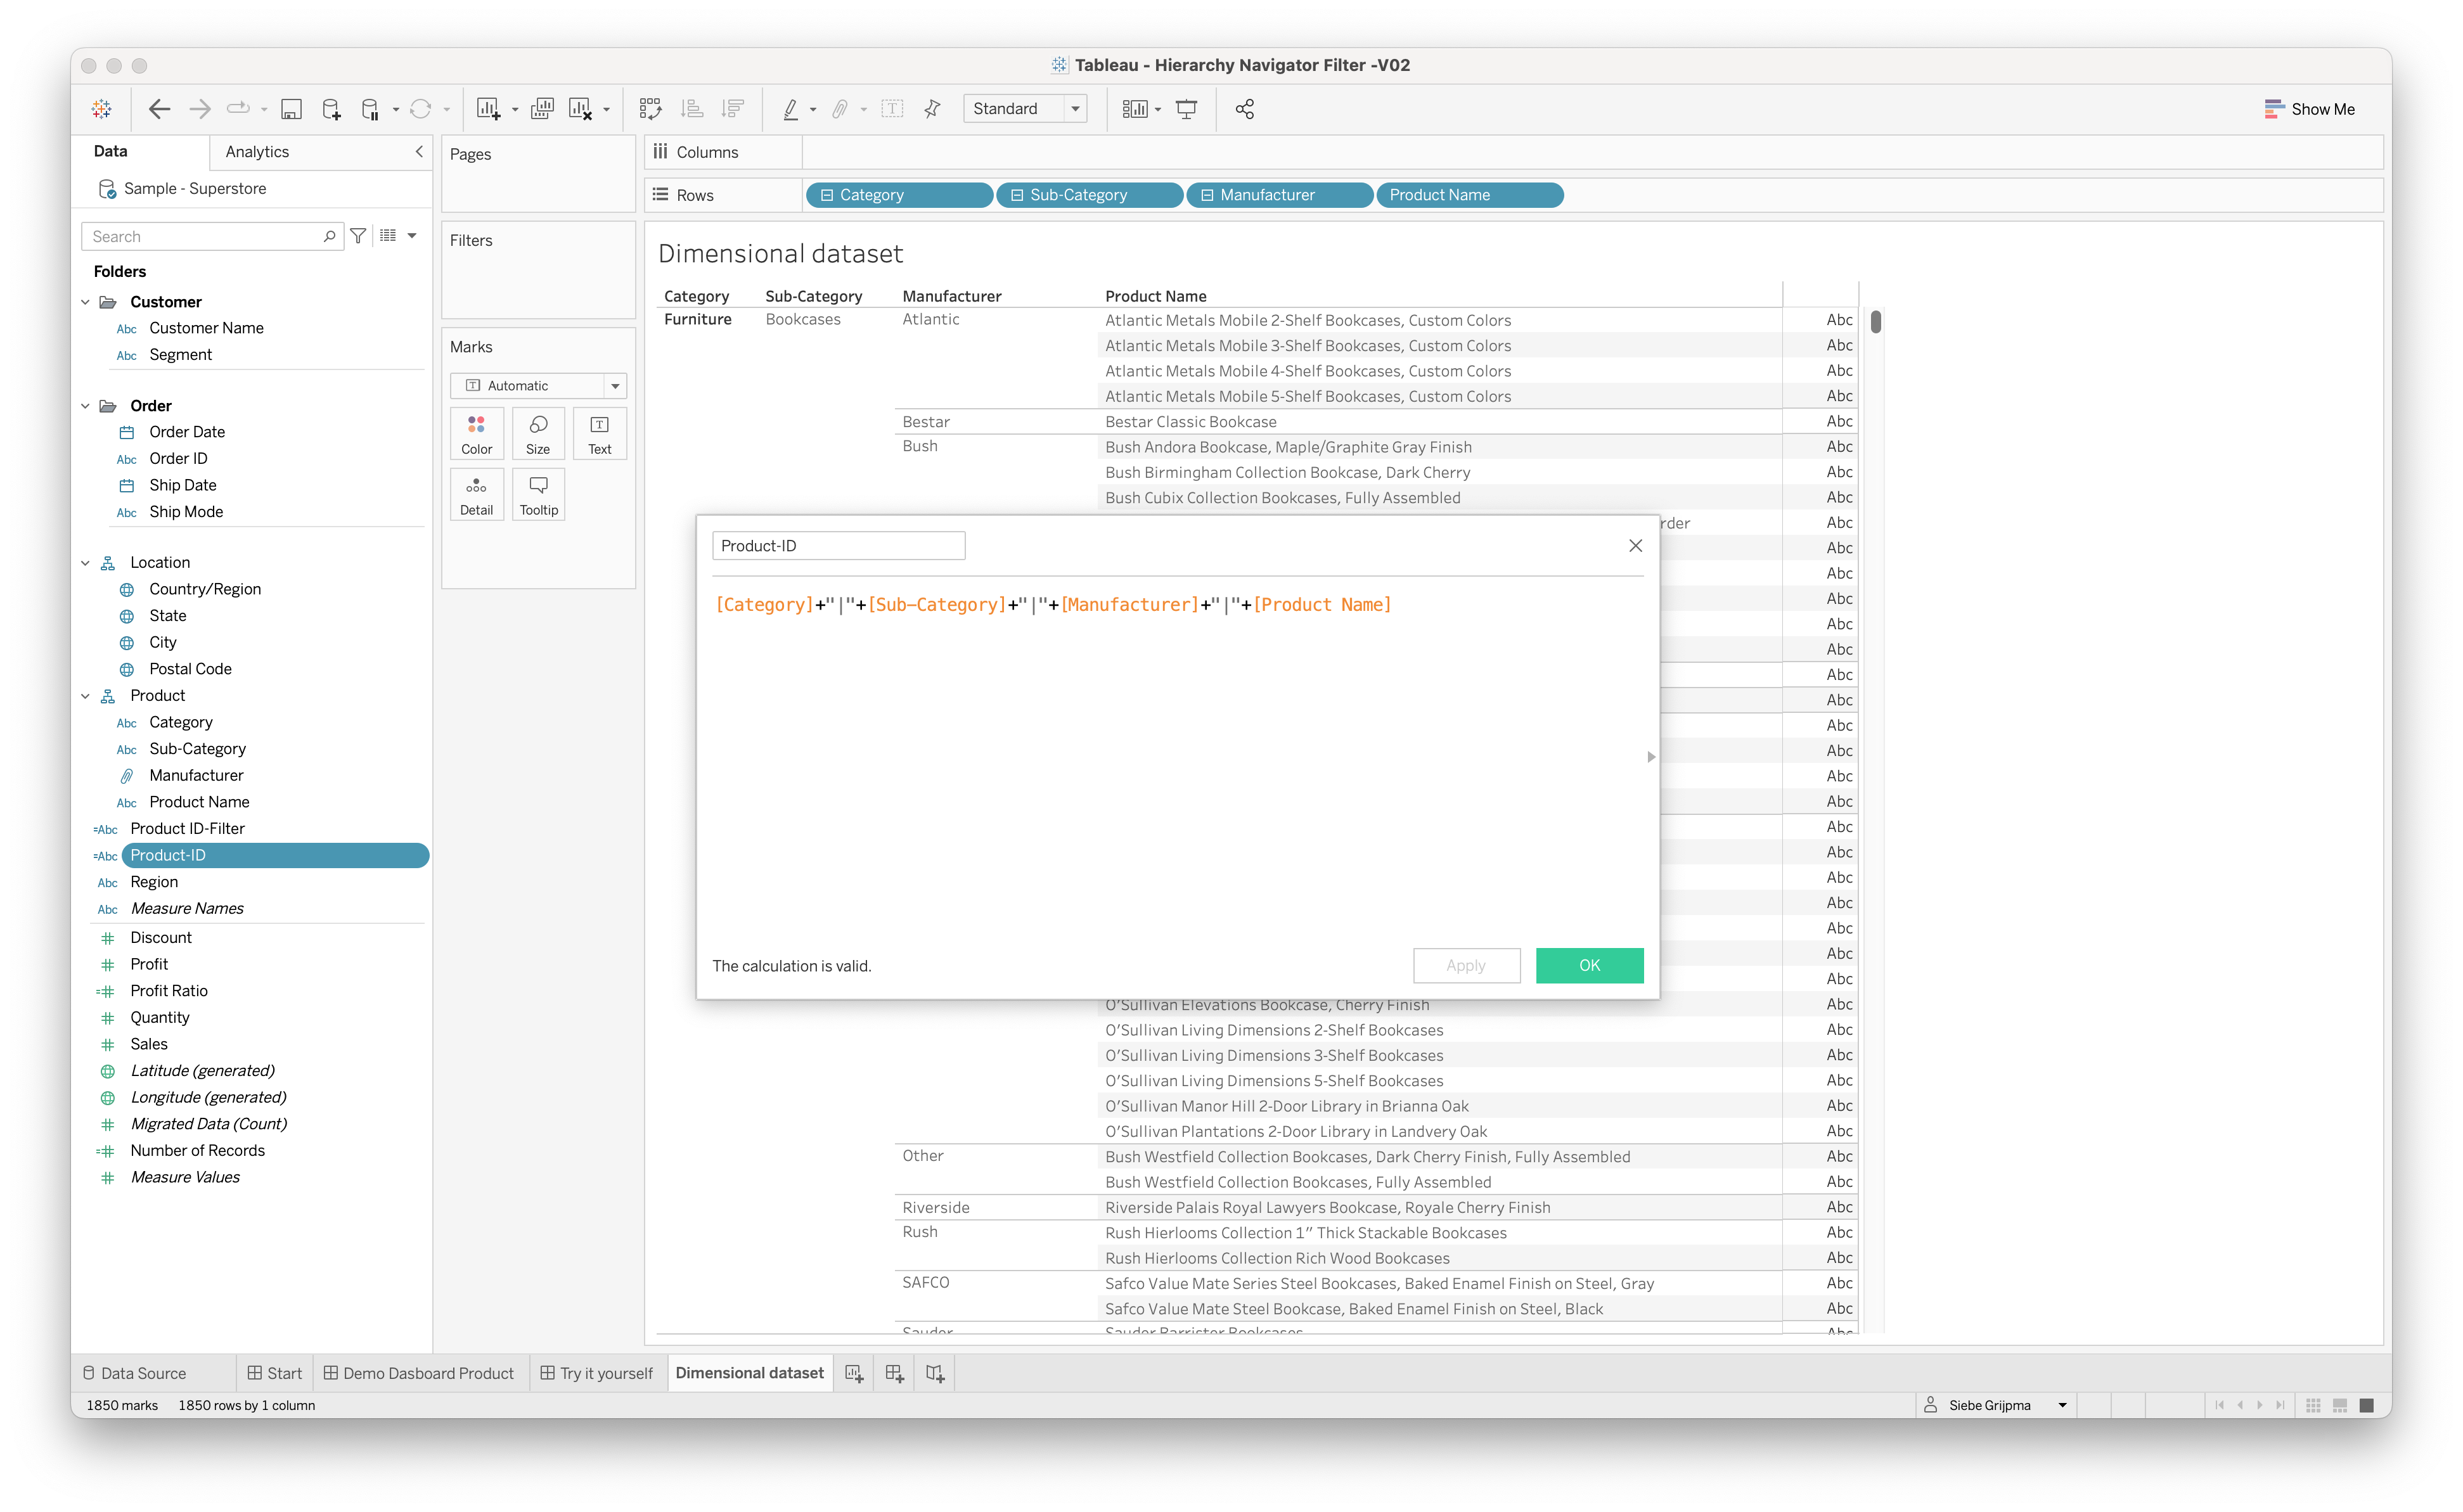
Our existing SuperStore Product structure is already organized in a Tableau hierarchy. It is not necessary to use a Tableau hierarchy upfront, we will be creating our own structure that will feed the extension in a calculated field. To do so create a calculated field as type “String” that consists of all dimensions you want to be part of the hierarchy, separated by a separator (we use the pipe symbol | in our example). The structure of the calculated field is shown in the image (click to enlarge).
Add the hierarchy calculated field to your datasheet
The last step to complete the datasheet is adding the calculated field (in this example Product-ID) to the details of the Marks pane like shown in the image below.

Create parameters to support advanced interactions
The HierarchyFilter extension allows you to set values of parameters based on selections made in the HierarchyFilter extension. This way you can create advanced interactivity between the HierarchyFilter and the Tableau sheets and visualizations in your dashboard. This is not a mandatory step but optional if you want advanced interactivity where parameters can be part of your calculations to filter or focus on the selections in your HiertarchyFilter.
- Creating these parameters is bound to some simple syntax structures:For every dimension that is part of your hierarchy structure as designed in your calculated field (e.g. Category – Sub-Category – Manufacturer – Product Name), create a parameter of type string and add an identical suffix to all your parameters that are related to the HierarchyFilter. In this example, we used the suffix “Param” for all the parameters that we need for the HierarchyFilter.
- Create two extra parameters
- “Label Param” of type String, this will store the label of the selected node in your HierarchyFilter
- “Level Param” of type Integer, will store the level in your Hierarchy of the selected node
Below are two examples of the String and Integer parameters we created.


Overview of parameters created in this example
Now we’re all set. In our example we have created the parameters as shown in the image below.

Create a dashboard containing your datasheet and the HierarchyFilter extension
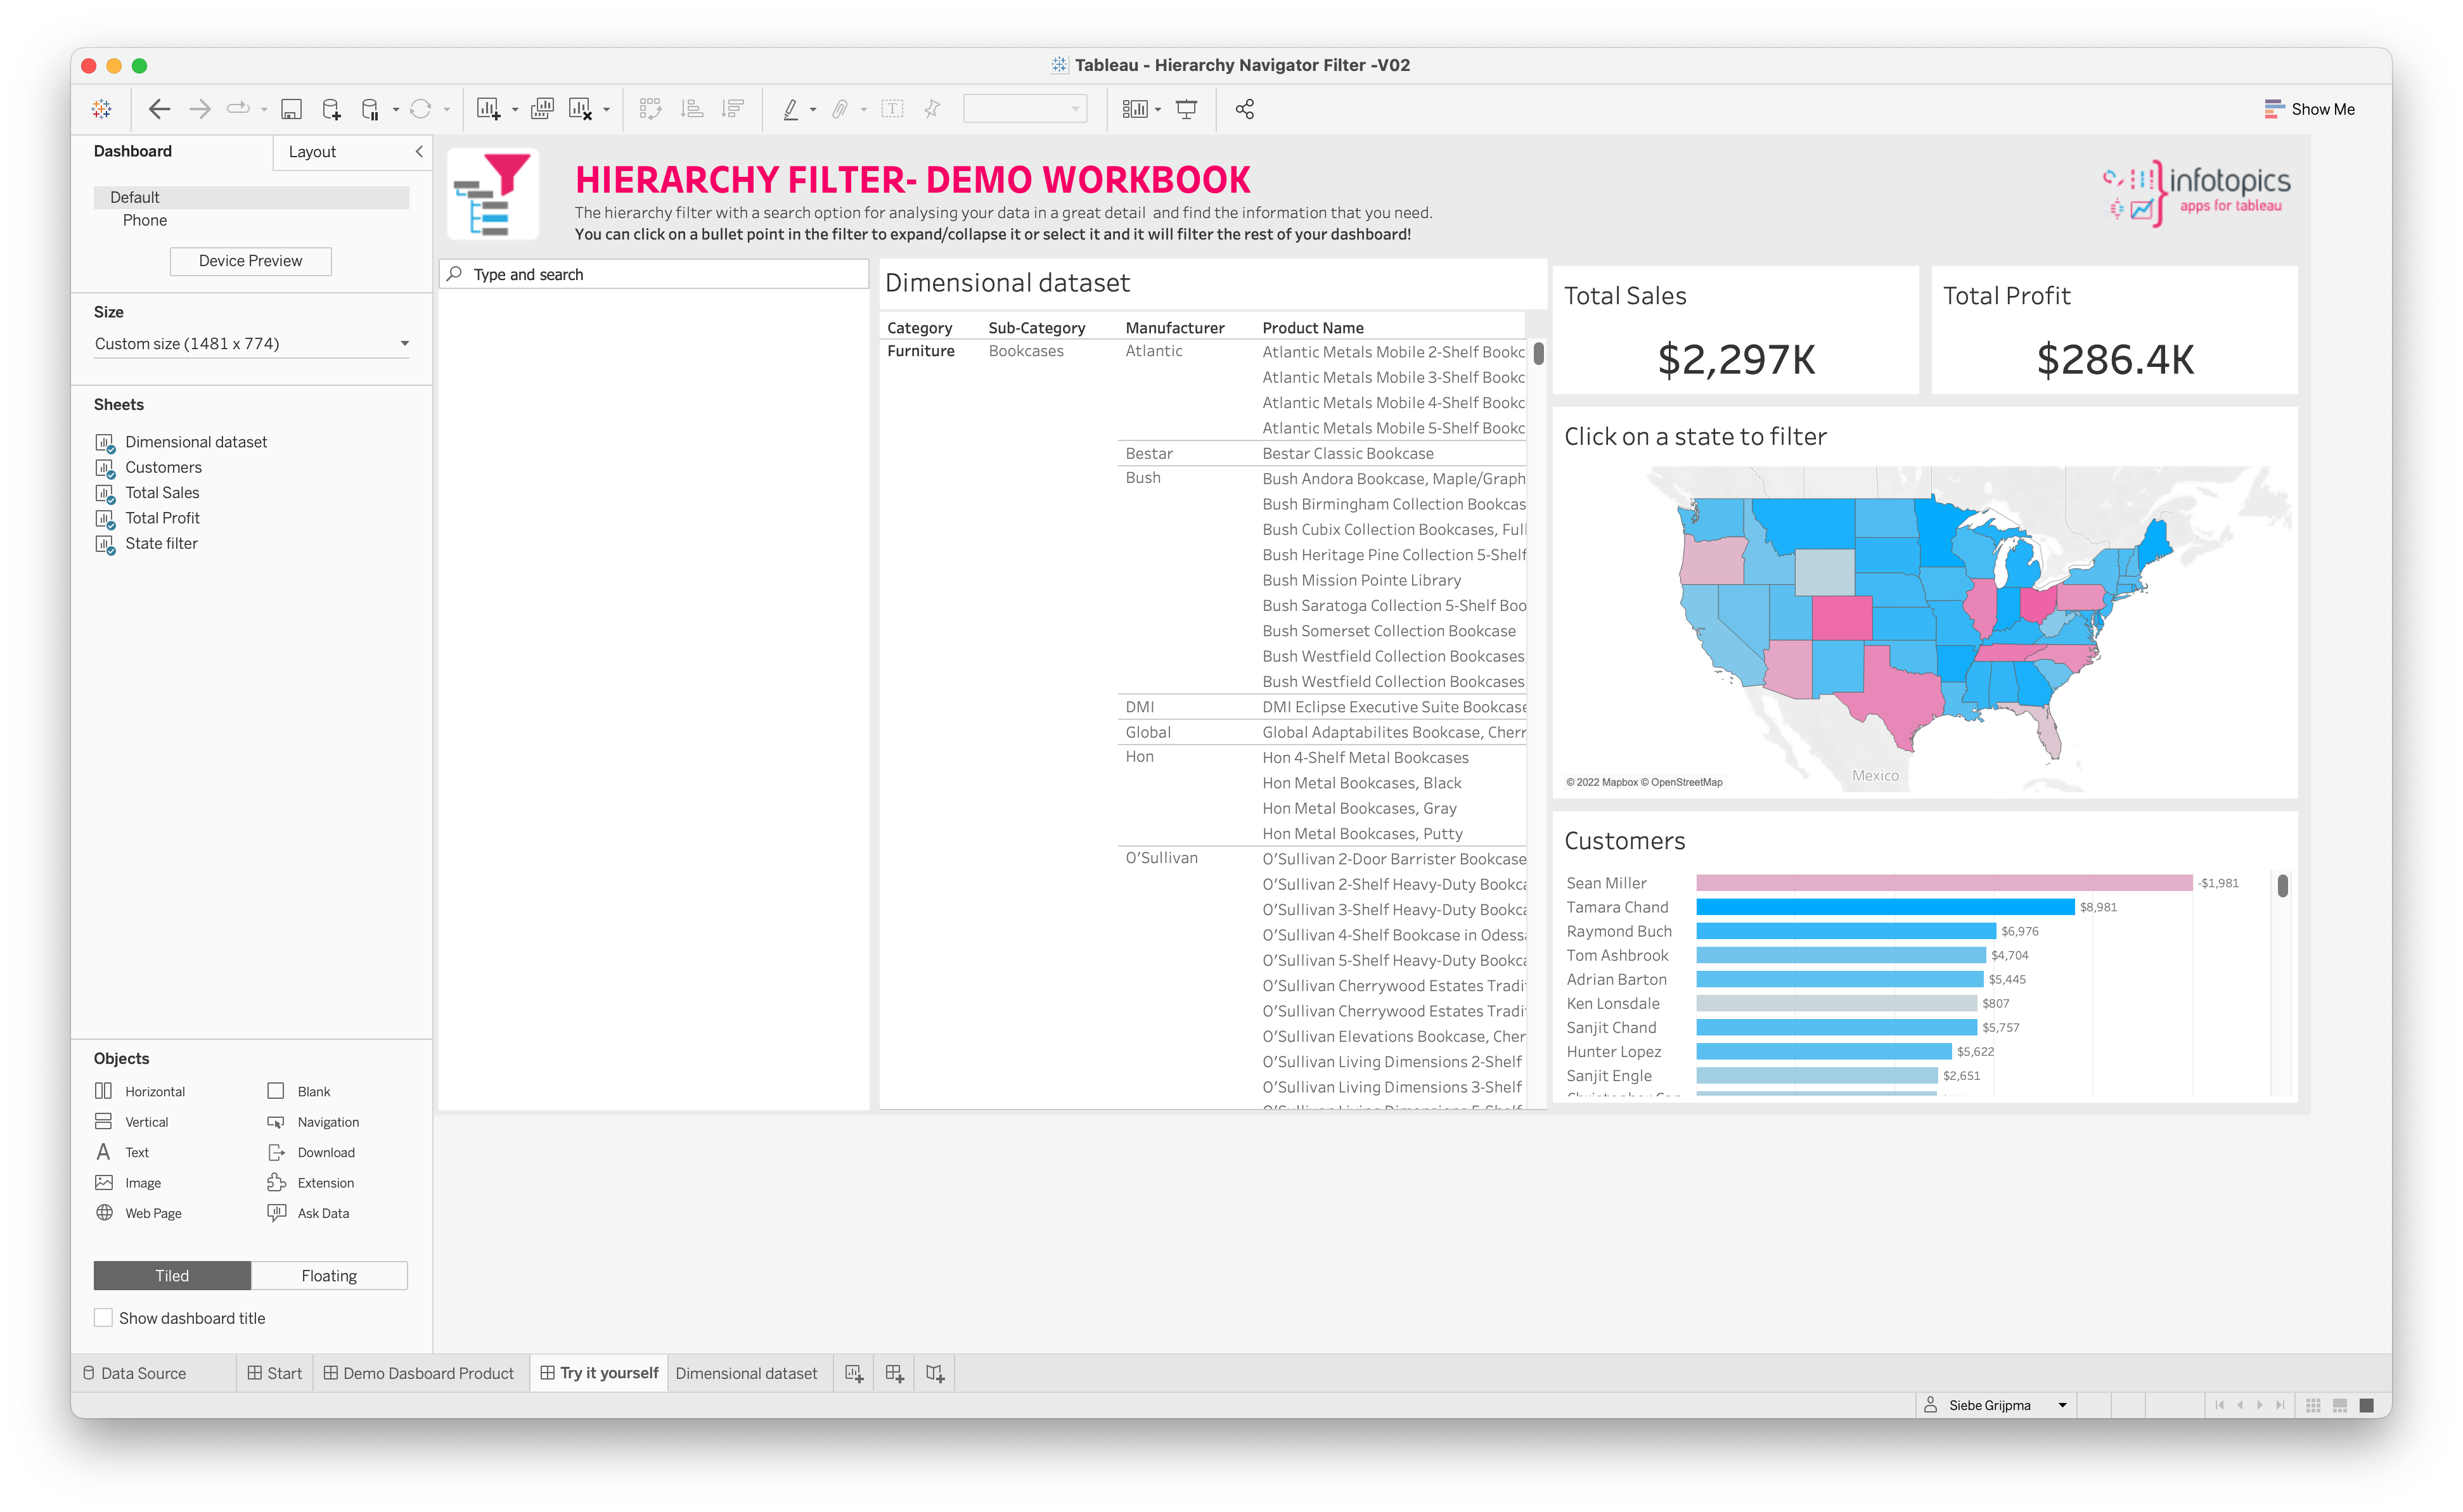
The next step is to create your dashboard with the HierarchyFilter. Create a new dashboard and add your hierarchy datasheet to the dashboard. This sheet contains the data that will feed the HierarchyFilter extension and makes the magic happen. You can also add some other Tableau visualization sheets to the dashboard based on the same data source. This way you can use the interactivity of the HierrchyFilter extension.
Now add the HierarchyFilter extension to the dashboard (use the trial Trex file or a Trex matching a purchased subscription). Your Dashboard should look something like the image below.
Configure the HierarchyFilter
So we managed to prepare our datasheet for the dimensional data model with the Hierarchy structure we want to use. We also set up a dashboard containing the HierarchyFilter extension. The next thing we need to do is configure the extension to use/visualize the hierarchy and make the dashboard interactive.
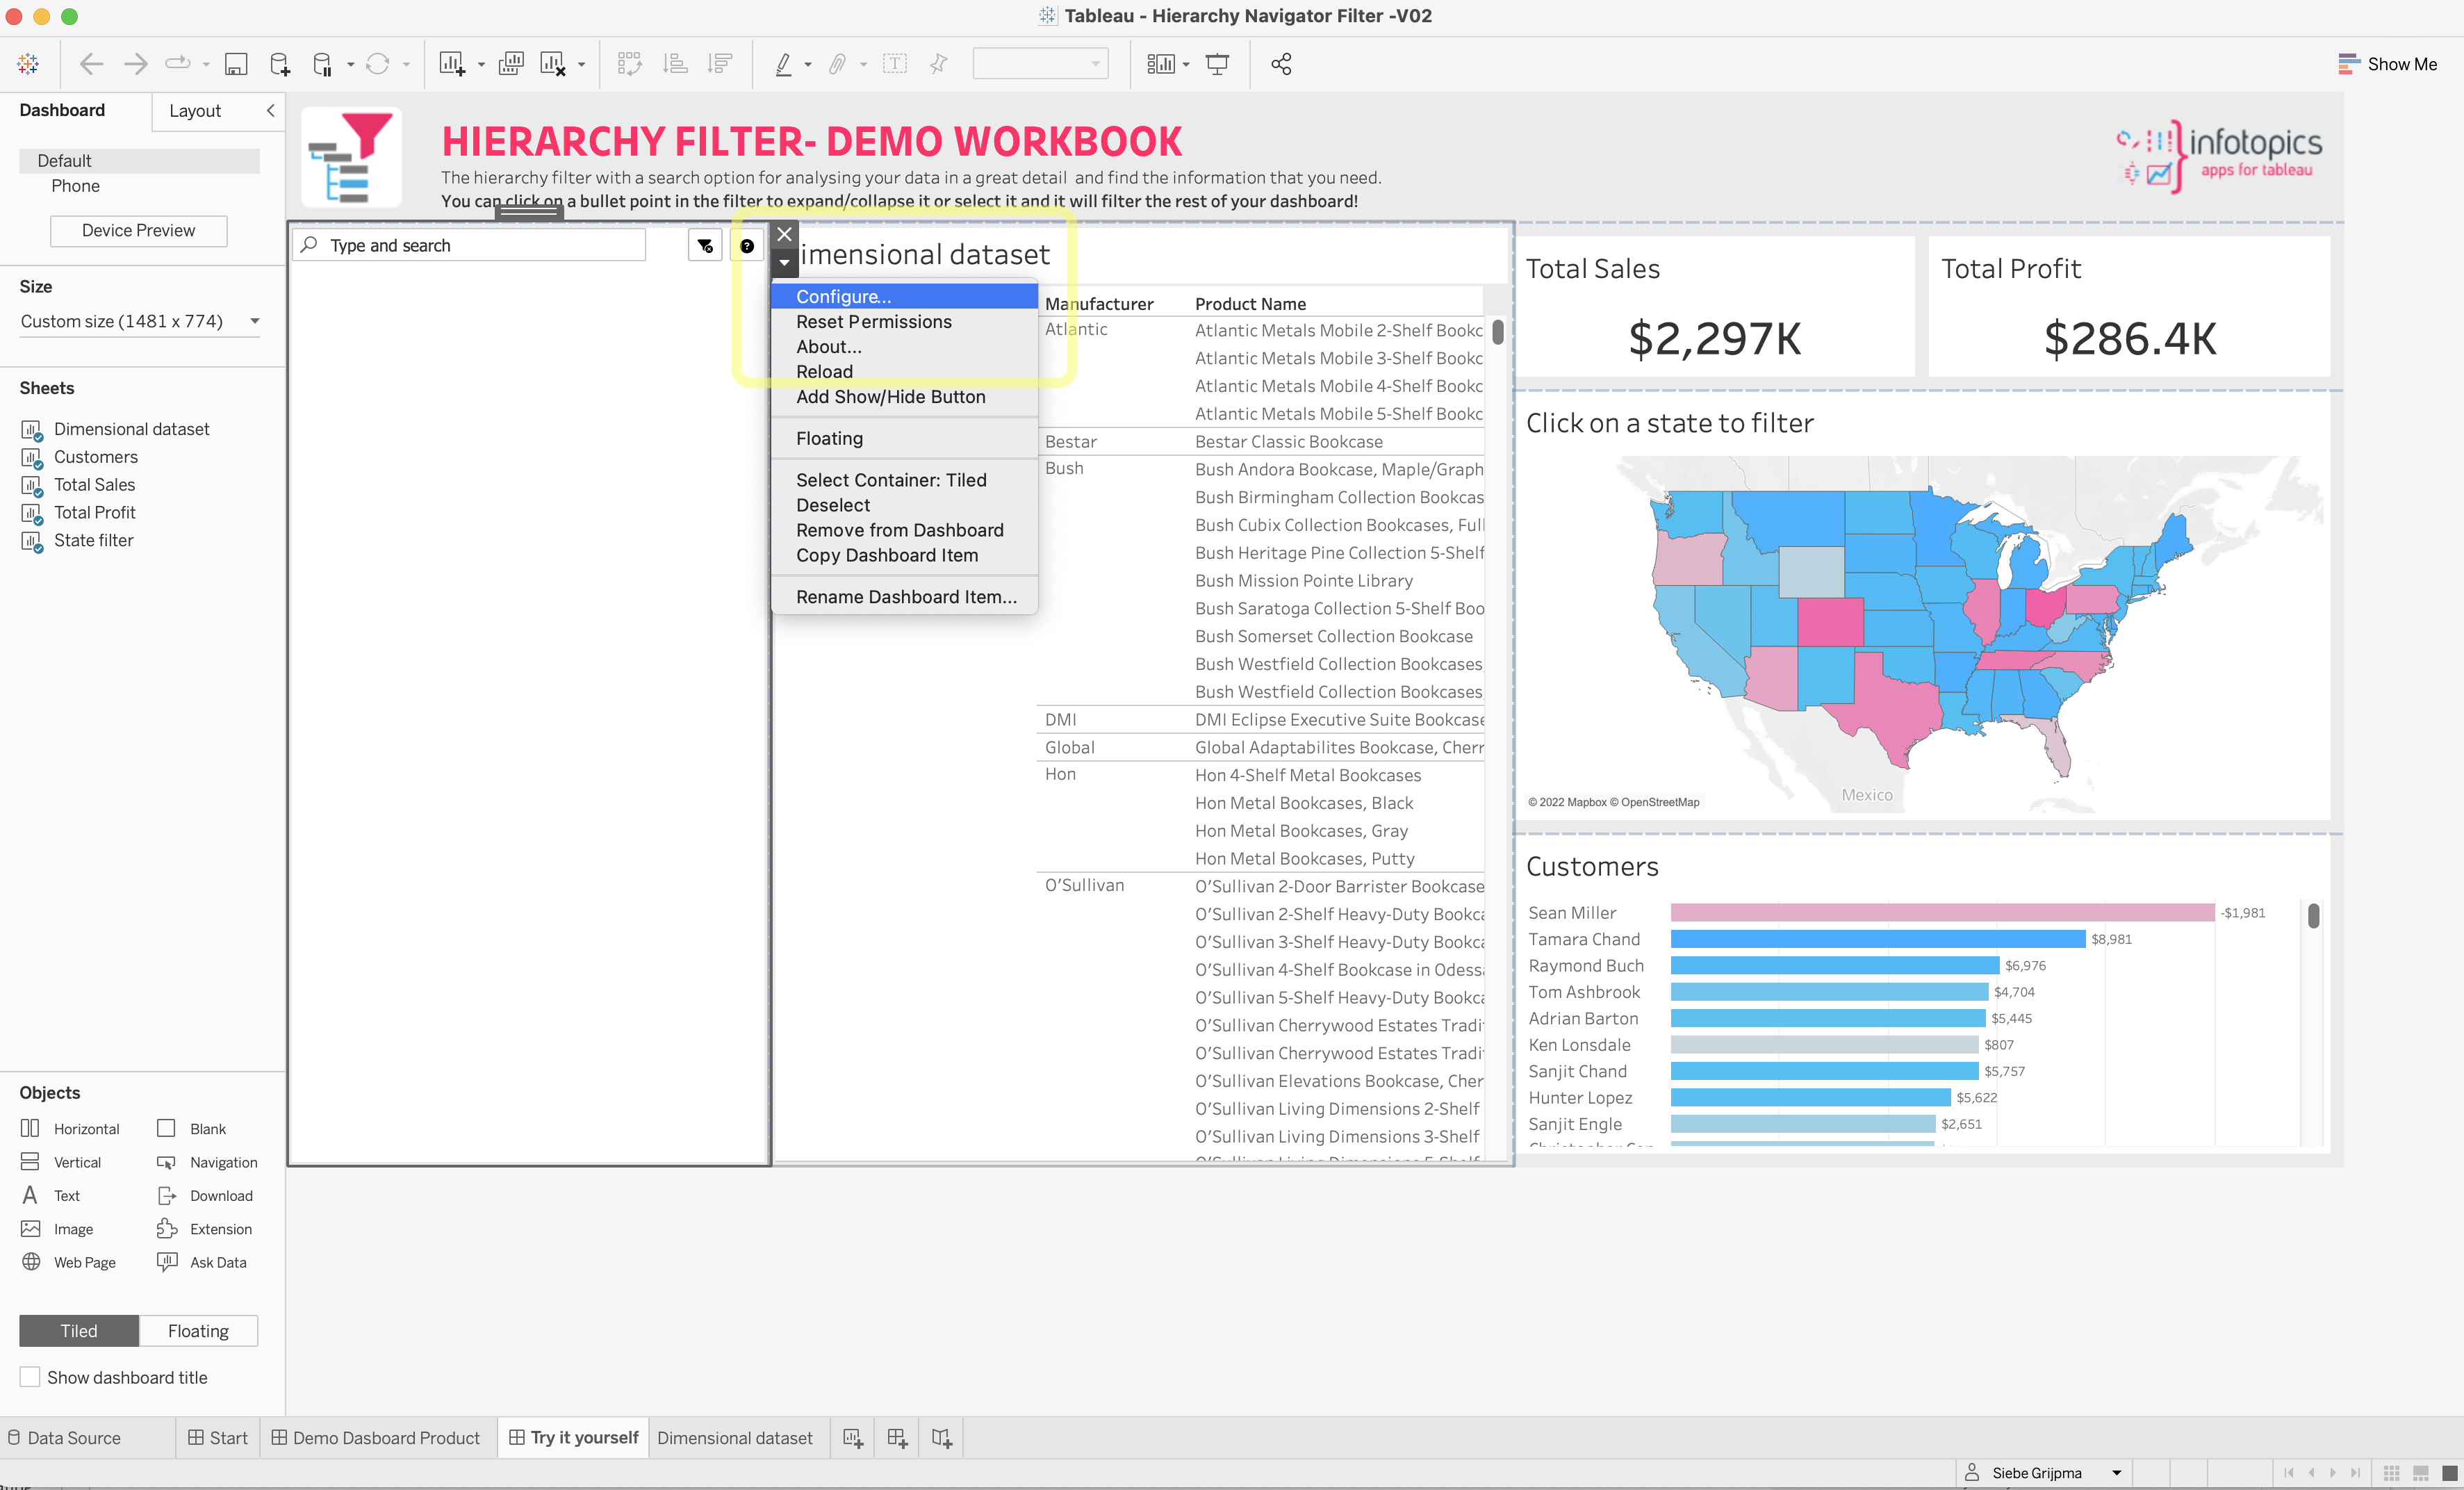
To enter the configuration screen, select the container of the HierarchyFilter extension and from the dropdown context menu select “Configure” as shown in the below image (click to enlarge).
Configuration wizard
A configuration menu will pop up. The configuration consists of wizard-like steps, indicated at the top of the screen. This is shown in the example below.
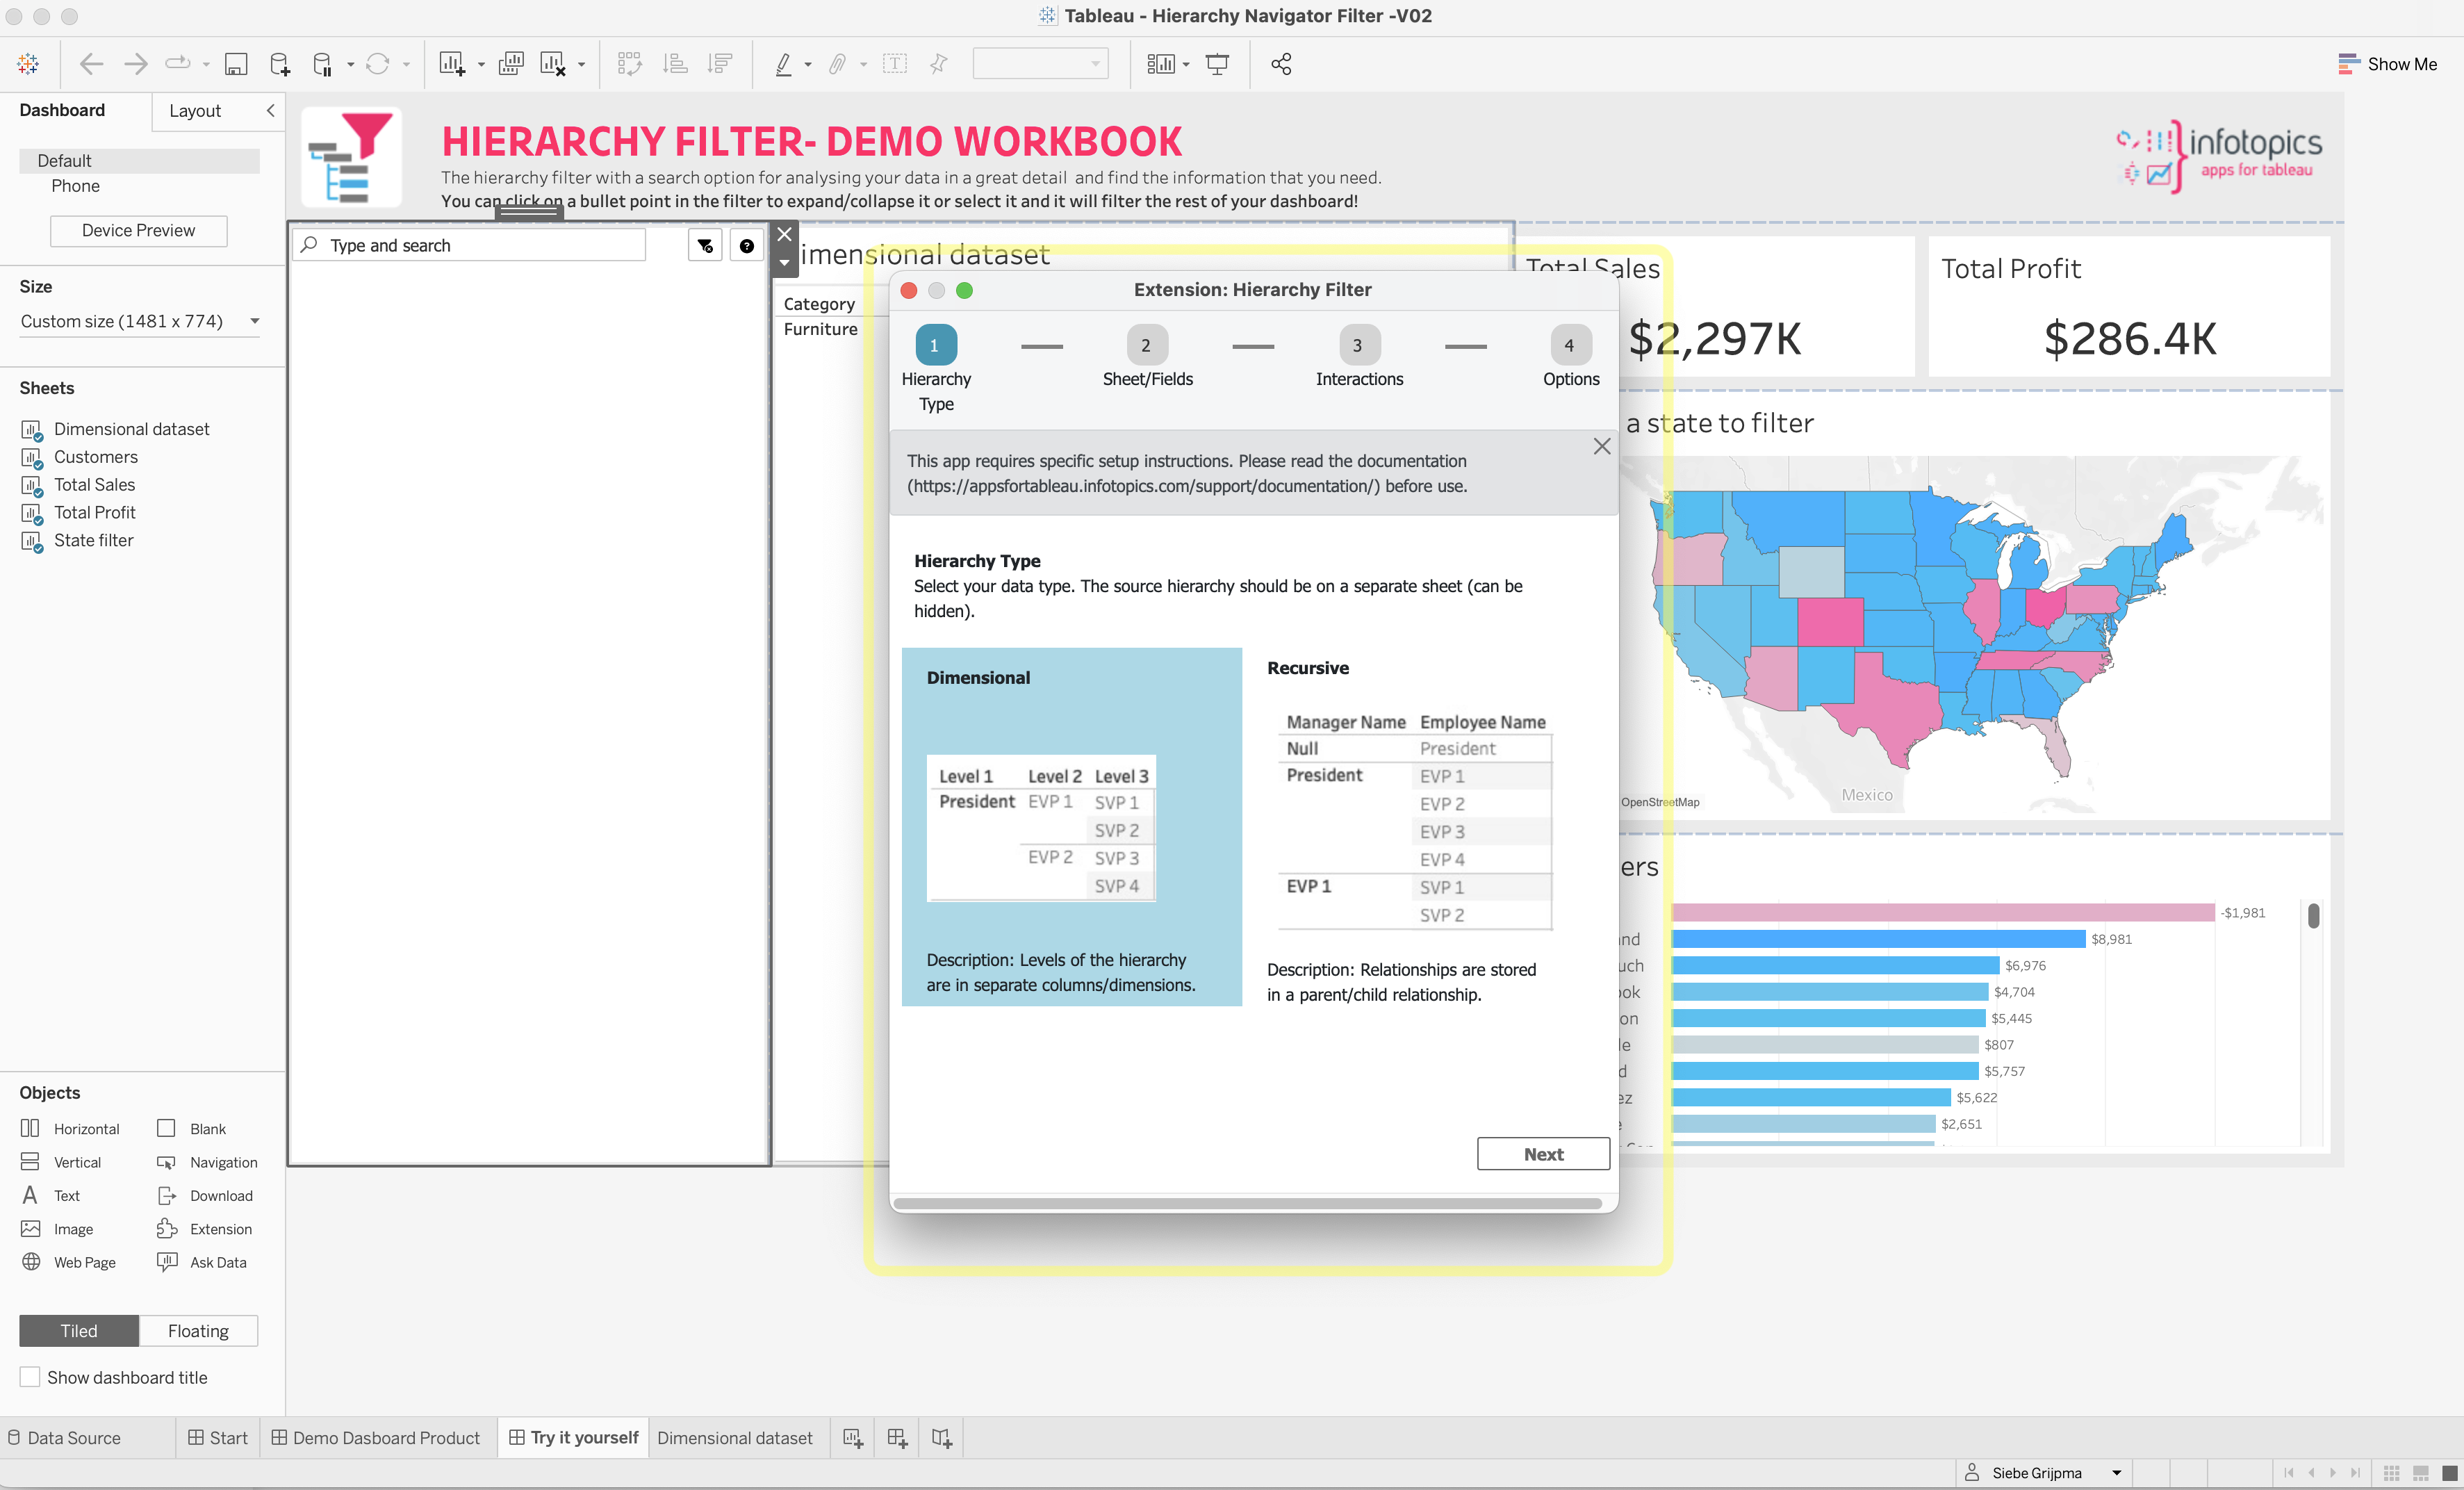
In this part of the Product Guide we discussed the dimensional model so we select the (default option) “Dimensional” from the startscreen of the configurtion wizard. Now when we press “Next” we move on to connecting the extension to the datasheet. In the screen below you see the second step of the wizard.
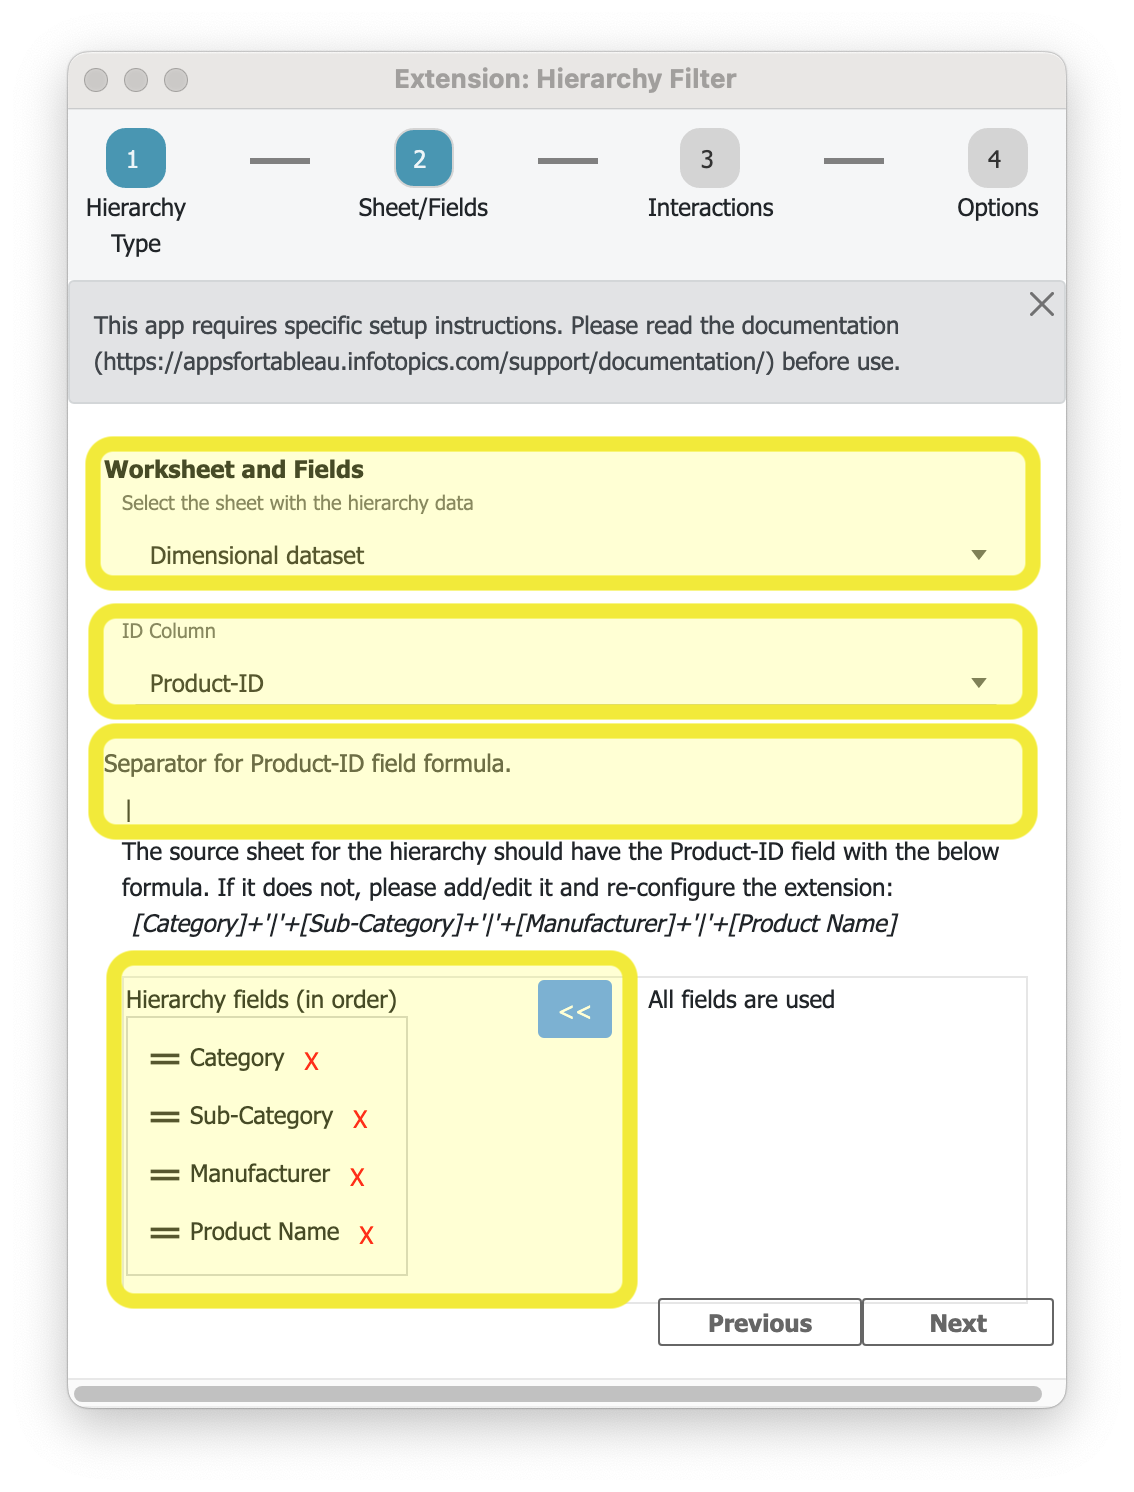
The marked areas need to be completed. First you select the “Dimensional dataset” sheet containing our Hierarchy data. The extension will read its content and from the second dropdown you select the ID collumn which we named “Product-ID”. It is important to fill the third field with the separator we used to separate the dimensions of our hierarchy. In this exampole we used the PIPE symbol “|”, the vertical line. The bottom part of this wizard screen shows the dimensions that were detected by the extension. You can choose which extensions you want to use in your Hierarchy Filter, we selected “All” dimensions that are in our Hierarchy datasheet.
Next step of the configuration we will set the interactions and connect to the parameters we created.
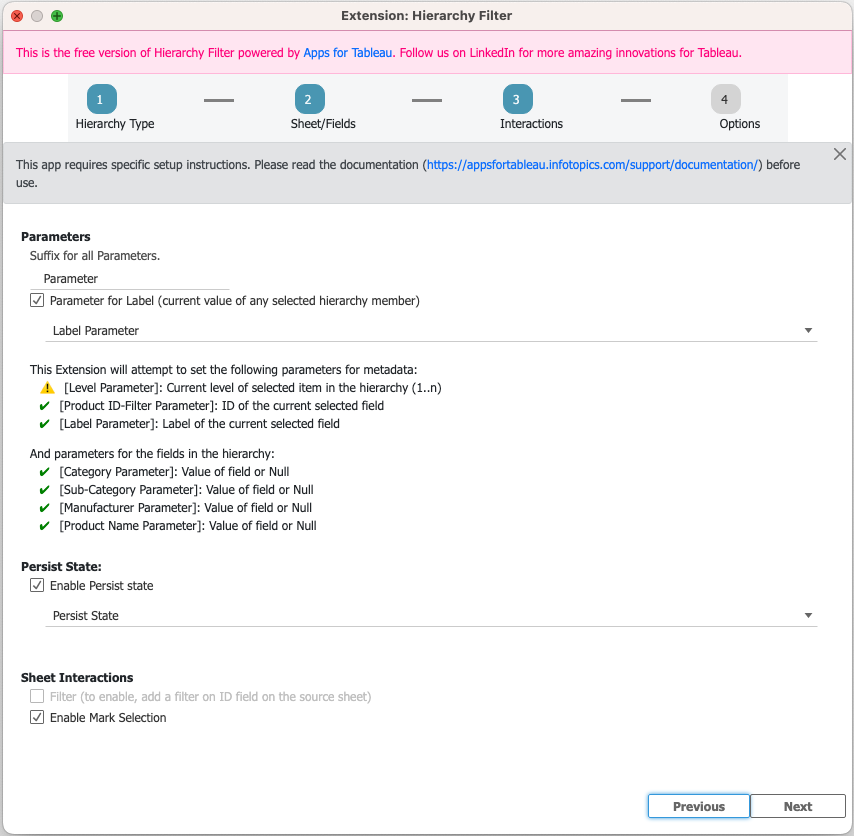
Again we have to enter some of the options we configured before. First of all we need to set the “suffix” we used for the parameters that we configured earlier. These parameters will automatically be detected and once your parameters show up correctly the will store the information of the selected marks in the HierarchyFilter extension. This way you can use the information of the selected node(s) in your Hierarchy filter in the rest of your dashboard using these parameters in your calculations and configurations.
Next, using a string parameter, you can use the “Persist State” setting to set up HierarchyFilter to remember the current selection when moving between dashboards. The state is meaning the collapsed and uncollapsed layout and the selected node. While using the dashboard, the parameter will update to maintain the current state. When opening a new instance of the dashboard (different user, platform, etc), the parameter will open in the state it was in at the time the workbook was published. When loading the dashboard from scratch, the parameter (and thus the state) will be based on the state of HierarchyFilter at the moment the workbook was published.
Last but not least on this wizard page you can configure if you want the Hierarchy filter to interact with the rest of your dashboard and if Yes what type of interaction you desire.
- Filter
- Mark selection
Performance wise we recommend using Mark Selections when working with large datasets. Below you will see the screen for the final step of your configuration wizard (appears when you press Next).
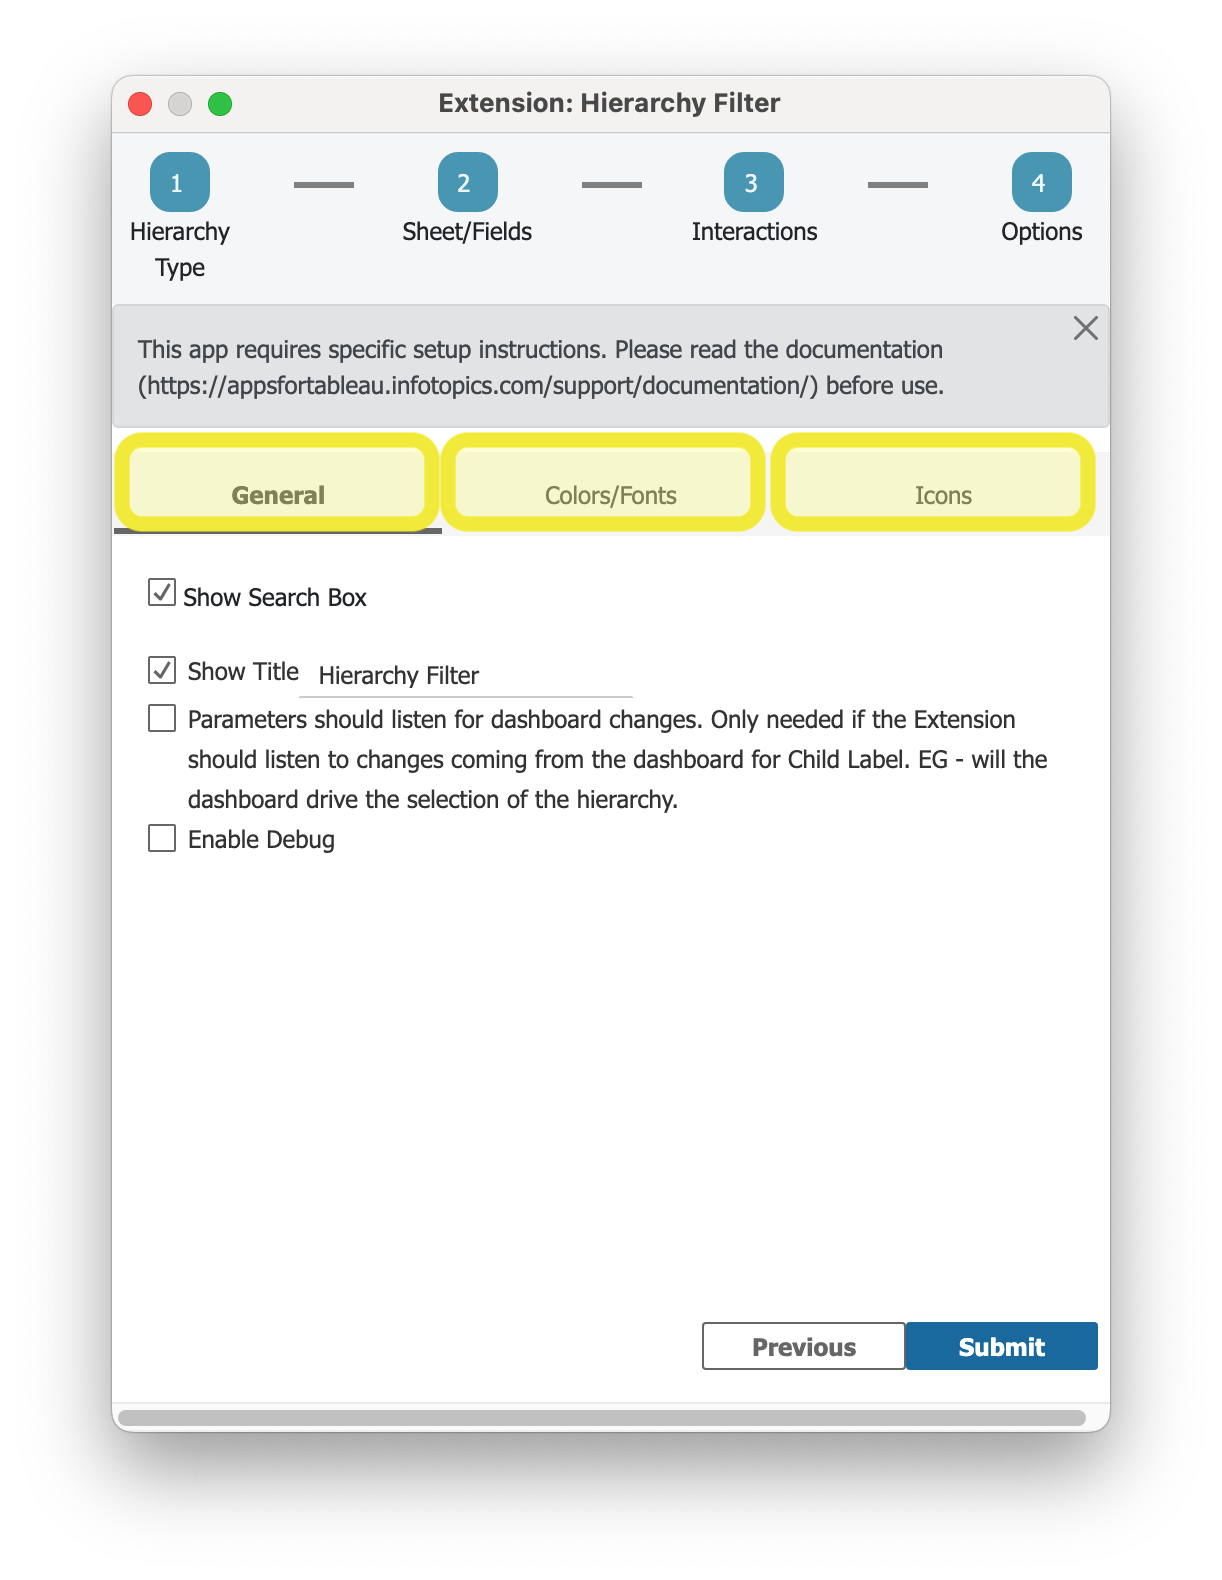
In the final step of the configuration of the HierarchyFilter you can set some lay-out options to match the appearance of the extension with the rest of your dashboard. You can enable/disable a search bar, add a title to your container, set colors and/or fonts or change the icons that are used within the extension for expanding and collapsing the hierarchy.
Once you’re satisfied with all the options you can press “Submit” and your configuration is done configuring your HierarchyFilter with the Dimensional model. You should see something like the image below and you can start exploring your hierarchy and enjoy the interactivity.
Supported data structures
It is important to know that the HierarchyFilter extension supports two different data models to visualize and interact with your hierarchy dataset. Both datamodels require a different approach in configuring the HIerarchyFilter extension. This Product Guide will elaborate on both data models/structures.
-
Dimensional data. The hierarchy is based on the dimensions in your dataset. An example of this model is the Product Structure in the SuperStore demo dataset of Tableau (Category >> Sub-Category >> Manufacturer >> Product Name)
-
Hierarchical data. The data structure you will often find in organization structures and consists of a Parent-Child relationship.
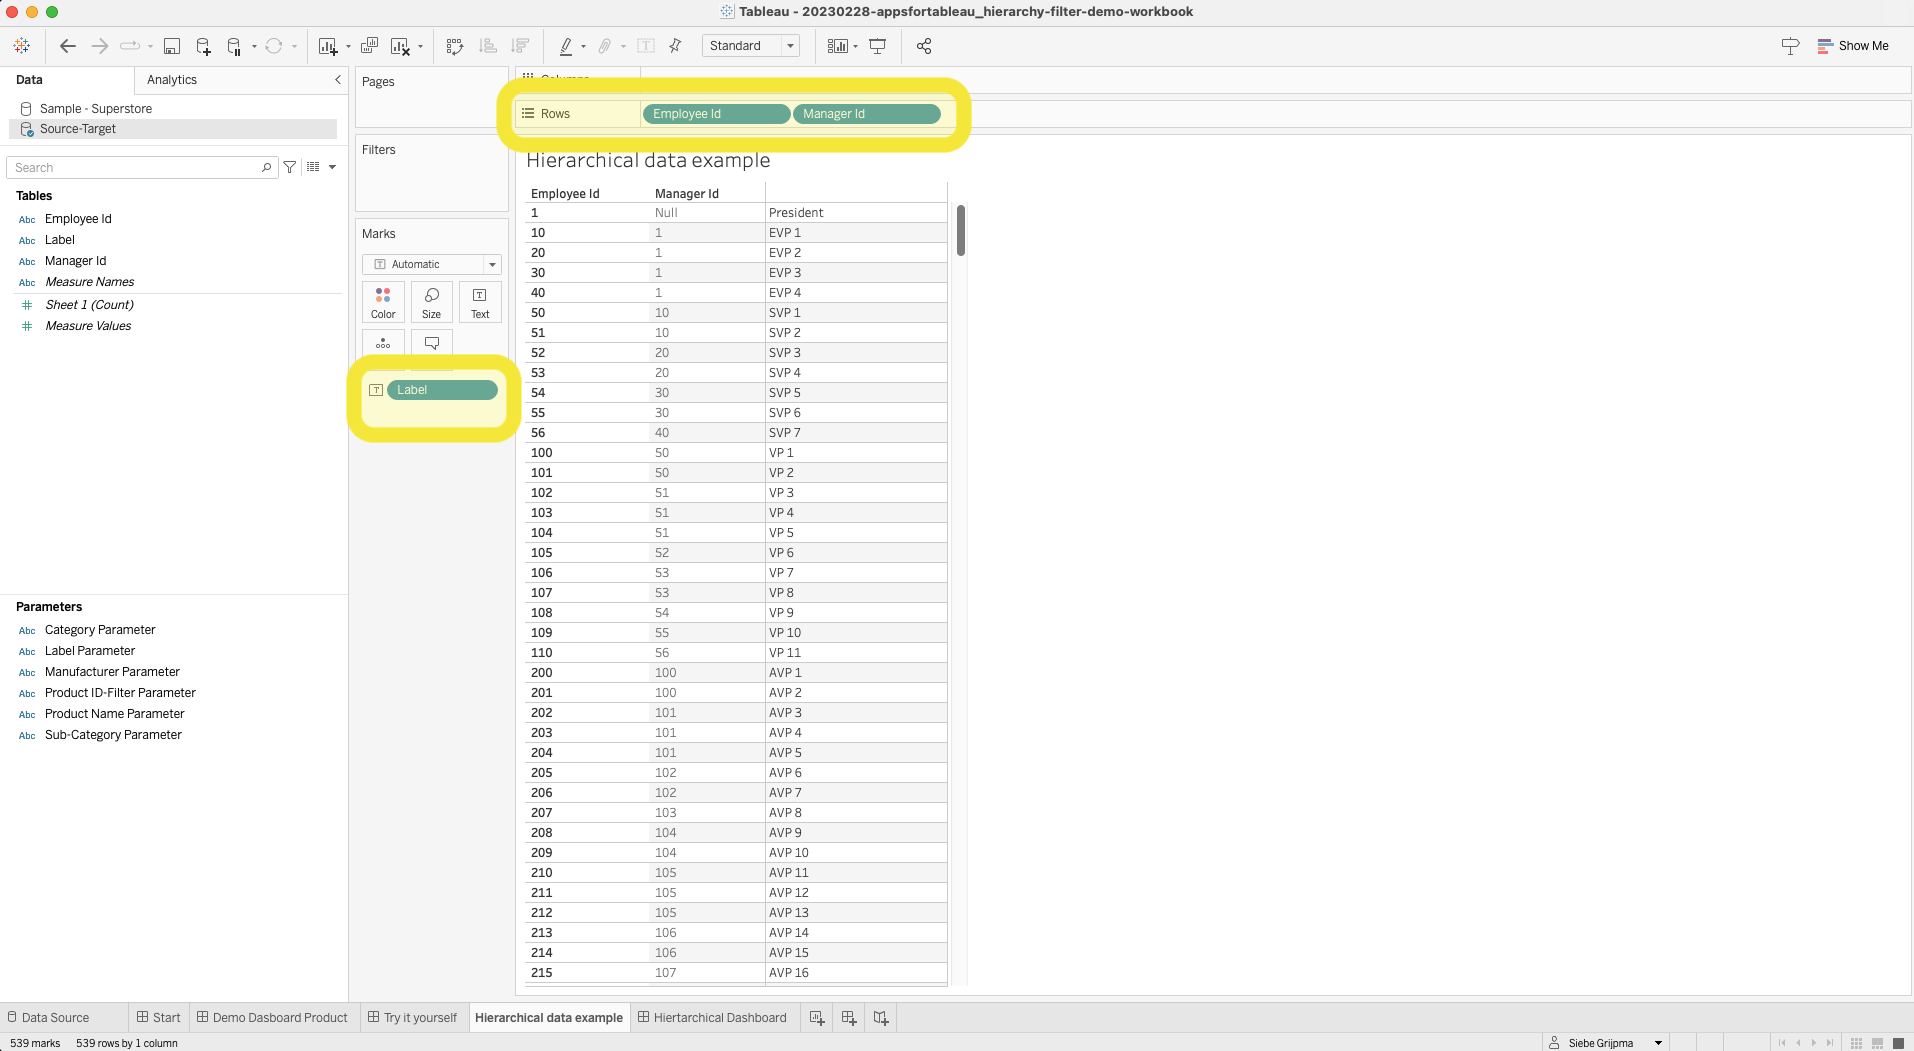
Hierarchical dataset
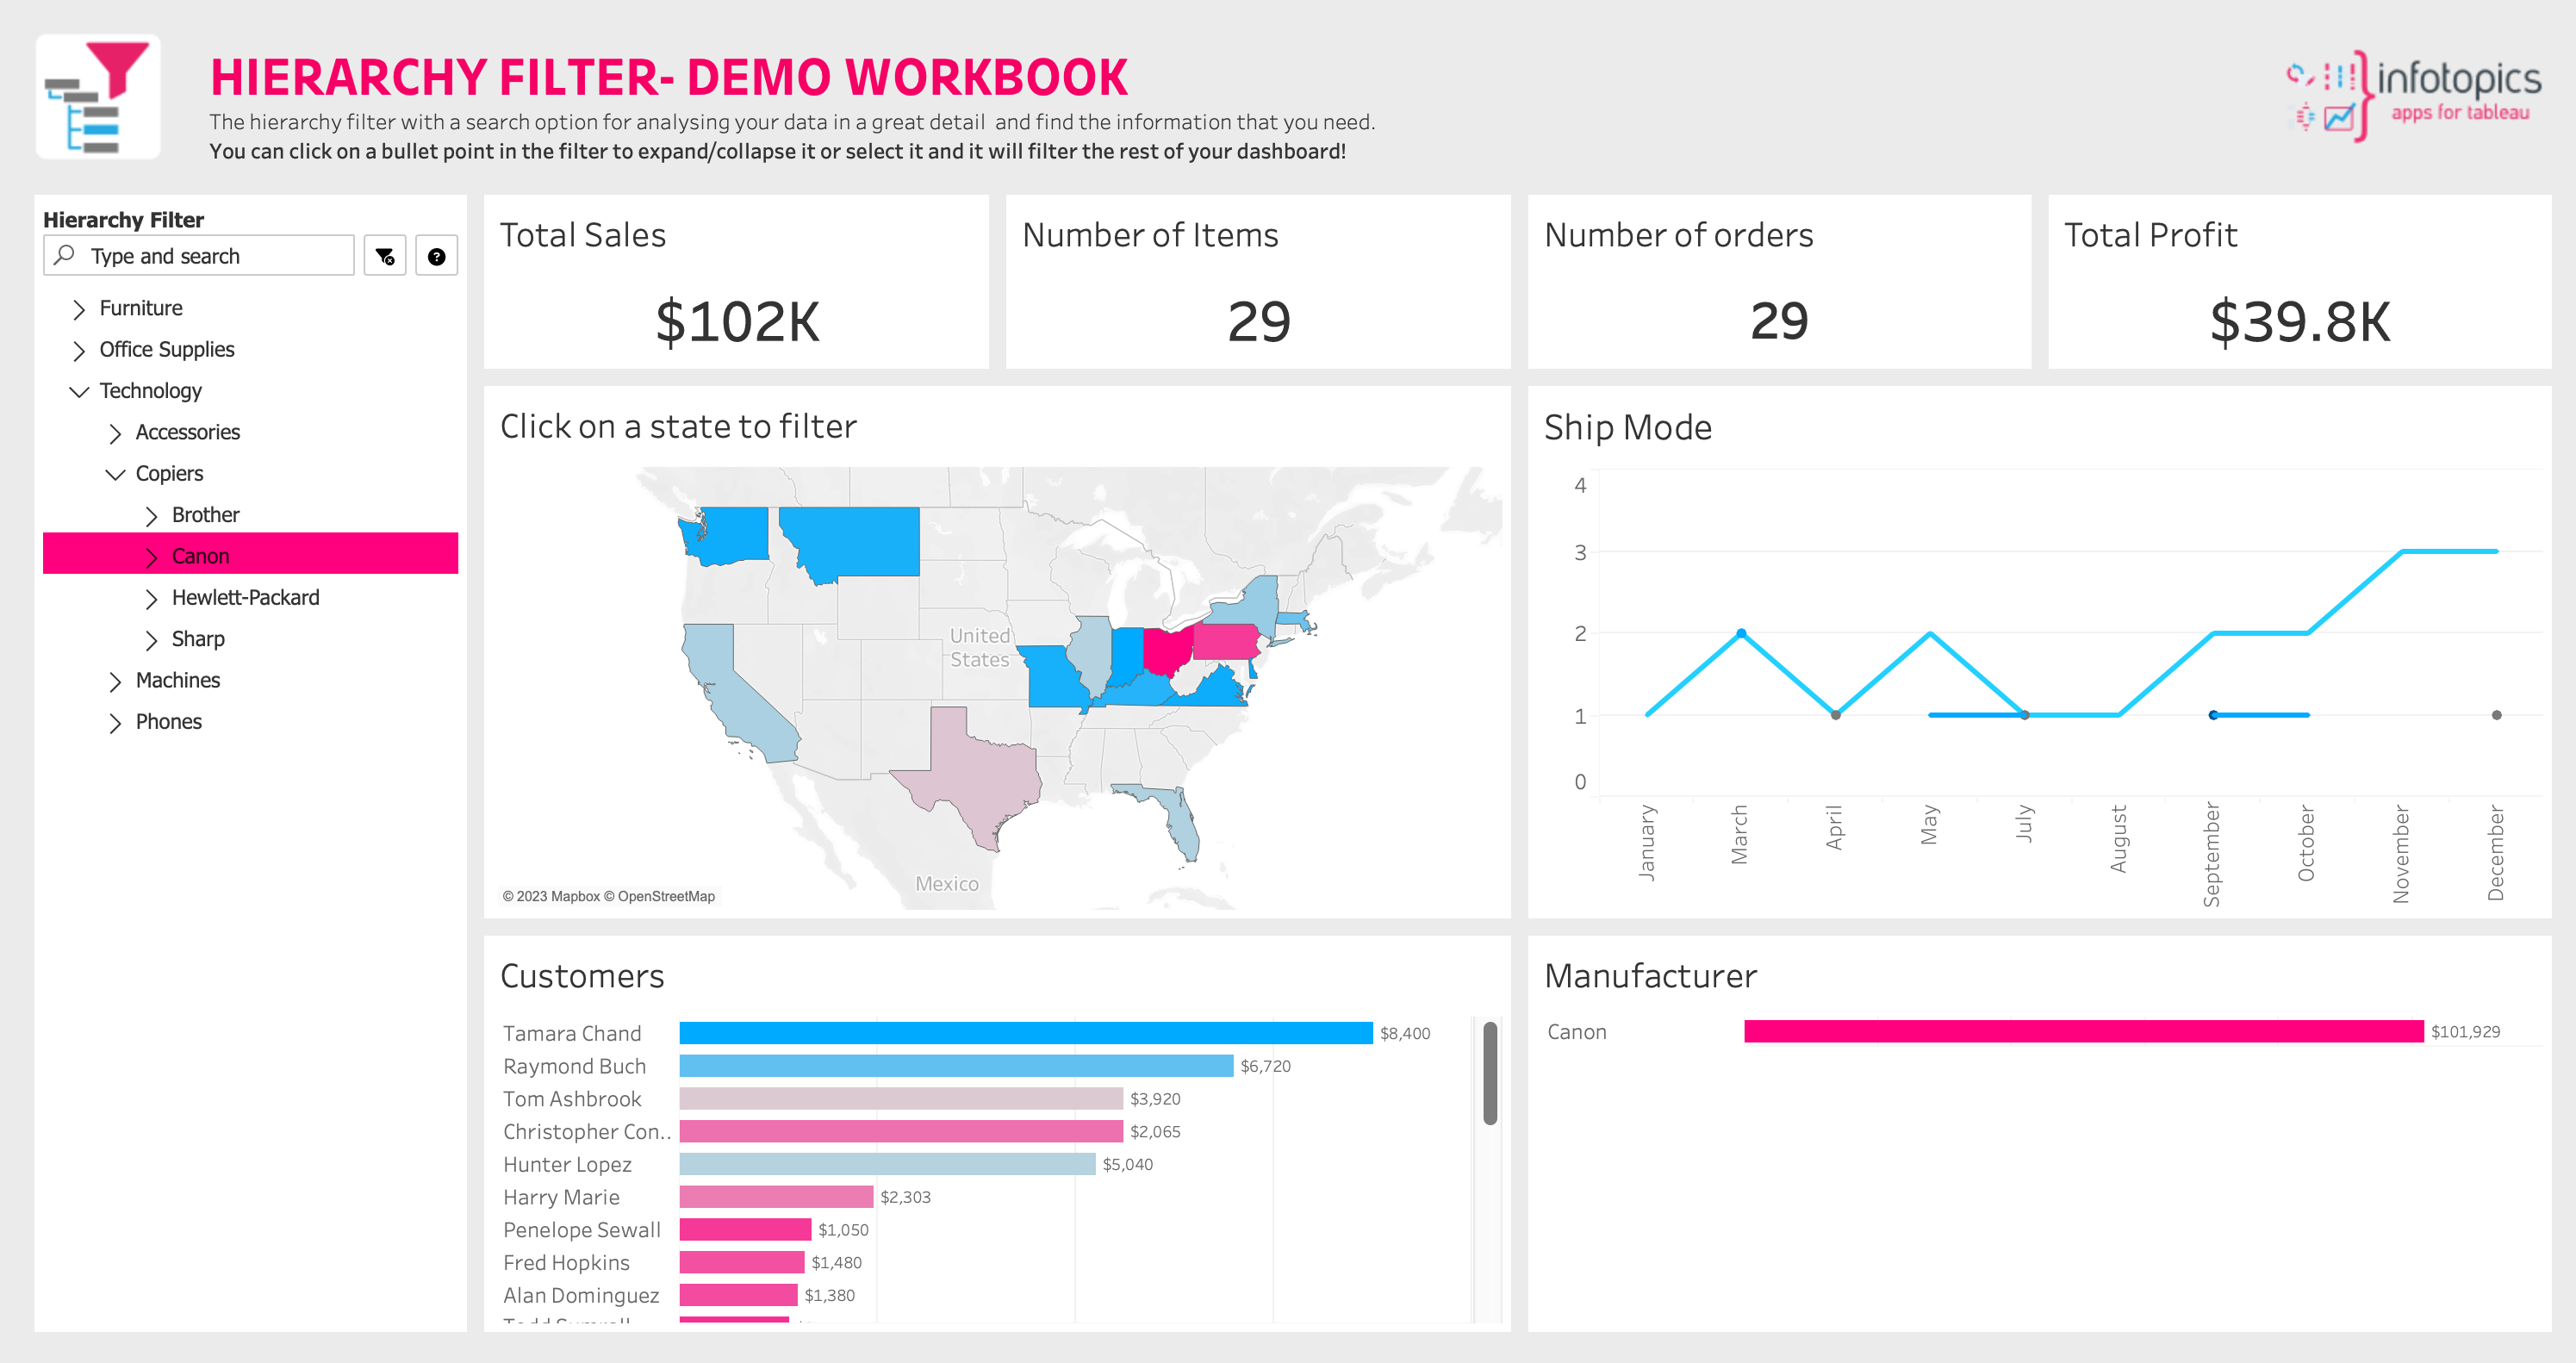
As indicated above, the HierarchyFilter supports a Hierarchical dataset as well. In this example, we use a traditional organizational structure as a hierarchy. The image shows an example of the Hierarchical structure as a dataset. The data represents a reporting structure where we use a label instead of a name to emphasize hierarchical organizational levels.
Global overview for using the hierarchical datamodel
When working with a hierarchical dataset, the global process of getting started with the HierarchyFilter extension for Tableau consists of the steps listed below. After this summary, we will explain each step.
- Create your datasheet. No need to use calculated fields
- Create parameters for extra dashboard interactivity
- Configure the extension
- Hide your hierarchy datasheet
- Interact with your dashboard
Create parameters to support advanced interactions
Since the structure in the hierarchical datamodel is much more straight forward the number of parameters that can be used are also limited. We support storing your selections in 2 parameters:
- Child ID
- Child Label
So basically it allows you to store the employee number or label in a parameter. In this example we created two parameters called ChildID-param and ChildLabel-param. No specific naming convention is needed in this case and the parameter again needs to be of type String and without any initial content.


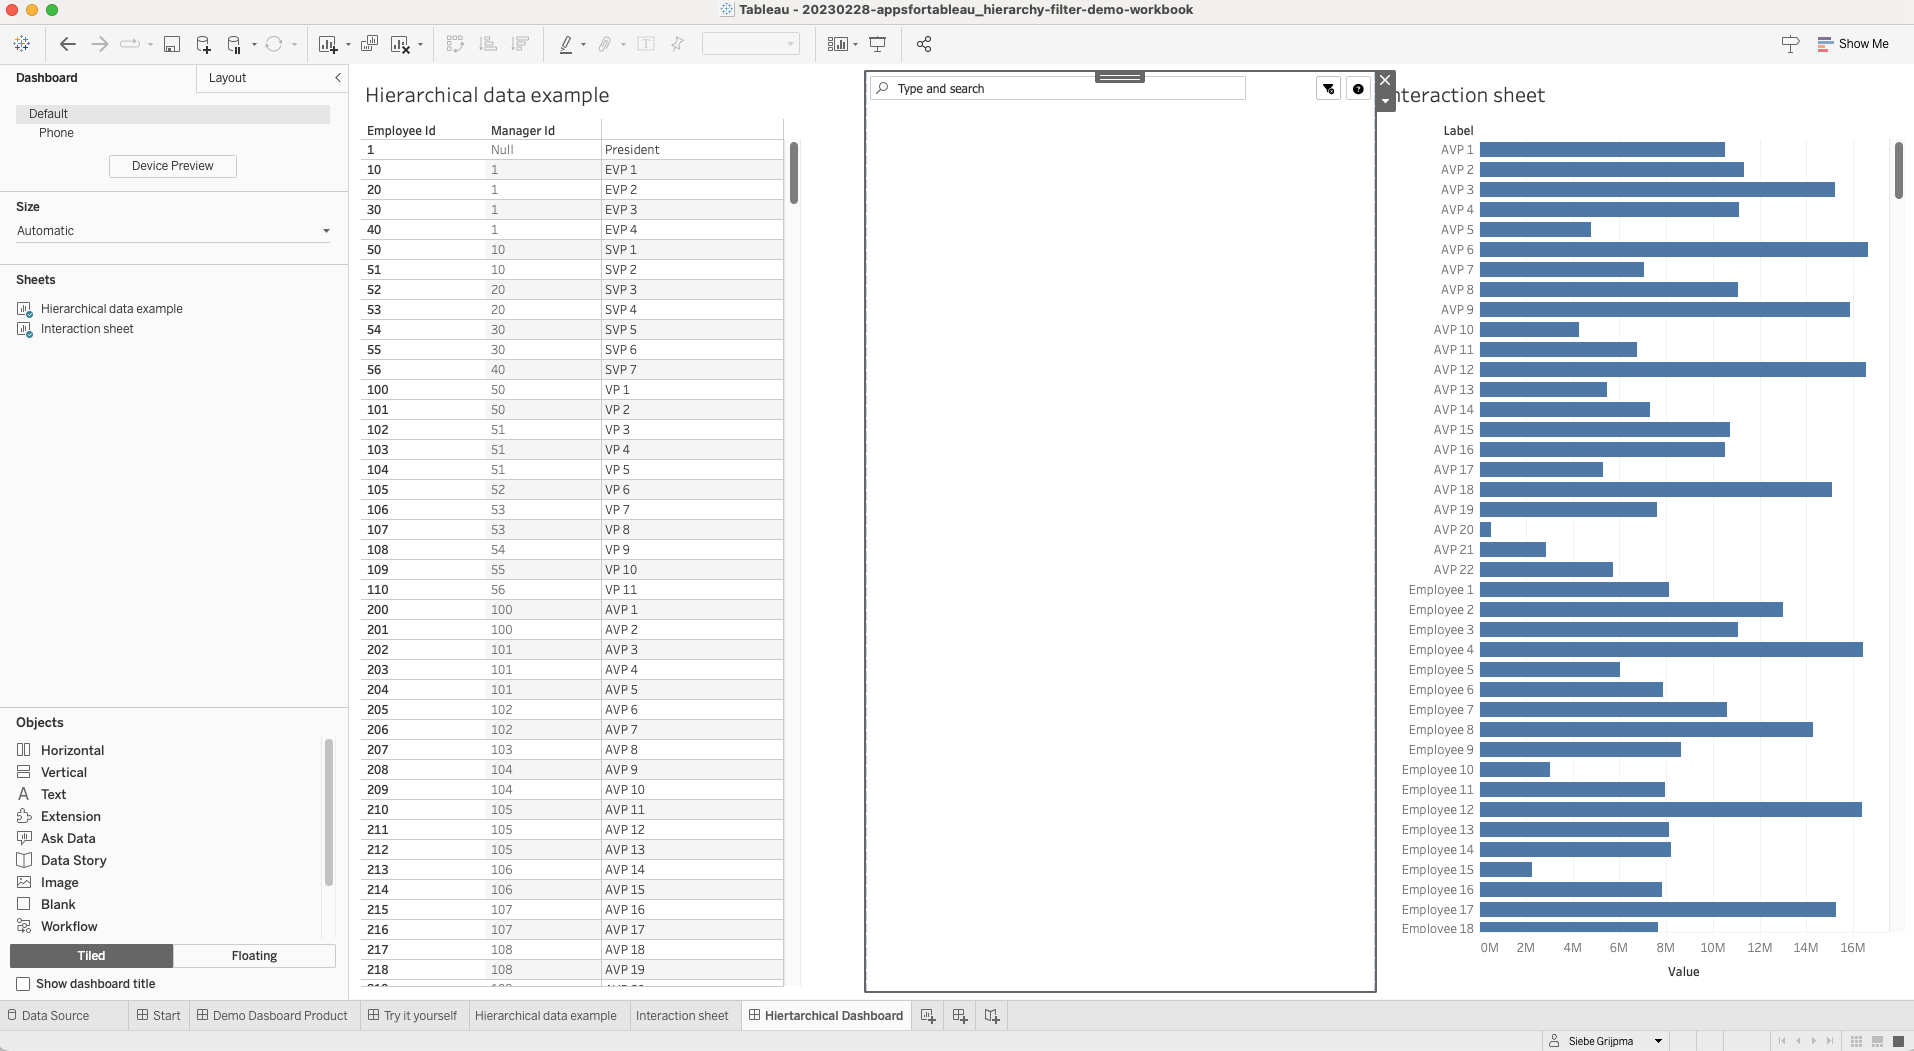
Create a dashboard containing your datasheet and the HierarchyFilter extension
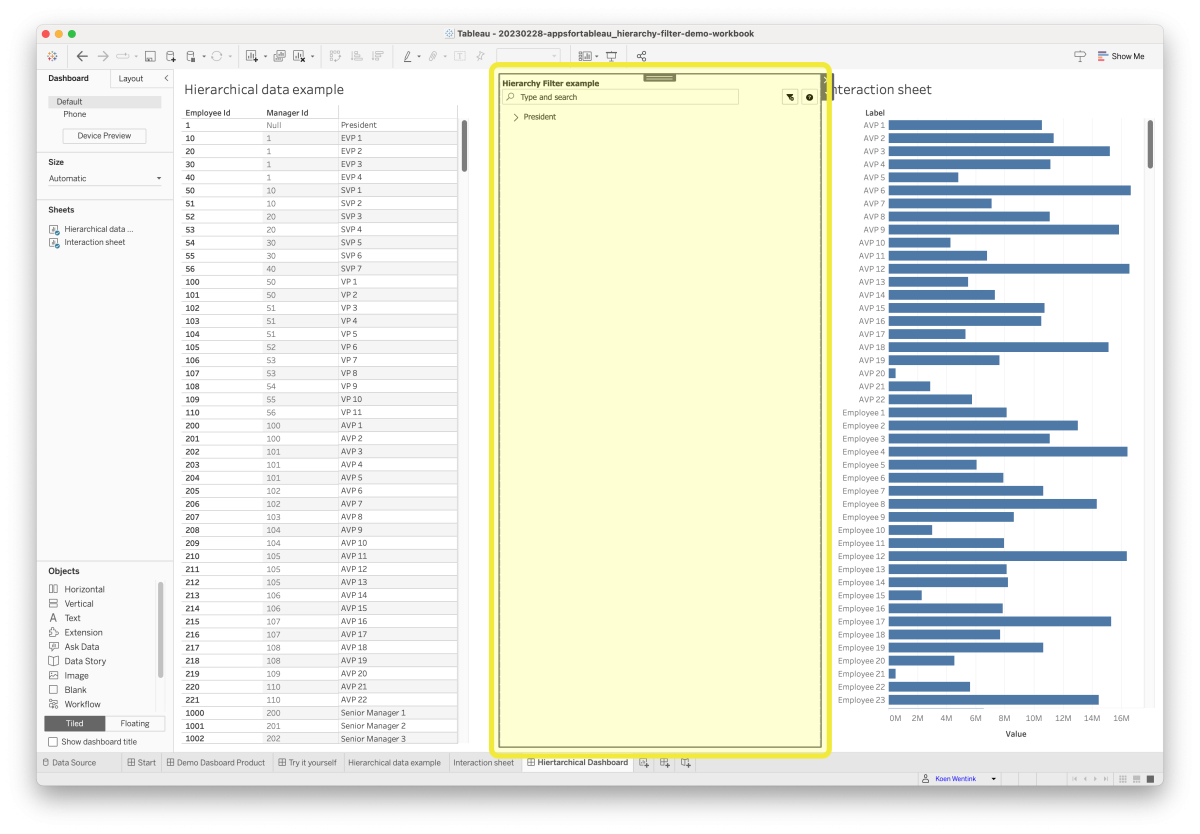
The next step is to create your dashboard with the HierarchyFilter. Create a new dashboard and add your hierarchy datasheet to the dashboard. This sheet contains the data that will feed the HierarchyFilter extension and makes the magic happen. You can also add some other Tableau visualization sheets to the dashboard based on the same data source. This way you can use the interactivity of the HierrchyFilter extension.
Now add the HierarchyFilter extension to the dashboard (use the trial Trex file or a Trex matching a purchased subscription). Your Dashboard should look something like the image below.
Configure the HierarchyFilter
So we managed to prepare our datasheet for the hierarchical data model with the structure we want to use. We also set up a dashboard containing the HierarchyFilter extension. The next thing we need to do is configure the extension to use/visualize the hierarchical data and make the dashboard interactive.
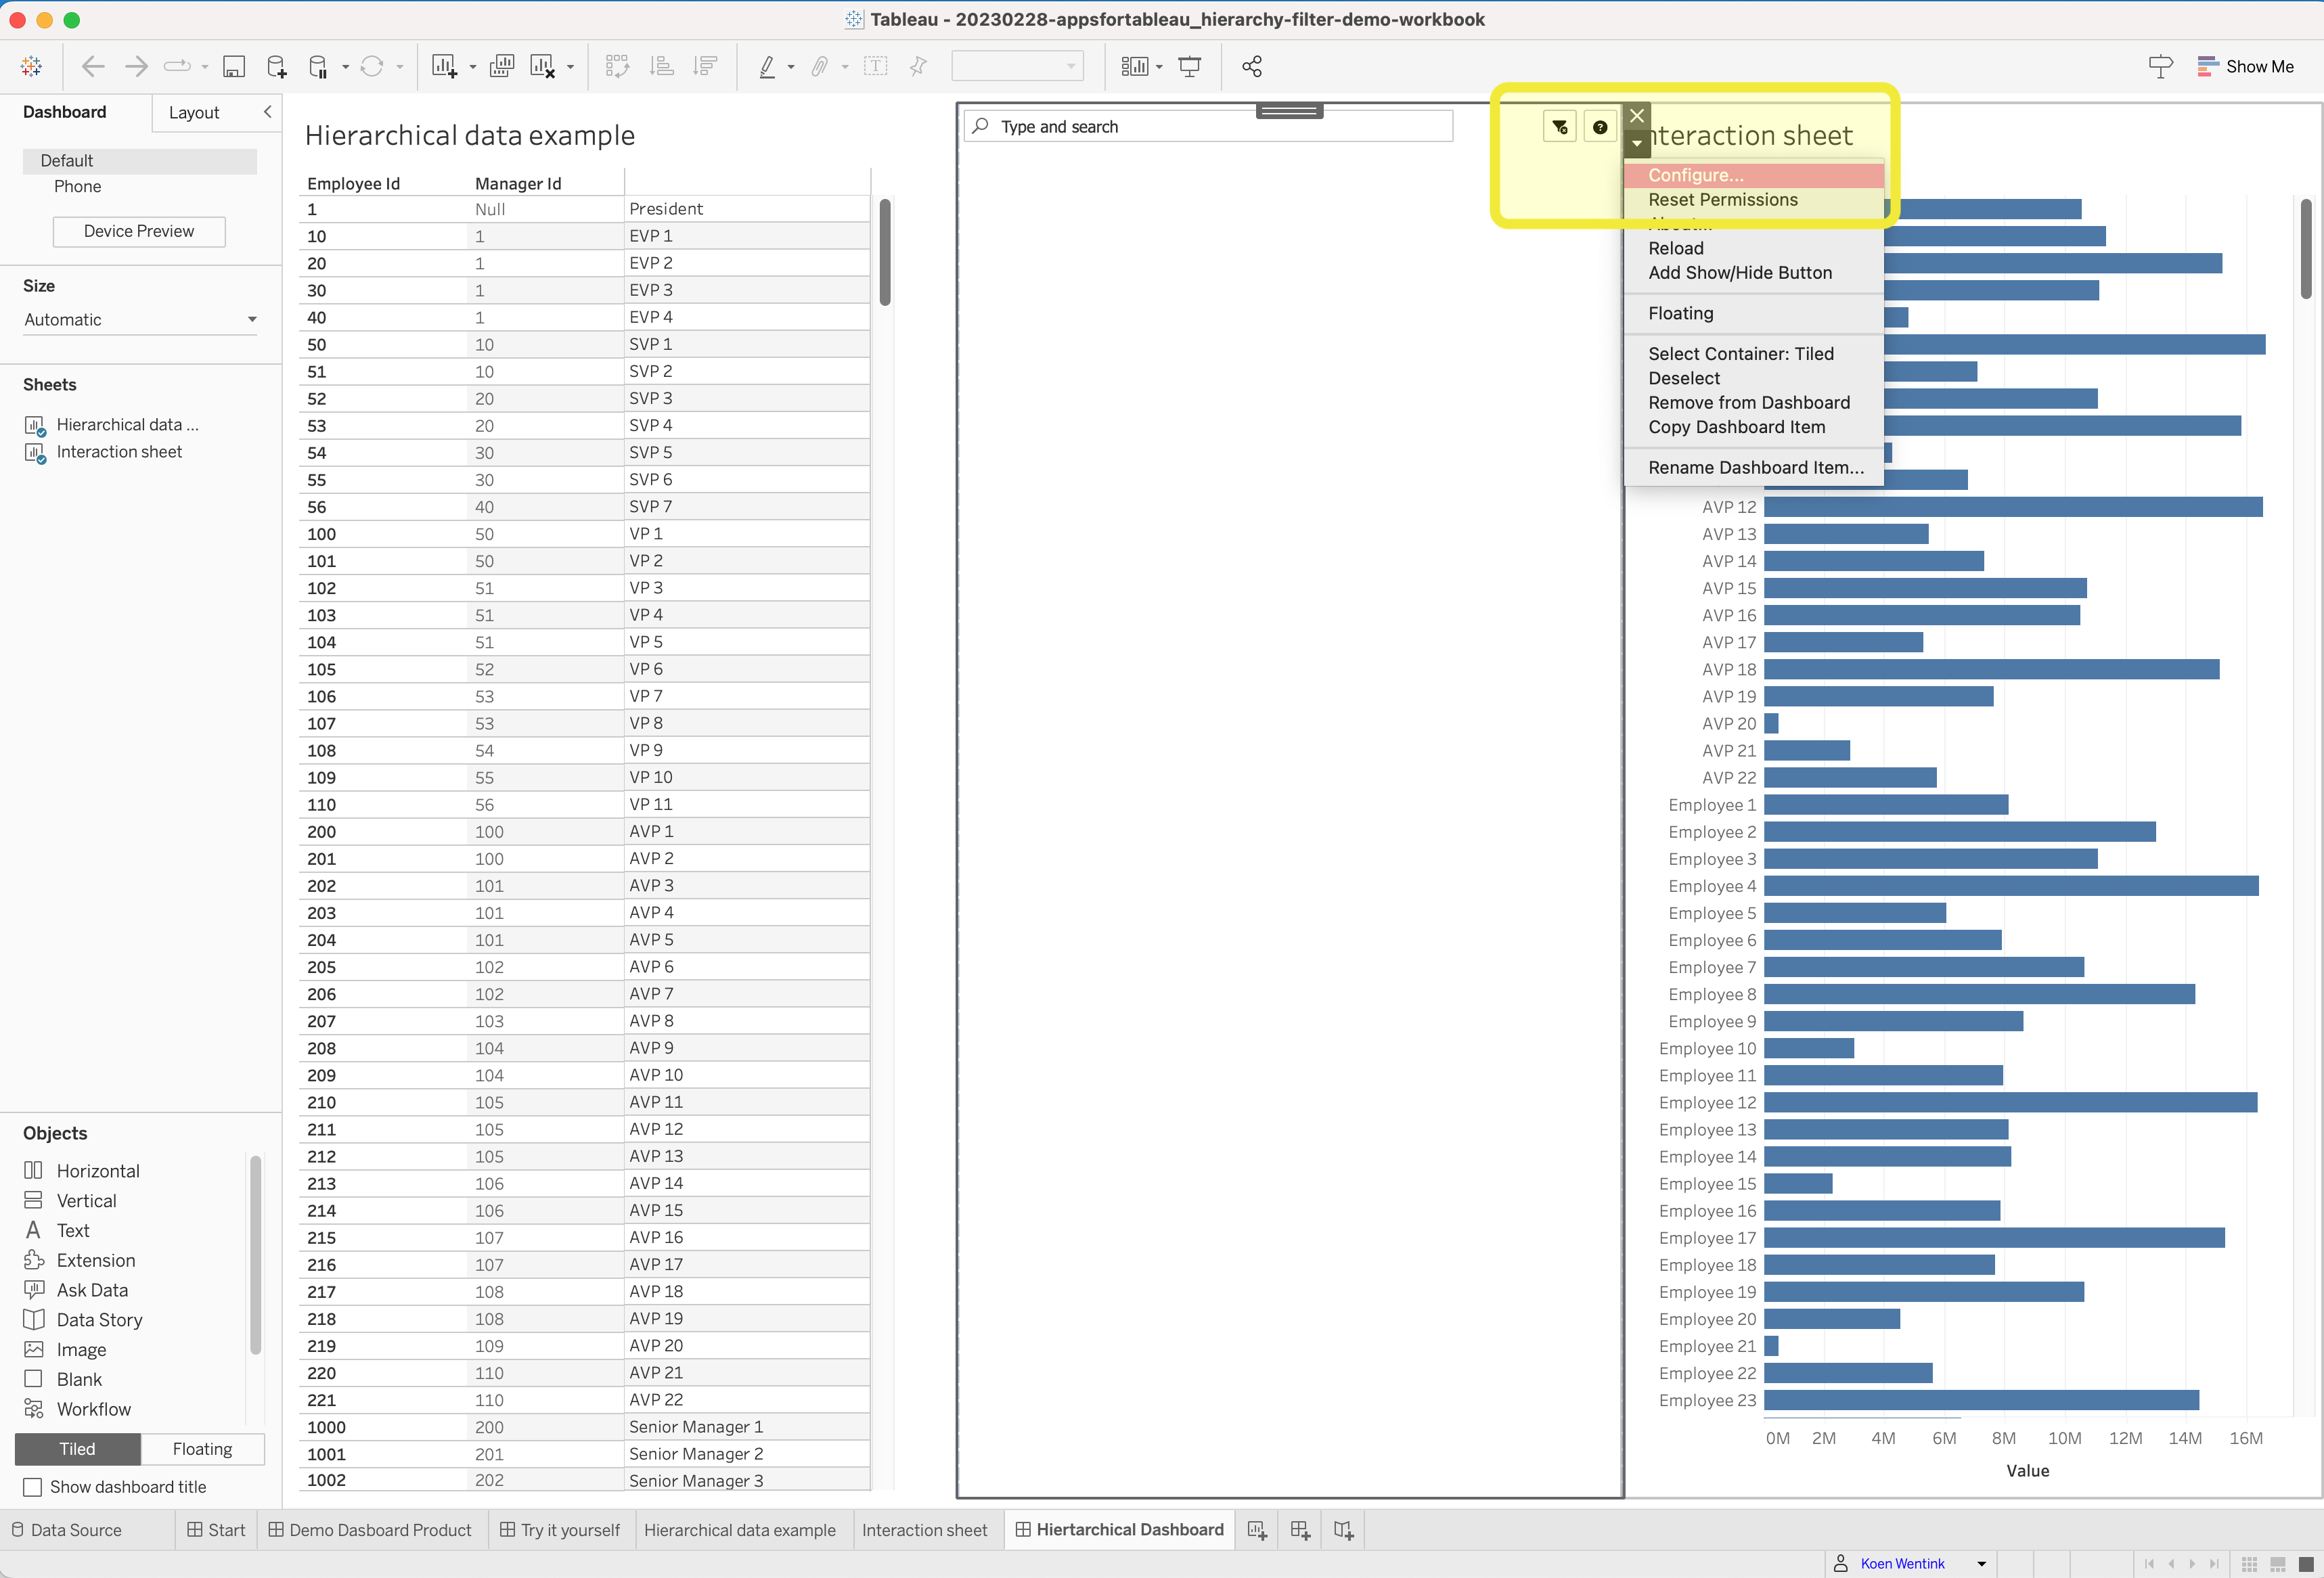
To enter the configuration screen, select the container of the HierarchyFilter extension and from the dropdown context menu select “Configure” as shown in the below image (click to enlarge).
Configuration wizard
A configuration menu will pop up. The configuration consists of wizard-like steps, indicated at the top of the screen. This is shown in the example below.

In this part of the Product Guide we discuss the hierarchical/Recursive model so we select the option “Recursive” from the startscreen of the configurtion wizard. Now when we press “Next” we move on to connecting the extension to the datasheet. In the screen below you see the second step of the wizard.
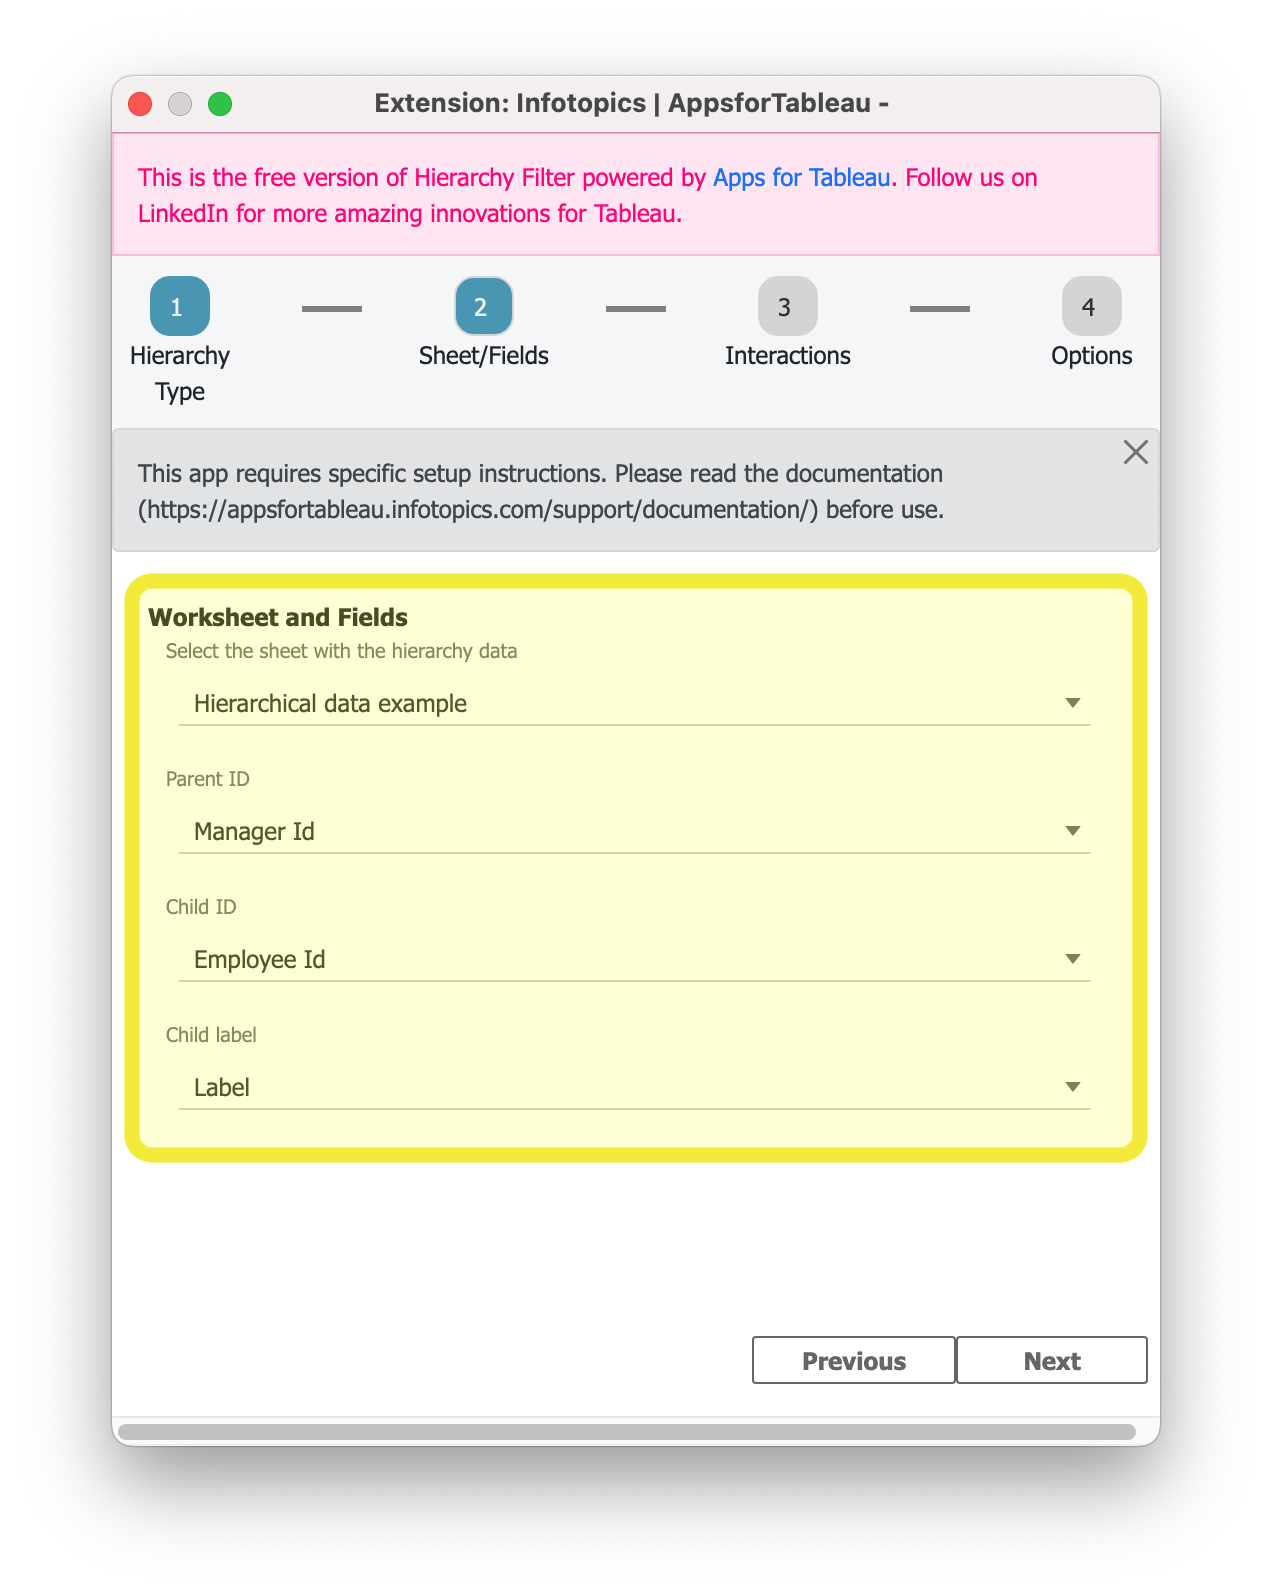
The marked areas need to be completed. First you select the “Hierarchical data example” sheet containing our Hierarchy data. The extension will read its content and from the second dropdown you select the “Parent ID” which is the ID of the manager and in our dataset that column is called “Manager ID”. Next field to address is the “Child ID” which in our dataset is called the “Employee ID”. Then we configure the “Child Label”. which will be the name of the node. In our dataset it is simply called “Label”
Next step of the configuration we will set the interactions and connect to the parameters we created.
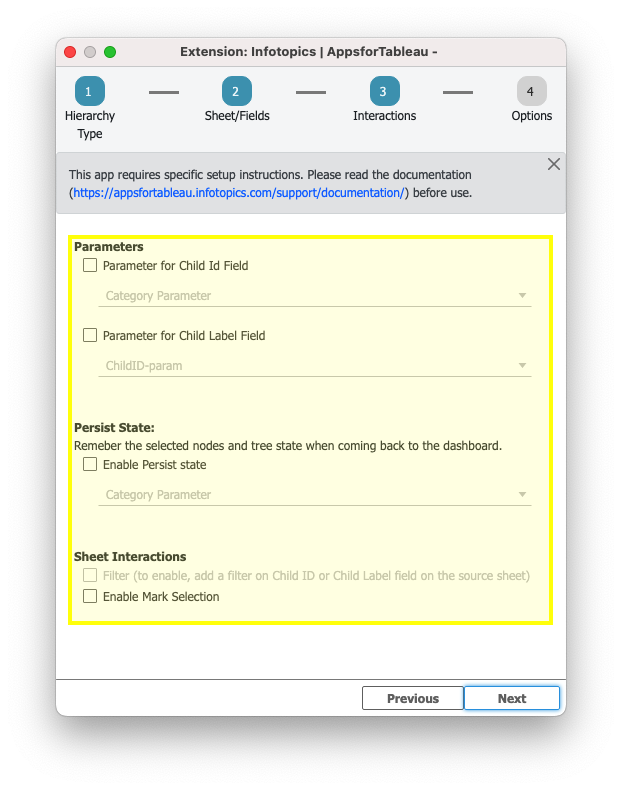
Again we have to enter some of the options we configured before. We will enter the paramaters we created to store the “Child ID” field which we named “ChildID-param”. We also select the “ChildLabel-param” we created in the the second dropdown field to store the “Child Label Field”. Now we’re done setting up our paramaters, and we can use the parameters in our Tableau Calculated fields to expand Tableau interactivity.
Persist State
Using a string parameter, you can use the “Persist State” setting to set up HierarchyFilter to remember the current selection when moving between dashboards. The state is meaning the collapsed and uncollapsed layout and the selected node. While using the dashboard, the parameter will update to maintain the current state. When opening a new instance of the dashboard (different user, platform, etc), the parameter will open in the state it was in at the time the workbook was published. When loading the dashboard from scratch, the parameter (and thus the state) will be based on the state of HierarchyFilter at the moment the workbook was published.
Intertactions
Last but not least on this wizard page you can configure if you want the Hierarchy filter to interact with the rest of your dashboard and if Yes what type of interaction you desire.
- Filter
- Mark selection
Performance wise we recommend using Mark Selections when working with large datasets. Below you will see the screen for the final step of your configuration wizard (appears when you press Next).
In the final step of the configuration of the HierarchyFilter you can set some lay-out options to match the appearance of the extension with the rest of your dashboard. You can enable/disable a search bar, add a title to your container, set colors and/or fonts or change the icons that are used within the extension for expanding and collapsing the hierarchy.
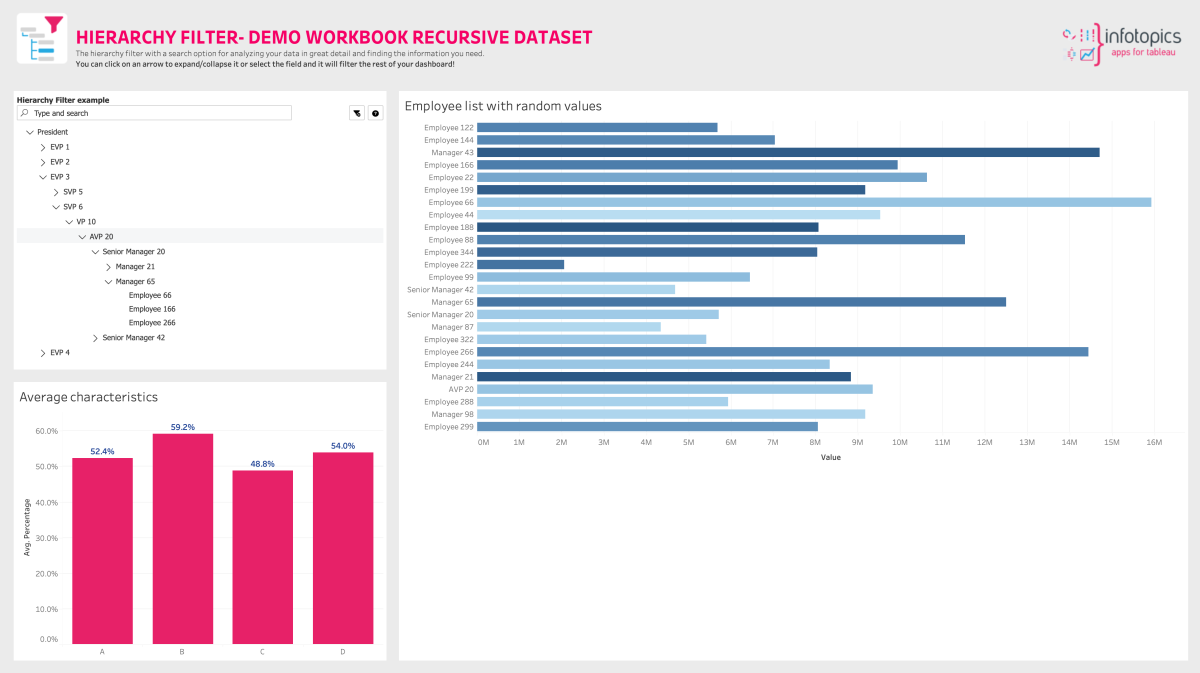
Once you’re satisfied with all the options you can press “Submit” and your configuration is done configuring your HierarchyFilter with the Dimensional model. You should see something like the image below and you can start exploring your hierarchy and enjoy the interactivity.
Now we can change the layut and visual appearance of our dashboard to match our corporate identity or use case. The HieraerchyFilter is now active and interactive in the dashboard. Try clicking the expand icons or search for specific employees in the extension and you will notice its fast and interactive responses. Multi selects can be obtained by holding the Ctrl or Command keys (or use Shift for range selections). Enjoy the HierarchyFilter!
Selected Pills
When selecting a pill the chosen pill will be shown in the overview, helping users to see which filter(s) are live. Holding CTRL and clicking will allow users to select multiple. Deselecting or hitting the X on the pill will deselect the filter.
