Product Guide
Introduction
The DreamTeams Extension for Tableau allows users to share metrics from your Tableau workbook to Microsoft Teams. Using DreamsTeams allows users to share insights quickly and easy with their whole organisation, even non Tableau users! DreamTeams allows you to share a viz along with a title and text for you to add more context to your findings, all within Tableau! You can even tag individual or multiple members within your channel so they don’t miss your viz!
Let’s get Started
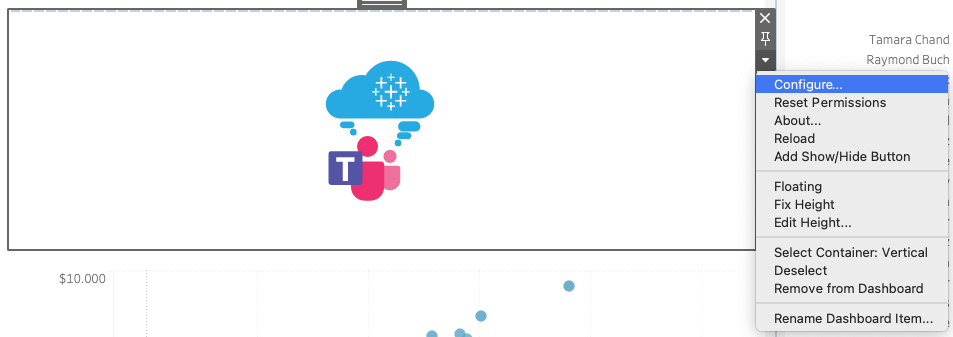
When dragging in the extension object, locate the DreamTeams ‘trex’ file supplied by Infotopics | Apps for Tableau. You will be presented by the familiar ‘Teams’ logo. Important: Use the configure dropdown of the extension to begin configuring. Log in using your Microsoft Teams account or through a webhook URL, below we will explain more.
Connection Configuration
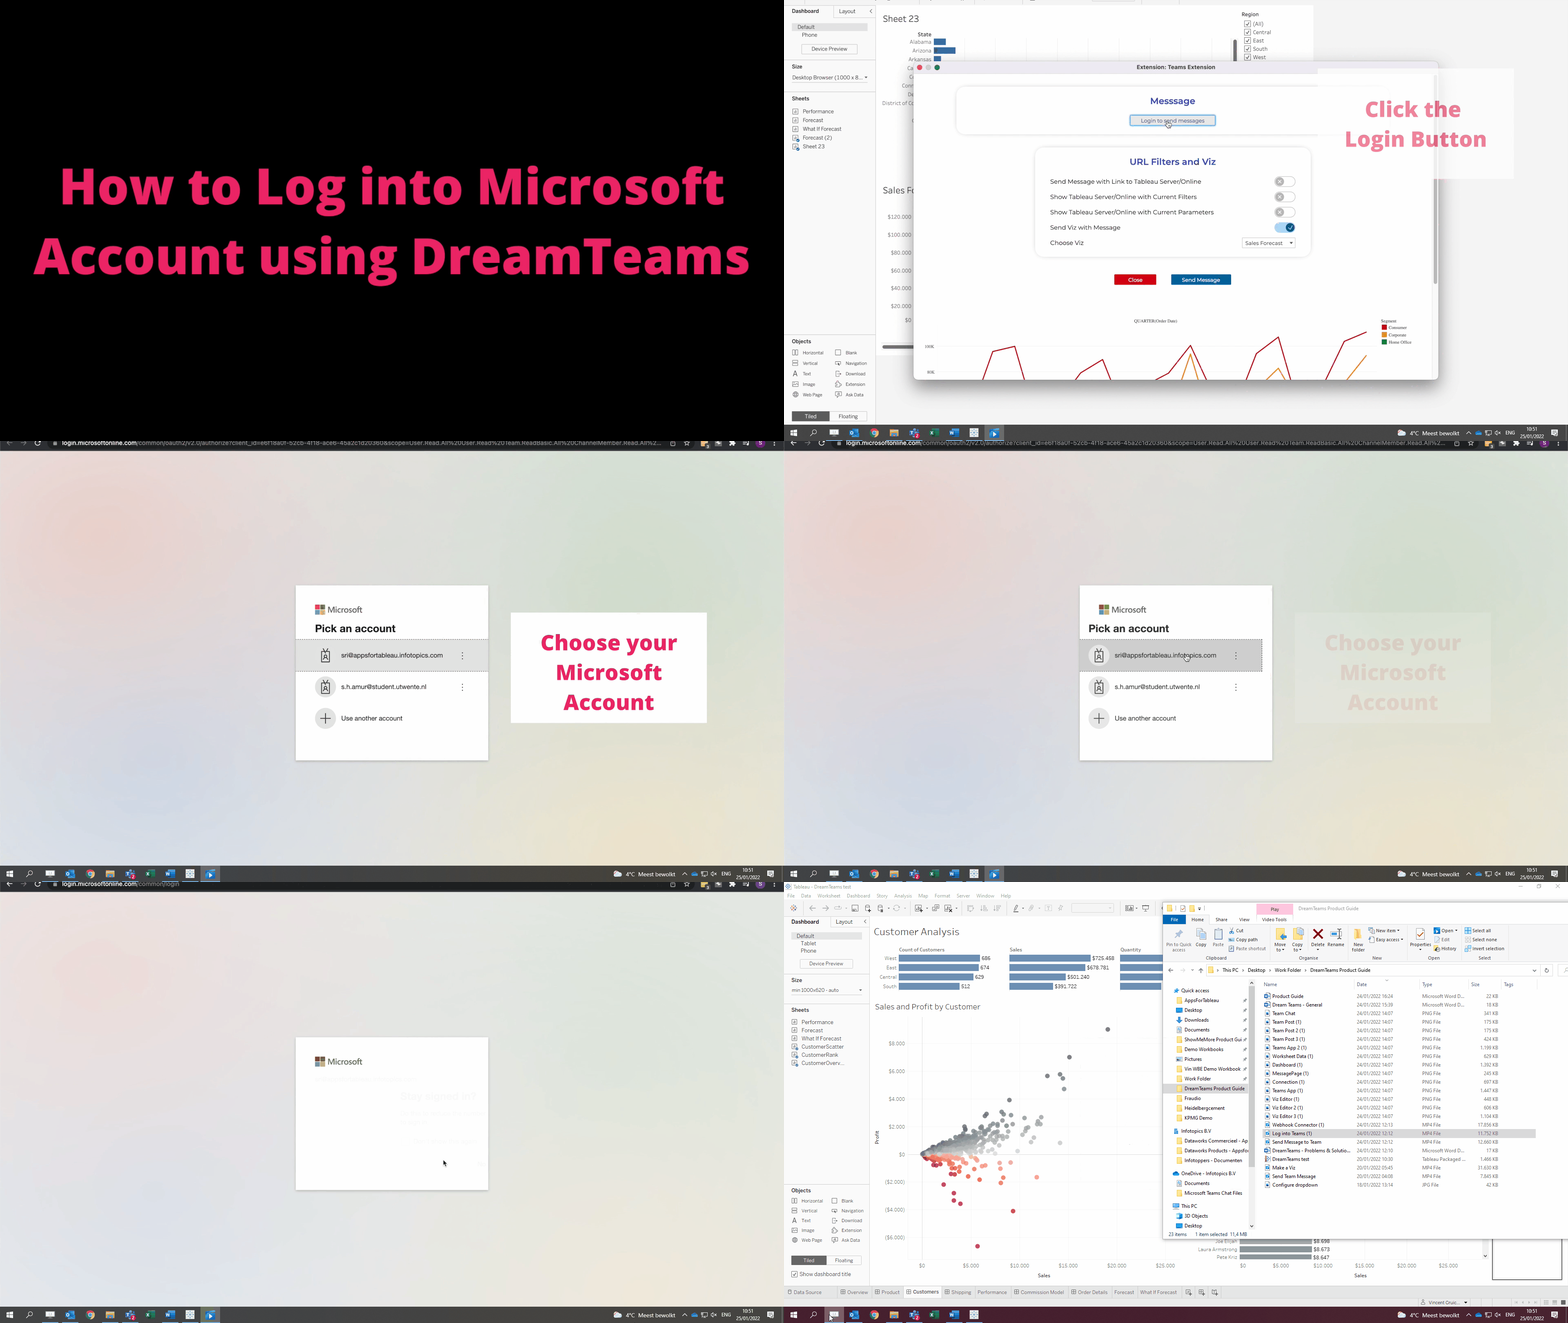
Before logging in to Teams, allow messages to Teams and/or chat. Login to Microsoft Teams by clicking the blue login button. This will open a browser for you to enter your details (see GIF below), there will be a confirmation once logged in successfully. This can only be a business or a student Teams account.
Configure Integration
Once logged in, you will see your Teams channels from the dropdown menu as well as the channel within that Team below. Choose your desired location to share your viz’s. Selecting your teams will show you your list of Teams, choose your desired team. This will load the channels within that team.
Set up a channel webhook URL
To find out how to use a Channel Webhook URL instead click on the link within the extension or here, this will give you a step by step guide: https://docs.microsoft.com/en-us/microsoftteams/platform/webhooks-and-connectors/how-to/add-incoming-webhook#create-incoming-webhook-1
Drawbacks of connecting a channel using a webhook URL
| 1-Step Configuration | 2-Step Configuration |
|---|---|
| You just have to click the login button in DreamTeams. |
You need to create a webhook URL for your channel in teams and use this URL in DreamTeams. |
| Access to all Teams and Chats | Access to only one Channel |
|---|---|
| You can send messages to any Team or Chat your Microsoft account has access to. DreamTeams provides a simple dropdown menu to choose from. | A webhook URL can only be valid for one channel. Therefore, all messages can only be sent to one Channel (which is part of one Team). |
| Mention Team Members | No Mentions possible |
|---|---|
| You can mention (tag) your teammates to a message, and they will receive a notification. |
Unfortunately, webhook URL doesn’t have access to team members of a channel. DreamTeams has a ‘TO’ field which can be used to address your teammates, but it will be displayed as plain text and the team members will not be notified. |
Configure Link to Tableau Online
Enter your online Tableau Dashboard URL here. Edit the label of the link given in the message. Imagine you applied some filters on your worksheet and have a message to share with your team. To do so, you would have to share your Tableau site via email or Teams and let your teammates know which filters you had applied. All this work just to let share a simple message. But with DreamTeams, you can send a Viz of your worksheet and a link to your Tableau site (Online & Server). The link would also contain all the filters and parameters applied by you, so when your teammates open this link, they will see exactly what you saw.
Worksheet Data
Here is where you will be creating the viz you would like to share with your team on Teams! Trigger them with your findings to start the discussion in Teams. It’s possible to create one more multiple viz’s here, rather than having to create one by one. Once created they can be sent individually later. Be sure to enter a title that will be clear in what you’re showing.
Configure Viz
When hitting the ‘Add Viz’ button to start to configure your viz, you will be presented with an easy to use form. As mentioned give your viz a clear title, connect to the worksheet that holds the data and add the row data and column data you wish to share. Choose which type each should be between a continuous or a discrete type.
Viz Editor
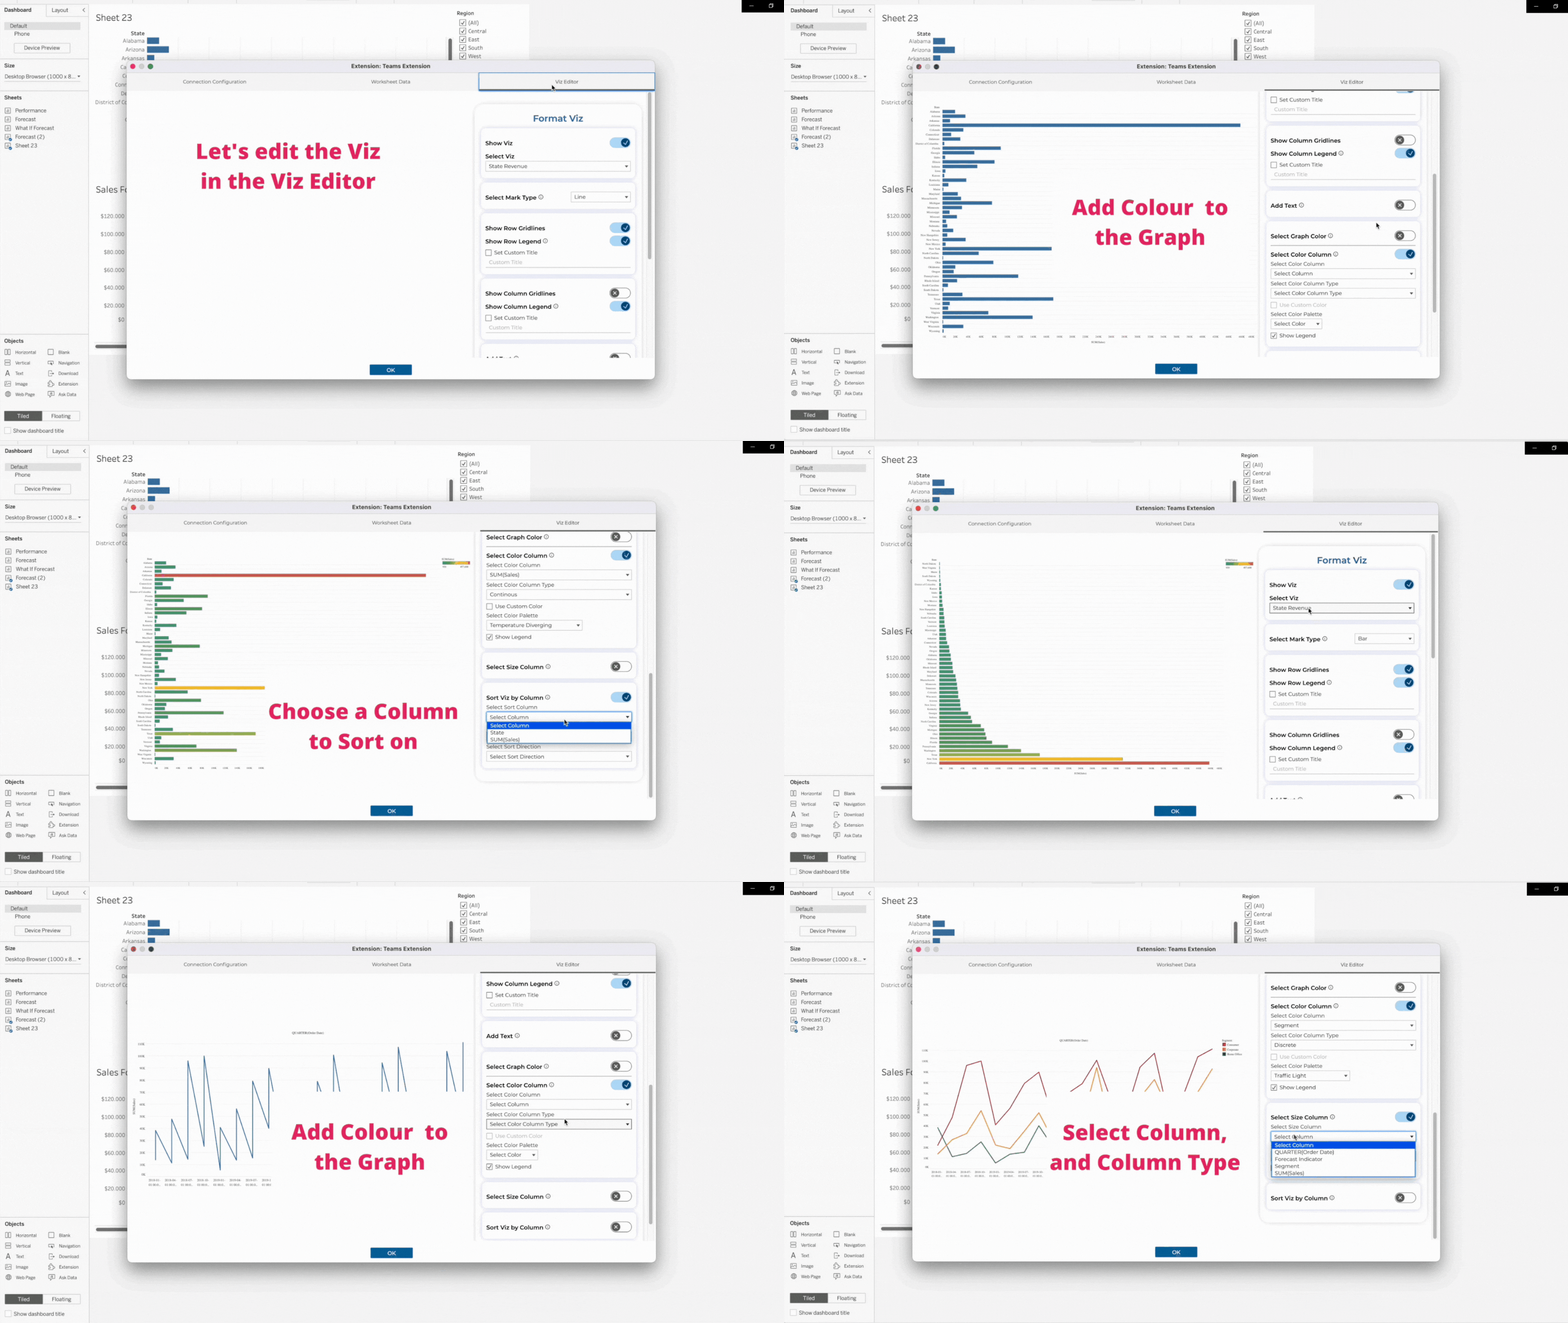
The built in Viz Editor allows you to format your viz before sending off. The Viz Editor allows you to format your chart by showing columns, adding text to the columns, color and much more. Get that viz looking great before sharing. Within the Format Viz segment select the viz you wish to format using the dropdown.
Mark Type
The Viz Editor gives your great option in how to present your data. Does your insight show better using a Bar Chart or a Line Chart? When choosing you will see an instant representation of the graph in the pane. Any changes you make will be shown instantly.
Color your Viz
The easy to use formatting allows you to color your graph with a set color or to color by a measure. Use ‘Select graph color’ to color your graph to a set color, maybe to match your company’s color brand. If you want to added insight to your viz, use the ‘Select Color Column’. Here you can color your graph with any dimension or measure present on your dashboard, a legend will be added to your view, if required.
Resize your Graph
Choose a measure to resize the columns within your view. Formatting the size of your columns may give a your viewers eye catching insight to any differences you want to show. Use the ‘Select Size Column’ to choose your measure and column type. You can decide whether you wish to have a legend shown in the view.
You are now done configuring the DreamTeams extension for your dashboard. Your dashboard users can now start using the extension to share their findings in Microsoft Teams.
Send your viz from Tableau to Microsoft Teams
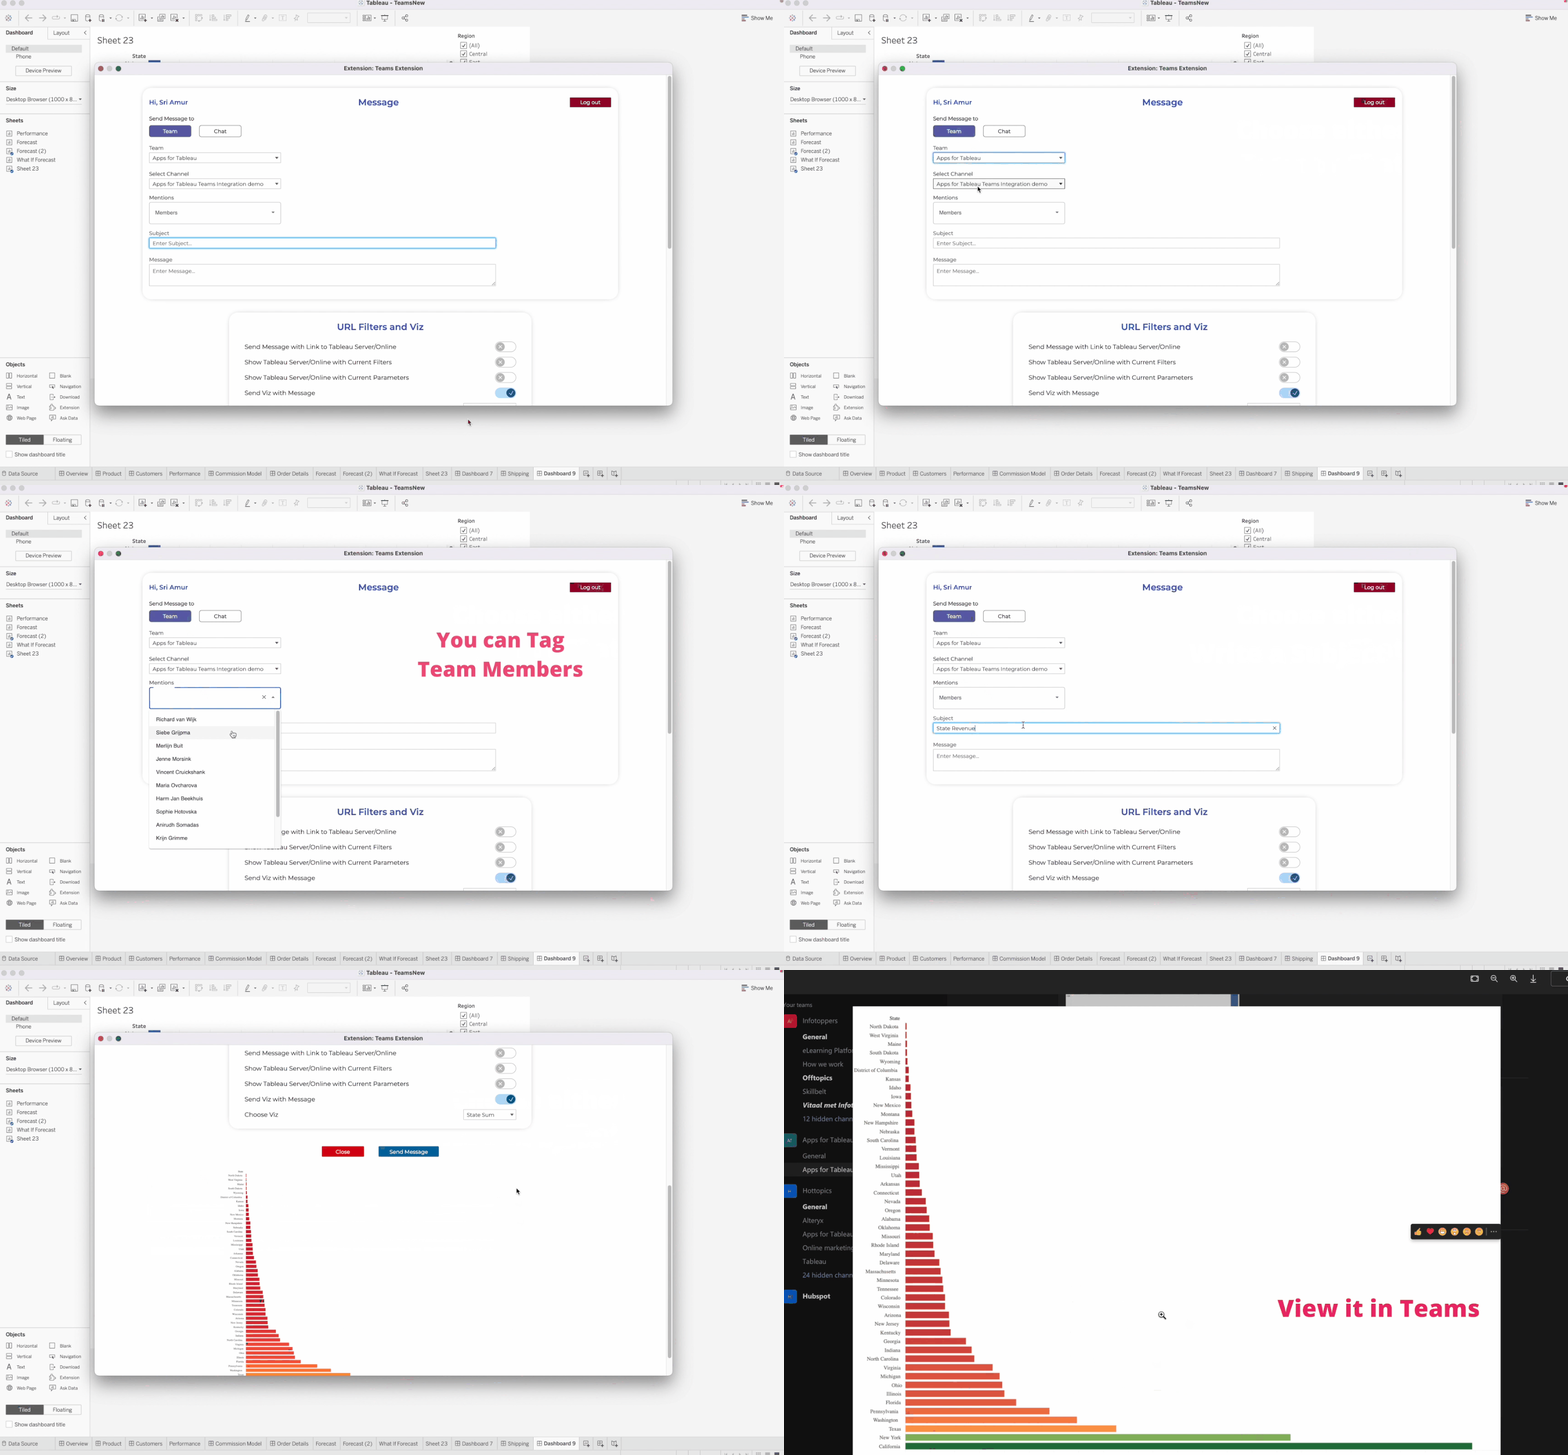
You have created all your viz’s in the configure screen of the extension, you have formatted them all and would like to share with your team. Clicking on the Teams logo in the extension will allow you to do just that. Send to a Teams channel or directly to a personal contact. Once you’ve logged in to your Microsoft Teams account, all your channels and chats will be available in the dropdown menus. Tag members in your team, add a accompanying message, add a link to Tableau Server/Online and include all the filters and parameters you’ve set up!
Add a message to your Viz
Once logged in, select your team from the drop down menu, when choosing your team this will fill the channel drop down with the channels within that team. These are the channels where you will be sharing your created viz. Choosing the channel will then allow you to tag members of that channel, using the mentions drop down. Add a subject and an accompanying message.
URL, Filters and Viz
Here you’re given options of what else you would like added to the message. Add a link containing the URL of your Tableau Server/Online environment to allow users to have a direct link to the dashboard. Show Filter/Parameter. When sending the message if you have filtered down on a dimension for example, the message will show that filtered information. Huge value!
Once you’re happy with everything, hit that send message button and see it appear in your Teams environment.
We love to make solutions and help Tableau users to do things more efficiently. If you have feedback, ideas, questions or need support, please share them with us! Also, don’t forget to follow us on social media for our latest news and updates.