Enterprise Installation Guide
This document describes the installation procedure for the enterprise subscriptions of the Apps for Tableau premium dashboard extensions for Tableau.
Introduction
To work with extensions in Tableau Dashboards you need at least two parts: 1. A web server capable of running extensions Extensions is basically web applications that are served by a web server. By default, most extensions connect to a web server somewhere on the internet. With our Enterprise subscription, you get to host the Extension server yourself (on premise), which grants you full control of security and access to your data. No internet connections are needed, and there is no traffic of data over the internet. You are in full control. 2. The “.trex” Tableau manifest file that you can drag into your dashboard (dashboard object). This “.trex” file is an XML file containing metadata on the extension and a URL that points your dashboard to the other part that you need when working with extensions; the extension (web)server as explained above this point. By default, most third-party extensions connect to a web server somewhere on the internet. With the enterprise subscription, you get to host the extension server in your private infrastructure. In this manual, you learn how to install the Extension server in your private infrastructure and alter your “.trex” file to let users connect to your local extension server. Once tested you share or distribute the “.trex” file with your dashboard designers. AppsforTableau offers two types of subscriptions, the ones using an internet connection to the webserver hosting the extension (the extension server) and the subscriptions where you don’t need any connection to the internet (you get to host the extension server in your organization’s infrastructure). Below you see two images representing these differences.
SAAS/CLOUD extension model (Share subscriptions)
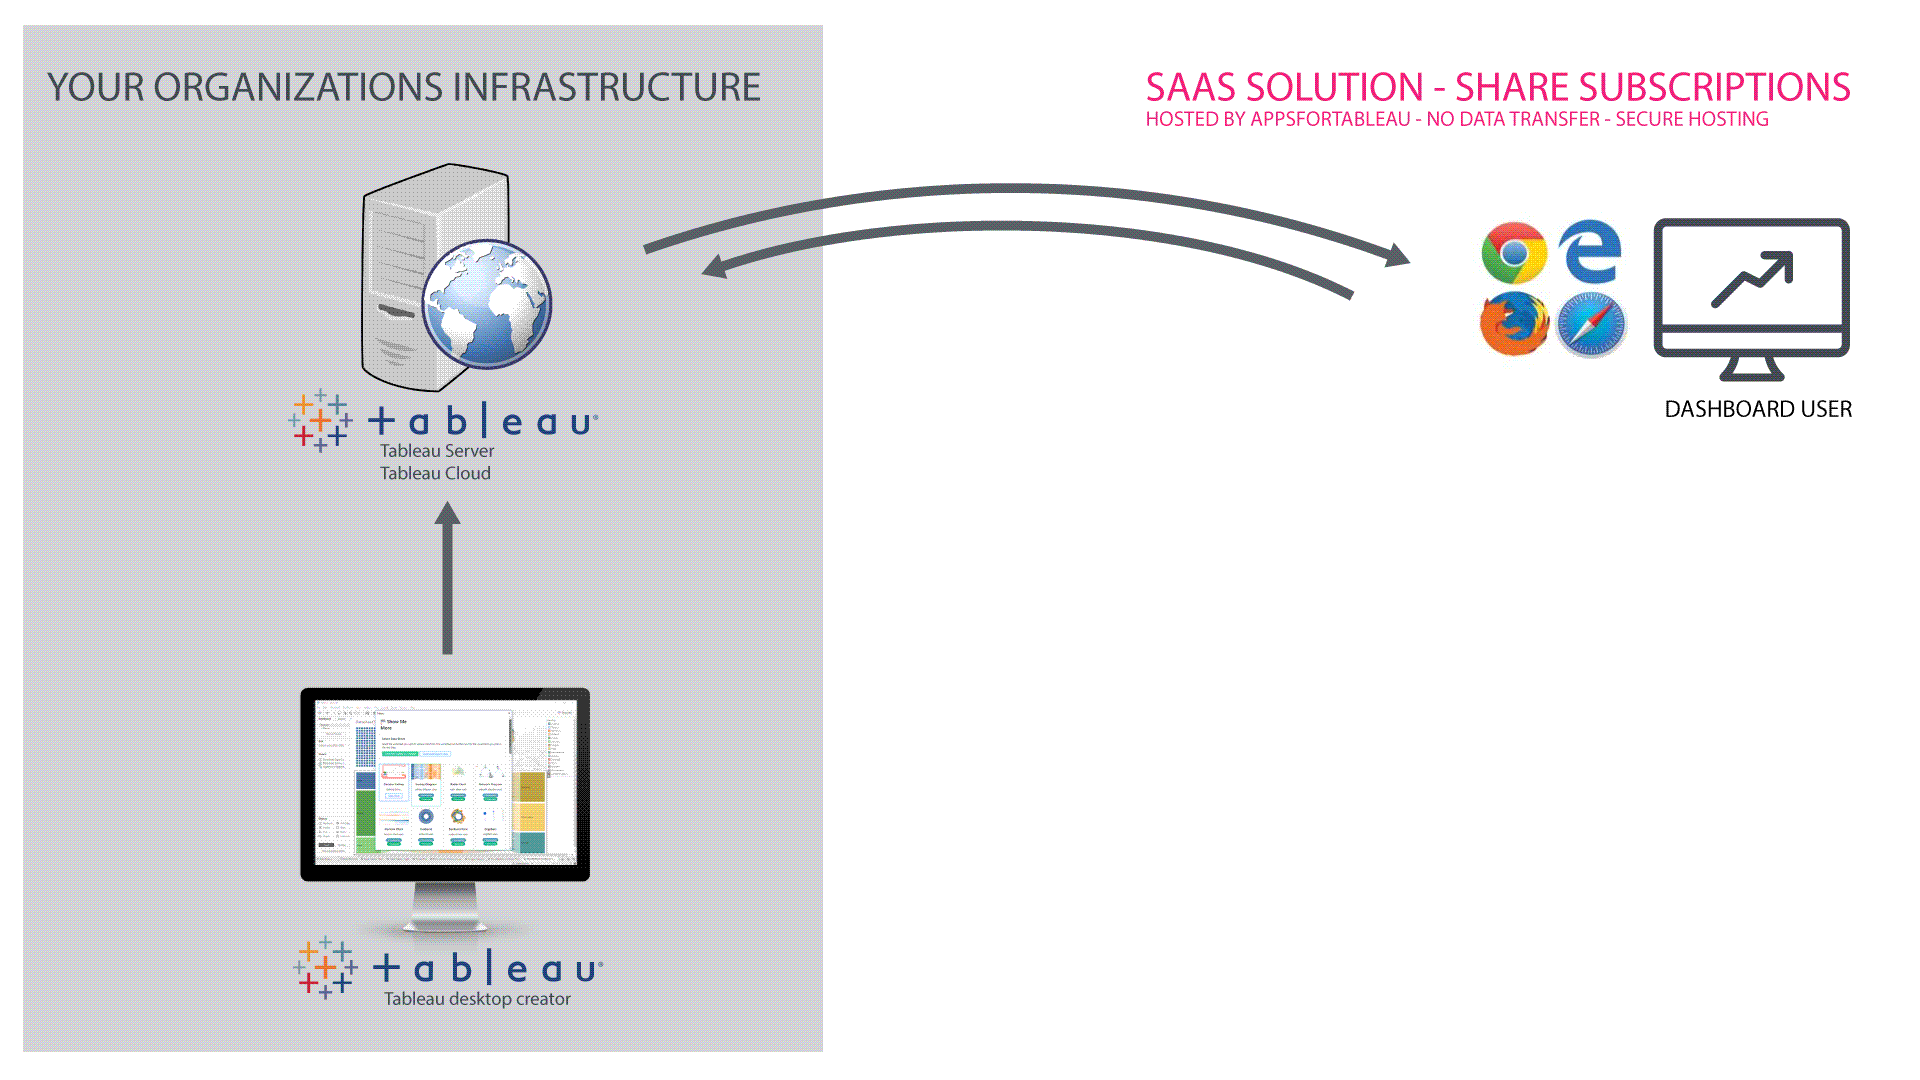
Click the image to see an animation how you can get from your plain Tableau architecture to a Premium SaaS Tableau Dashboard Extension deployment
On-Premise / Private Cloud deployment model (Enterprise subscriptions)

Click on the image to view an animation of your infrastructure setup with enterprise subscriptions
More information on our premium Tableau dashboard extensions can be found at: https://appsfortableau.infotopics.com/support/documentation
Before you start
Infrastructure requirements
- A web domain, for example, https://extension.company.com (create a DNS entry)
- SSL certificates for the above domain (the installation requires the domain’s .crt and private .key file)
- Domain from step 1 needs to point to the IP address of the server to install the extension server using DNS (internal and/or external)
- Server Resources: 4 vCPU, 8Gb, 50Gb application disk space, 100Mbps or 1Gbps network-interface
- Firewall rules permit access on port 443 (HTTPS) to the server (or any other port you configure in the startup commands of the extension server). Both internal, external, and server-firewall.
Overview of the installation process
What does the installation look like The enterprise installation package contains 3 files?
- “extension-name.exe” for Windows or “extension-name” for Linux (where extension-name is replaced by the name of the extension).
- This (Windows or Linux) binary is the Extension server that hosts the server part of the extension in your infrastructure. The binary has several option flags to start/configure the server (double -):
- –help: show all available options
- –port: allows you to configure the port the server runs on
- –license: path to the license file. By default, the extension server uses the file named ‘license.lic’ in the same folder as the extension binary. You don’t have to use this flag on starting up the extension server if you placed the “license.lic” file in the same folder as your extension server (the binary file). The license file can be stored in another folder, if so you need to use this flag.
- –cert: path to the TLS certificate to use. Tableau extensions need an SSL connection from the .trex file to the extension server.
- –key: path to the key file that corresponds to the certificate for the SSL connection.
- This (Windows or Linux) binary is the Extension server that hosts the server part of the extension in your infrastructure. The binary has several option flags to start/configure the server (double -):
- license.lic
- The extension license file, without this file the server will only show a warning and the extension will not function.
- extension_example.trex
- The extension trex file that tableau requires to embed the extension in a dashboard.
This trex file needs to be modified to point to the URL where the “extension-name.exe” is hosting the files. Tableau creators who want to use the extension in a dashboard will need this file. First, you need to comply to the requirements from this step so you need a domain name (url) that points to the IP address of the machine where you want to install the extension server. You also need the ssl certificate and sll private key file to start with the installation. Second step is to place the files listed above and the ssl certificate and private key file in a folder on the machine where you want to install the extension server. The third step is to use the command line to start the extension server Fourth step is to edit the trex file
Running the binary file
The binary file should preferably run on a server that is accessible to anyone who wants to use the extension in a Tableau dashboard. So all Tableau Desktop Creator users that use the extension in designing their dashboards should be able to connect to the extension server (in your local network). For Tableau Viewer and Tableau explorer users on the Tableau Server to access published dashboards running the extension, the Tableau Server must be granted access to the Extension server. To learn more on configuring your Tableau Server to run extensions, please read our blog here Tableau extensions require SSL/HTTPS connections from the dashboard to the server. You can either configure the binary to use HTTPS directly or place it behind a reverse proxy that handles the HTTPS. The binary should preferably be configured to launch on server start-up. To run the binary as a user (for test or evaluation purposes for example), open a command prompt in the same folder as the binary and use the following command:
Linux: ./extension-name --port 4000 --cert ./certificate.crt --key ./certificate.key
Windows: ./extension-name.exe --port 4000 --cert ./certificate.crt --key ./certificate.key
is an example, you can choose another one you like, make sure you also include it in the .trex file (see next steps in this installation guide). Make sure to use double dashes (- -) for commands.
NOTE: Be aware and make sure that the port you use for the extension server to run on is available to your dashboard users. So please make sure that firewalls and routers allow network communication on the server/extension host!
Modifying the trex

Distribute and share the .trex file
The modified “.trex” file can now be tested in Tableau Desktop Creator and, if proven to work correctly, it can be distributed or shared (on a network drive) with the dashboard designers to create beautiful dashboards with the extensions embedded in them.
Run as service Windows
Windows
1. Start Windows Task Scheduler

2. Create a new task
3. Enter the general task information
- Name the task with a reference to the extension you will start with this task
- Set SYSTEM user account to execute this task. It is important to use an account with privelidges to start services
- Check what version suits your system best (Windows Server)
4. Set trigger for the task to be executed (startup)
- Add a new trigger on the TASK pane
- Select the trigger “At Startup”
- Make sure the trigger is enabled
5. Set the action to start the program
- On the “Actions” tab select “New…”
- Set your action to type “Start program”
- Select the binary file of your extension as the “Program”. In this example it is “C:SuperTablessuper-tables-win.exe”. Make sure to include the entire path
- Set your Arguments for the extension server (port number and certificate details). In this example: “- -port 443 – -cert certificate.crt – -key certificate.key” (double dashes without space in between)
- Set the “Start in” folder. This is very important for the service to start correctly. It is the path where the binary file/program is located. In this example: “C:SuperTables”
- Press OK to store your “Action”
6. Set Conditions
- Make sure the task will always be executed (battery or AC power)
7. Set extra settings
- Make sure the task will remain running
- Make sure the task can be started on demand
8. Manual start the task
- Once you saved the newly created task select it in the list of tasks
- click the “Run” button on the right panel to start the new task
- The status of the service will change from “Ready” to “Running” just like the ShowMeMore task in the screenshot.
Run as service on Linux
Linux
Create a Custom systemd Service
- Create a Unit file to define a systemd service:
- File: /lib/systemd/system/myservice.service
-
[Unit]
Description=Extension Name Service
After=network.target
[Service]
User=root
WorkingDirectory=/usr/local/bin
ExecStart=/usr/local/bin/super-tables-linux --port 443 --cert yourdomain.crt --key yourdomain.key
Restart=on-abort

[Install]
WantedBy=multi-user.target
This defines a simple service. The critical part is the
ExecStartdirective, which specifies the command that will be run to start the service. - Copy the unit file to /etc/systemd/system and give it permissions:
sudo cp myservice.service /etc/systemd/system/myservice.service
sudo chmod 644 /etc/systemd/system/myservice.service
Start and Enable the Service
- Once you have a unit file, you are ready to test the service:
sudo systemctl start myservice
- Check the status of the service:
sudo systemctl status myservice
If the service is running correctly, the output should resemble the following:
●myservice.service - Example systemd service. Loaded: loaded (/lib/systemd/system/myservice.service; enabled; vendor preset: enabled) Active: active (running) since Tue 2018-05-01 18:17:14 UTC; 4s ago Main PID: 16266 (bash) Tasks: 2 Memory: 748.0K CPU: 4ms CGroup: /system.slice/myservice.service ├─16266 /bin/bash /usr/bin/test_service.sh └─16270 sleep 30 May 01 18:17:14 localhost systemd[1]: Started Example systemd service.. May 01 18:17:14 localhost cat[16269]: Example service started at 2018-05-01 18:17:14 May 01 18:17:14 localhost bash[16266]: Looping... - The service can be stopped or restarted using standard systemd commands:
sudo systemctl stop myservice
sudo systemctl restart myservice
- Finally, use the
enablecommand to ensure that the service starts whenever the system boots:sudo systemctl enable myservice
Created symlink from /etc/systemd/system/multi-user.target.wants/myservice.service to /lib/systemd/system/myservice.service.
- Reboot your Linode from the Linode Manager and check the status of the service:
sudo systemctl status myserviceYou should see that the service logged its start time immediately after booting:
●myservice.service - Example systemd service. Loaded: loaded (/usr/lib/systemd/system/myservice.service; enabled; vendor preset: disabled) Active: active (running) since Wed 2018-05-02 15:03:07 UTC; 48s ago Main PID: 2973 (bash) CGroup: /system.slice/myservice.service ├─2973 /bin/bash /usr/bin/test_service.sh └─3371 sleep 30 May 02 15:03:07 localhost systemd[1]: Started Example systemd service.. May 02 15:03:07 localhost systemd[1]: Starting Example systemd service.... May 02 15:03:07 localhost bash[2973]: Looping... May 02 15:03:37 localhost bash[2973]: Looping...
Upgrade procedure
The Apps for Tableau extensions will continue to develop over time. We will add new functionality, expand possibilities and eliminate bugs. This section will explain how to upgrade your (production) instance of your Enterprise extension server. The principles of this procedure are:
- Commands are written for the Windows executable but are equally applicable in Linux environments
- You have access to the command prompt of the server the AppsforTableau extension server is running on
- You don’t have to change the trex file already distributed to your users
Just follow these steps:
- Login to the machine the extension server is running on
- Open a command prompt (Windows Powershell for instance) in the location the Extension server is running
- Check on what port the extension is running and where the ssl certificate and key file are located
- Stop the running extension server (by pressing “Ctrl C” on Windows or Linux)
- Replace the executable/binary file of the extension server with the new one
- Start the new version of the Extension server with the same port number it was running on in the older version
Example powershell command to start the server (replace server-name and my-certificate with the proper filenames and use the correct port number that is also in the production version of your trex file):
Windows
./server-name.exe --port:8000 --cert ./my-certificate.crt --key ./my-certificate.key
Linux
./server-name --port:8000 --cert ./my-certificate.crt --key ./my-certificate.key
TIP: Before upgrading your production environment with the new extension server you can test-drive the new version on a different server or your local laptop. To do so, copy the license file, certificate file, and certificate key file to a folder, together with the new version of your extension server. Start the new version of the server on your new location (local laptop for instance) and edit the URL in a copy of the existing trex file to point to your local new ‘test’ installation. Do not distribute this test-trex file to your production environment users! The url in the test-trex file could for instance be https://127.0.0.1:8000 or https://localhost:8000 when you run it on your laptop on port 8000. Make sure you also install the ssl certificate and key file in this local instance as well since Tableau demands an ssl connection to the extension server! Test the new version of the extension server with your Tableau Desktop and the test-trex file on your new location. When confident of the result, upgrade your production environment.
System Requirements
By default we distribute a windows binary (.exe file) containing the extension server. You just need a license file (we also provide) and your companies ssl certificate an key file. The extension server is a small webserver to serve Javascript and HTML of the extension. The server does not have to be equipped with a lot of resources. We advice:
- Windows or Linux Server
- Fixed IP address
- Internal DNS
- At least 8gb RAM
- 2 cpu or more (preferred)
- 10 gb hdd space on the server


We love to make solutions and help Tableau users to do things more efficiently. If you have feedback, ideas, questions or need support, please share them with us! Also, don’t forget to follow us on social media for our latest news and updates.