VizSlides Installation Manual
Introduction
VizSlides is on-Premises only. This guide will walk you through the installation process of VizSlides. Luckily, this process is easy and you’ll be up and running in no time.
Files
You will need the following files that come with VizSlides, which you can download from our enterprise portal. From the portal, you can pick the operating system of your choice.
- An .env file (This is a hidden file, make sure to enable ‘View hidden Files’ on Windows)
- A binary build file (specific to your operating system)
- Manifest
- License (download separate from the portal)
Getting started
Unzip all the files on your server into a folder. Rename the .env.example (hidden file) to .env and open the file as administrator. If you are on windows, open .env.example in Notepad++ and save it as .env (run as administrator required).
Linux Only
When using a Linux server the following packages need to be installed before running the application. You can use apt-get to install these.
2. Configure the .env file
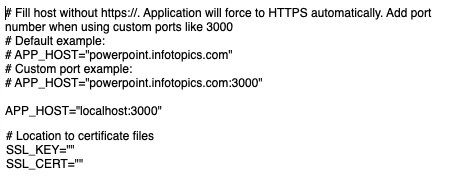
The first thing you need to do is fill out your environment variables in the .env file. The image on the right shows an example .env file.
App Host
Fill host without https://. The application will force to HTTPS automatically. Add port number when using custom ports like 3000. Use 0.0.0.0 to expose it from your webserver to the end-user.
APP_HOST=”0.0.0.0″
OR with a custom port
APP_HOST=”0.0.0.0:3000″
SSL
SSL_KEY=”/location/to/certificate.key”
SSL_CERT=”/location/to/certificate.crt”

3. Start the application
The binary file should preferably run on a server accessible to anyone who wants to use the add-in. You can either configure the binary to use https directly or place it behind a reverse proxy that handles the https. The binary should preferably be configured to launch on server start-up. To run the binary as a user (for test or evaluation purposes, for example), open a command prompt in the same folder as the binary and use the following command:
Windows:
./viz-slides-windows.exe
Linux:
./viz-slides-linux
The easiest way to have the extension started automatically as a service is to create a task in Windows Task scheduler or a service in Linux. You can read more about how to set this up in our Enterprise Installation Manual.
4. Register an add-in in your local store
You can find your manifest file in the enterprise installation files downloaded previously. Open the file with a text editor like notepad++ and replace the https://localhost:8080 with your own domain for example https://vizslides.infotopics.com. Please note this is on multiple locations in the manifest.
Go to https://admin.microsoft.com/ and log in with a Microsoft admin account.
Click on Show all and then on Settings > Integrated apps
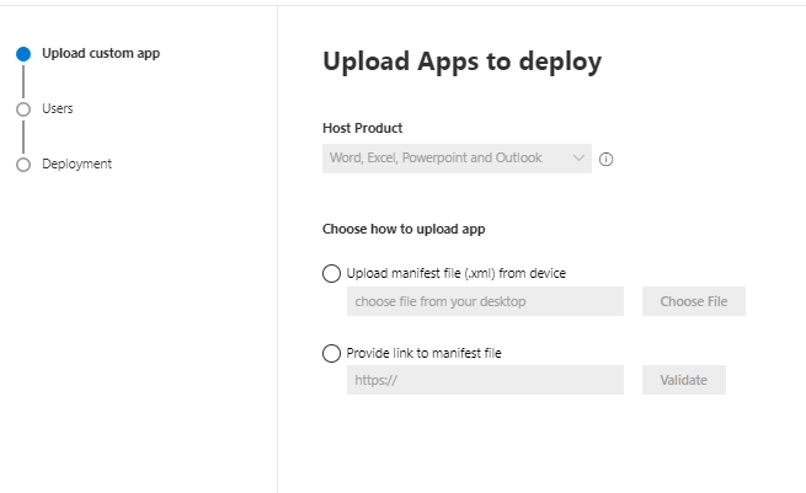
In the overview, click on Upload custom apps
Select upload manifest file (.xml) from device. Click on Choose File and select the manifest file (.xml) from your device.
or choose Provide link to manifest file and put in the URL where the manifest is stored.

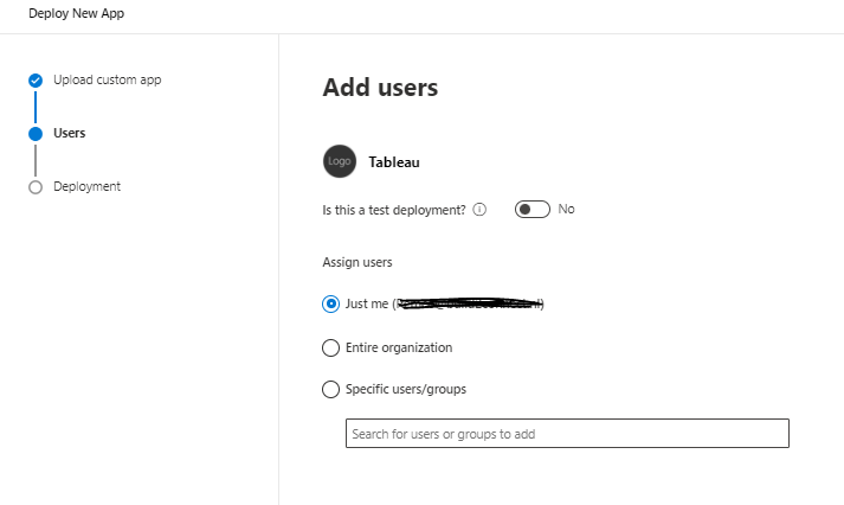
Click on Next and choose who may have access to the add-in. Set the toggle Is this a test deployment? to no.

Click on next and then again on next. As the last step, click on Finish deployment and click on Done.
The sync process to your organization could take about 1 hour.
5. Use the new Add-in in Powerpoint
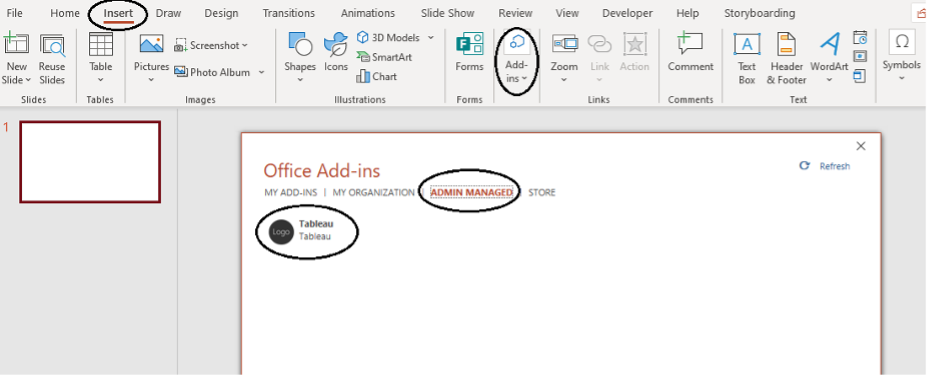
Open PowerPoint and go to
Insert followed by Add-ins > My add-ins.
Click on the tab admin managed. There you can add the Tableau add-ins to your PowerPoint presentation. If you want to know more about how to use the add-in, we’ve prepared a guide to get you started.


We love to make solutions and help Tableau users to do things more efficiently. If you have feedback, ideas, questions or need support, please share them with us! Also, don’t forget to follow us on social media for our latest news and updates.